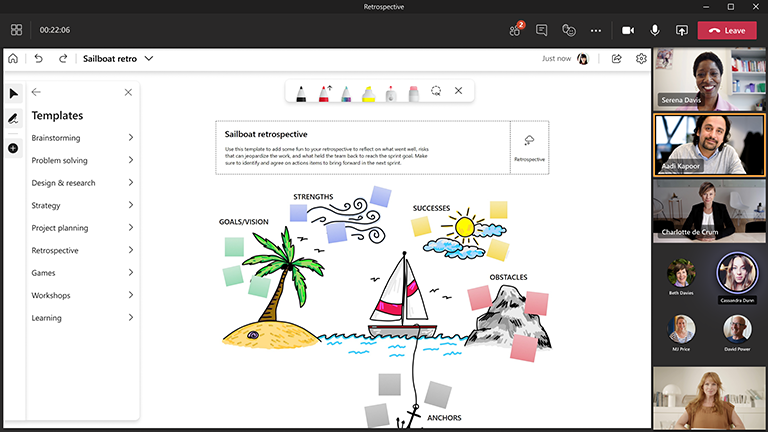
Retrospectives are essential for unpacking projects and improving processes for the future, and Microsoft Whiteboard makes the process collaborative and fun!
When planning, projects, sprints, or any other important milestones conclude, holding a retrospective is the best way to pull out key insights into what went well, while also uncovering what could be improved next time.
Key features:
-
Templates for a variety of retrospective formats
-
Reactions to allow everyone’s opinion to be heard
-
Colorful sticky notes to organize feedback into categories
-
Smart inking to easily visualize topics
-
PNG image export to share out results
Why are retrospectives so important for a team?
Retrospectives are often seen as just another meeting on the calendar, but they are worth the time and effort for a few reasons:
1. Teams can provide candid feedback
A retrospective meeting invites all members of the team to share their insights at the conclusion of the milestone. What went well? What didn’t go so well? What can we improve? Retrospectives should provide an opportunity for everyone to use the whiteboard to share their opinions. Encourage your team to get candid and ask probing questions to get the root causes.
2. Discuss the good, the bad, and the ugly
While it’s easy to get caught up in the work and focusing on completing tasks, we sometimes forget to address how we get the work done. There is always something behind the scenes that can cause people tension, and not every process may be working as efficiently as intended. When this kind of feedback comes up in project retrospectives, it’s time for the team to address these challenges and work together to find the best solutions.
3. Up your collaboration game
Set a cadence for conducting regular retrospectives within your team. The more the team evaluates their processes and acts on the improvements that need to be made, the better the output. There are many methods for running a retrospective. Teams are encouraged to use a variety of different methods to keep the collaboration fresh and productive.
How to conduct a successful retrospective session
Do the following:
Prepare the board ahead of time
-
Schedule a Microsoft Teams meeting.
-
Navigate to the Teams meeting and select Whiteboard from the list at the top of the meeting. You can also do this by creating a whiteboard and sharing the link in the Whiteboard Windows App or in the browser at whiteboard.office.com.
-
In the Create panel, select Templates > Retrospective, and then choose a template.
-
Add your goals for the session, and then label everything else appropriately.
-
Share a link to the board if others are helping you prepare.
During the session
-
Ensure that all attendees have the Teams meeting link.
-
Once the meeting has started, share the whiteboard from the Share tray, or send a link to the board from the Whiteboard app or from whiteboard.office.com.
-
Introduce the goal of the session and ensure that everyone is familiar with using Whiteboard.
-
Consider how you’d like to organize the session (for example, dedicated sticky note colors for specific people, specific reactions representing different ideas, and so on).
-
During the retrospective, encourage participation with sticky notes and reactions.
-
Use the "Raise Hand" feature in Teams to organize the order in which participants will speak.
-
Keep an eye on the time to make sure that the session is on track.
After the session
-
Send a message to attendees with the link to the whiteboard so everyone has access, or remind them that the board can be accessed in their own Whiteboard board picker.
-
If you would like to send a summary snapshot of the board, you can export a PNG image to share from the Settings menu.
-
Migrate work for next steps into the tracking tool of your choice to take action on and measure progress.
Too busy to get everyone together? Run the session asynchronously
-
Open a new whiteboard and select the appropriate retrospective template.
-
Write clear instructions on the whiteboard.
-
If needed, create a legend to define what certain sticky note colors or reactions mean on the board.
-
Share the whiteboard out with a link via Microsoft Teams or email, and give a due date for providing feedback.
-
Export a PNG image of the board from the Settings menu to share a summary of the findings with the team.
Retrospective best practices
-
Any team member can facilitate a retrospective.
-
Schedule the retrospective at the end of each sprint or milestone.
-
Retrospectives should be an opportunity to discuss realities openly, without fear of judgment.
-
The main goal of a retrospective is to come out of the meeting with improvement experiments that will be tested in the upcoming sprint or milestone. The following are some examples:
-
Testing new collaboration tools to improve meeting effectiveness with remote team members.
-
Improving the effectiveness of product backlog refinement.
-
Adjusting team bandwidth limits to better reflect team member availability during the sprint or milestone (for example, if not enough time was set aside for resolving urgent incoming bugs or issues).
See also
Check out our other Whiteboard guides to learn more!


