Sign in with Microsoft
Sign in or create an account.
Hello,
Select a different account.
You have multiple accounts
Choose the account you want to sign in with.

If an image in an email message is sideways or upside down, you can rotate it to an upright position.

Rotate an image sent to you in email

  1. Double-click the message to open it. (You can't edit a message in the Reading pane, so you must open the message in its own window.)

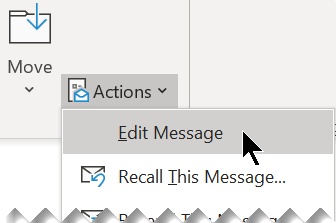
  2. On the Message tab, in the Move group, select Actions > Edit Message (or, if you don't see Actions, select  The More Move Actions button. > Edit Message).

    Select Actions and then select Edit Message.               

  3. Select the photo you want to rotate.

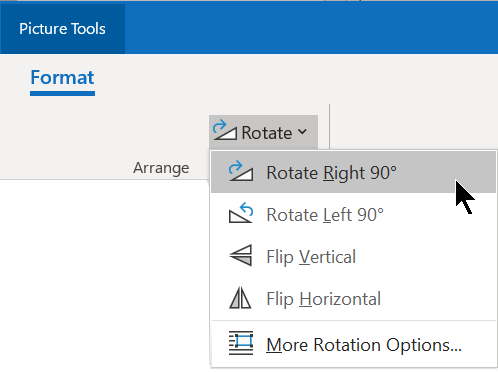
  4. On the Picture Format (or just Format) tab, in the Arrange group, select Rotate  The Rotate button., and then choose the rotation option you need (Rotate Right, Rotate Left, Flip Vertical, etc.).

    The Rotate button is on the Format tab of the ribbon, in the Arrange group.

Rotate an image you're sending to someone

  1. Select the photo you want to rotate.

  2. On the Picture Format (or just Format) tab, in the Arrange group, select Rotate  The Rotate button., and then choose the rotation option you need (Rotate Right, Rotate Left, Flip Vertical, etc.).

    The Rotate button is on the Format tab of the ribbon, in the Arrange group.

Rotate a picture sent to you in email

  1. In the email message, right-click the picture, and then select Save image as.

  2. Give the image a clear name and save it to your hard drive.

  3. Open File Explorer and navigate to the folder where you saved the image.

  4. Right-click the image file and select Open with > Photos.

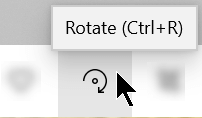
  5. At the top, select the Rotate button.

    The Rotate button on the toolbar of the Photos app.

    (Each click rotates the image rightward 90 degrees.)

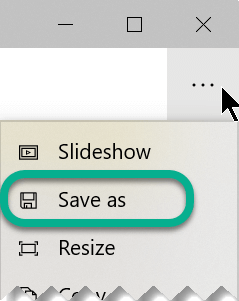
  6. At the top, select the ellipsis [...], and then select Save as

    On the toolbar, select the ellipsis to open the See More menu, and then select Save As.

    This action saves the rotated image as a separate file from the original image.

Rotate a picture you're sending to someone

Use the Photos app to rotate the image before you insert it in your email message. 

  1. Open File Explorer and navigate to the folder where the image is stored.

  2. Right-click the image file and select Open with > Photos.

  3. At the top, select the Rotate button.

    The Rotate button on the toolbar of the Photos app.

    (Each click rotates the image rightward 90 degrees.)

  4. At the top, select the ellipsis [...], and then select Save as.

    On the toolbar, select the ellipsis to open the See More menu, and then select Save As.

    This action saves the rotated image as a separate file from the original image.

  5. Switch to Outlook and insert the rotated image file into your message: Below the message body, near the Save and Discard buttons, select Insert pictures inline:

    Below the message body, select the Insert Pictures Online button.

  6. Navigate to the folder where the rotated image is stored, select it, and then select Open.

Rotate a picture sent to you in email

  1. Ctrl-click the image and select Save As.

  2. Save the image to your Mac hard drive.

  3. Switch to Finder, and navigate to the file you just saved.

  4. Double-click to open the image.

    The image opens in the Preview window. 

  5. On the toolbar button at the top, use the Rotate Left button  Rotate Left button. to rotate the image in 90-degree increments until it's positioned as you want.

  6. On the File menu, choose Save.

Rotate a picture you're sending to someone

  1. Select the picture you've inserted in the message.

  2. Click and hold the rotation handle above the top center of the image. Drag the mouse in the direction you want to rotate the image, then release the mouse button. 

Need more help?

Want more options?

Explore subscription benefits, browse training courses, learn how to secure your device, and more.

Communities help you ask and answer questions, give feedback, and hear from experts with rich knowledge.

Was this information helpful?

What affected your experience?
By pressing submit, your feedback will be used to improve Microsoft products and services. Your IT admin will be able to collect this data. Privacy Statement.

Thank you for your feedback!

×