Setting up Microsoft OneDrive in your SharePoint Server 2013 on-premises environment may be easier than you think – in fact, you may already have it configured.
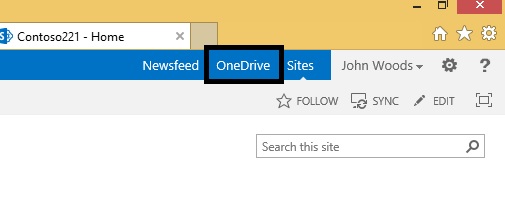
If OneDrive is already set up for your SharePoint 2013 users, they will see a OneDrive button in the upper right quadrant of a SharePoint 2013 site. This means you probably have the required services for OneDrive set up already. To verify if you do, go to Verify your setup.
The following three services must be configured in SharePoint Central Administration in order to use OneDrive in your SharePoint Server 2013 on-premises environment:
<Insert icons for configuring the services>
Note: The following procedures are the minimum base requirements for configuring the required services to enable OneDrive in SharePoint 2013. To learn more about the full capabilities of each service, see the links at the end of each step for additional planning information.
<insert icon for Configuring Managed Metadata service>
To turn on the Managed Metadata Web Service:
-
In SharePoint Server 2013, in Central Administration, under System Settings, click Manage services on server.
-
On the Server drop-down list, choose Change Server.
-
Choose the server where you want to run the Managed Metadata Web Service.
-
In the Service list, click Start for the Managed Metadata Web Service.
To create a Managed Metadata service application:
-
In SharePoint Server 2013, in Central Administration, under Application Management, click Manage service applications.
-
Click New, and then click Managed Metadata Service.
-
Type a name for the service application in the Name box.
-
In the Database Name box, type a name for the database.
-
Under Application Pool, choose SharePoint Web Services Default from the Use existing application pool list.
-
Click OK.
If you want to make further use of the Managed Metadata service, see Plan Managed Metadata in SharePoint Server 2013.
<Insert Icon for Configure My Sites>
To create a web application for the My Sites site:
-
In SharePoint Server 2013, in Central Administration, under Application Management, click Manage web applications.
-
On the ribbon, click New.
-
On the Create New Web Application page, in the Authentication section, select the authentication mode that will be used for this web application.
To create a My Site Host site collection:
-
In SharePoint Server 2013, in Central Administration, under Application Management, click Create site collections.
-
On the Create Site Collections page, in the Web Application section, select the web application that you just created for the My Sites.
-
In the Title and Description section, type the title and description for the site collection.
-
In the Web Site Address section, select the path of the URL for the My Sites host. In most cases, you can use the root directory (/).
-
In the Template Selection section, click the Enterprise tab, and then select My Site Host.
-
In the Primary Site Collection Administrator section, type the user name (in the form <DOMAIN>\<user name>) for the user who be the site collection administrator.
-
In the Secondary Site Collection Administrator section, type the user name for the secondary administrator of the site collection.
-
If you are using quotas to manage storage for site collections, in the Quota Template section, click a template in the Select a quota template list.
-
Click OK.
If you want to make further use of My Sites, see Configure My Sites in SharePoint Server 2013.
<Insert Icon for Configure User Profile service>
To turn on the User Profile Service:
-
In SharePoint Server 2013, in Central Administration, under System Settings, click Manage services on server.
-
On the Server drop-down list, choose Change Server.
-
Choose the server where you want to run the User Profile Service.
-
In the Service list, click Start for the User Profile Service.
To create a User Profile service application:
-
In SharePoint Server 2013, in Central Administration, under Application Management, click Manage service applications.
-
Click New, and then click User Profile Service.
-
Type a name for the service application in the Name box.
-
Under Application Pool, choose SharePoint Web Services Default from the Use existing application pool list.
-
In the Profile Synchronization Instance drop-down list, choose the server where you want to run the User Profile Synchronization Service.
-
In the My Site Host URL box, type the URL of the My Site Host that you created.
-
Optionally change other settings to meet the needs of your organization.
-
Click OK.
To turn on the User Profile Synchronization Service:
-
In SharePoint Server 2013, in Central Administration, under System Settings, click Manage services on server.
-
On the Server drop-down list, choose Change Server.
-
Choose the server where you want to run the User Profile Synchronization Service.
-
In the Service list, click Start for the User Profile Synchronization Service.
-
Type the credentials for the account shown, and click OK.
If you want to make further use of the User Profile service, see Plan user profiles and identities (SharePoint Server 2013).
<Add icon for Verify your setup>
-
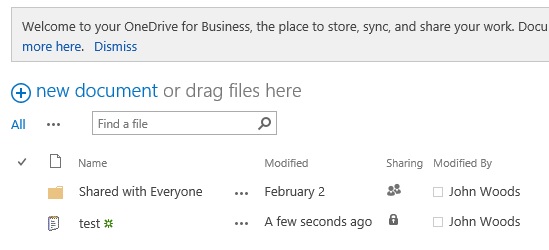
Verify that your users can see the OneDrive link on the upper right portion of their My Site page.
-
Open Microsoft Word or NotePad, create a test file and save it to your desktop.
-
In your SharePoint site, click the OneDrive link to open your OneDrive document library. Click the File tab, and then click Upload Document. In the Add a document screen, click Browse and then select the test file you had saved to your desktop. Click OK. If your file is saved to your OneDrive document library and is visible, your setup is successful.