With task publishing in Microsoft Teams, operations managers and other business leaders can centrally define tasks and distribute them to the teams across your organization who must perform the work. If task publishing is enabled for you and your organization, you can use task publishing to create a list on the Publishing page of the Planner app, add tasks to it, and then publish the list to the teams (locations) that you choose.
You can add recurrence to a task list so that it automatically publishes to the selected teams on a regular basis. For example, you can schedule a task list to publish every week at 8:00 AM on Monday.
Note: Recurrence is available on standard task lists. Recurrence isn’t available for everyone to complete task lists, which are most commonly used for training tasks or policy acknowledgement tasks. Learn more about tasks lists in task publishing.
In this article
Edit recurrence for a task list series
Overview
Publishing a recurring task list is a great way to work with routine tasks that need to be completed. Here’s an overview of how it works.
-
You can add recurrence to a standard task list under Drafts by defining the recurrence settings and start and end dates. This changes the list from a one-time task list to a recurring task list series. When you’re ready, you can publish the recurring task list series.
-
When published, the first occurrence of the recurring series appears under Scheduled until it's time to be published. When a scheduled occurrence is published, the next occurrence is automatically created.
-
When a new occurrence is created, task due dates are updated automatically based on how far they are after the series start date you chose. Say, for example, you created a monthly series recurring on the fifteenth of every month. If you choose a series start date of January 15 and include a task due on January 17, the second occurrence scheduled for February 15 also has a two-day offset. The task will be due on February 17. To learn more, see the Make a task list recurring section of this article.
-
After the first occurrence in the series is published, the task list series appears under Published. You can expand it to show all published occurrences of the task list.
-
You can edit the tasks in the series or a scheduled occurrence. You can also edit the tasks in a published occurrence of the task list series.
-
(Coming soon) You can edit recipient teams for the series or a scheduled occurrence. You can’t edit recipient teams for an occurrence that’s already published.
-
To make changes to the tasks or recipients of a series where the first occurrence hasn’t been published yet, you can cancel the series. If no occurrences have published yet, the series will return to Drafts.
-
You can see reporting for task list occurrences after they’re published, just as you can with non-recurring task lists.
-
You can also unpublish task list occurrences or the task list series when they’re no longer needed or if you make a mistake.
Make a task list recurring
Apply a recurrence interval to a publishable task list to have it automatically publish on a repeating schedule such as daily, weekly, monthly, or yearly.
-
On the Publishing page of the Planner app, select a list under Drafts or create a new list, and then select Does not repeat.
-
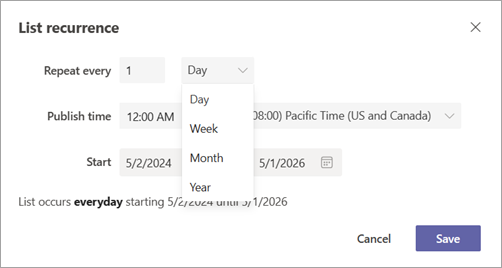
In the List recurrence dialog box, choose the recurrence settings for the list.
-
Recurrence interval. By default, Day, Week, and Month have an end date of two years from the start date. All recurrence intervals have a maximum end date of five years from the start date.
-
Publish time and time zone.
-
Start and end dates. Occurrences are only published when they occur on or after the start date and on or before the end date.
Note: We recommend that you set the start date to the date when the first occurrence will be published. If the series start date and the publish date of the first occurrence are different, the automatic date adjustments will be based on the series start date. For example, a series recurs on the tenth of every month with a start date of January 1 and contains a task due on January 12. In this example, the task will be due 11 days after the publish date of each future occurrence, instead of two days afterward. This is because automatic date adjustments are based on the start date (January 1) rather than the date when the first occurrence will be published (January 10). The system uses the start date for this calculation because it's a value you set directly, giving you more direct control over the due date behavior.
-
Publish a recurring task list
When your task list is ready to go, publish it to the teams whose members will do the work.
-
Under Drafts, select the recurring task list, and then in the upper-right corner, select Publish series.
-
Select the teams who will receive the task list. Choosing these teams works the same for recurring lists and non-recurring lists. You can choose teams from a hierarchy and use the main Teams list and/or any available filters to locate the teams to include. Alternatively, you can upload a custom list of teams.
-
Choose whether to notify recipient teams.
-
Select Next, and then review your publication plan. To make changes, select Back.
-
Select the Ready, everything looks good here check box, and then select Publish. Preparing the recurring task list can take some time. You might see a message that says the task list is being scheduled.
-
You’ll see the task list appear under Scheduled when the action is completed. The next occurrence of the recurring list is shown under Scheduled and will be published on the scheduled date and time.
Important: If alert icons appear, select View details to help resolve the issue(s).
To learn more about publishing task lists, see Publish a task list.
Reschedule an occurrence
You can reschedule the upcoming occurrence of a recurring task list. For example, you might need to do so if the next publishing date falls on a company holiday.
You can reschedule at any time up to the date of the next scheduled occurrence.
-
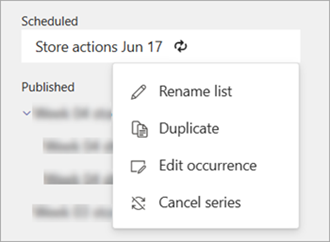
Under Scheduled, go to the task list you want to reschedule, and then select More actions
-
Select the recurrence interval dropdown menu (for example, Every Monday), and then select Reschedule this occurrence.
-
In the Reschedule this occurrence dialog box, choose a new publish date, publish time, and/or time zone as needed, and then select Save.
Skip an occurrence
You can skip an upcoming occurrence of a recurring task list. For example, you might need to do so if all staff are off work because the next publishing date falls on a company holiday.
-
Under Scheduled, go to the task list, and then select More actions
-
Select the recurrence interval dropdown menu, and then choose Skip this occurrence.
-
In the Skip occurrence dialog box, review the information, and then select Skip occurrence. The skipped occurrence no longer appears under Scheduled and won’t be published.
Edit recurrence for a task list series
If you need to change the recurrence interval or any other recurrence settings, edit the recurrence for the recurring task list series. The changes apply to the next occurrence and all future occurrences.
-
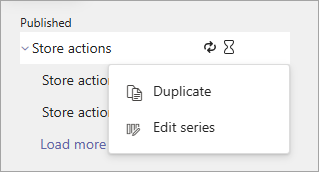
If at least one occurrence has already been published, find the task list series under Published, select the task list series you want to edit, and then select More actions
-
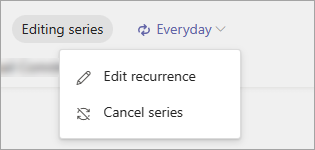
Select the recurrence interval dropdown menu, and then select Edit recurrence.
-
In the List recurrence dialog box, make the changes that you want for the task list series.
-
Review your changes, and then select Save. When the list is published, the changes apply to all future occurrences of the recurring task list.
Note: If the first occurrence of the series hasn’t been published yet, select the list under Scheduled and choose Cancel series. If no occurrences have been published, cancelling the series returns it to Drafts. This allows you to edit the recurrence and publish the task list series again.
Cancel recurrence for a task list series
When you no longer want a recurring task list series to continue publishing, you can stop (cancel) the recurrence. All future occurrences of the task list won’t be published.
-
Under Published, go to the recurring task list series, and then select More actions
-
Select the recurrence interval dropdown menu, and then select Cancel series.
-
In the Cancel series dialog box, verify that you want to cancel the series, and then choose Yes.
-
The next scheduled occurrence and all future occurrences no longer appear under Scheduled.
-
The existing recurring task list template and its corresponding published occurrences are still listed under Published and are available for reporting.
-
If no lists have been published for the series yet, you’ll see the recurring task list series under Drafts.
Note: If the first occurrence of the series hasn’t been published yet, select the list under Scheduled and choose Cancel series. If no occurrences have been published, cancelling the series returns it to Drafts.
Unpublish a task list series
Caution: Unpublishing a task list series removes the tasks from all teams that received them. This applies to all task lists that were ever published under the recurring task list series. Team members will lose access to all task details, including comments and attachments they may have added. This can’t be undone.
You may want to unpublish a task list series to remove tasks that are no longer needed or to correct a mistake in sending the series. In the event of a mistake, keep in mind that you can edit the tasks in a scheduled task list or a published task list, including task list occurrences published as part of a recurring series. If you do need to unpublish a task list because of a mistake, it's best to do so as soon as possible to reduce the assignment and completion of tasks that are wiped out.
If you want to unpublish a task list series, use the following steps. The task list series and all lists in it will move to the Unpublished section and can be duplicated but can't be republished.
-
Under Published, next to the task list series you want to unpublish, select More actions
-
Confirm you want to unpublish the series, and then choose Unpublish series.
-
After the list series and associated lists appear under Unpublished, you can delete them or duplicate them, edit the copy, and publish the edited copy.
Unpublish a list in a task list series
Caution: Unpublishing a list in a task list series removes all tasks in the list from all teams that received them. Team members will lose access to all task details, including comments and attachments they may have added. This can’t be undone.
You may want to unpublish a specific task list occurrence in a task list series to remove tasks that are no longer needed or to correct a mistake in sending the task list. In the event of a mistake, keep in mind that you can edit the tasks in a published task list, including a task list occurrence published as part of a recurring series. If you do need to unpublish a task list because of a mistake, it's best to do so as soon as possible to reduce the assignment and completion of tasks that are wiped out. If you want to unpublish a list in a task list series, use the following steps. The task list will move to the Unpublished section and can be duplicated but can't be republished.
-
Under Published, expand the task list series, go to the list you want to unpublish, and then select More actions
-
Confirm you want to unpublish the list, and then choose Unpublish.
-
After the list appears under Unpublished, you can delete it or duplicate it, edit the copy, and publish the edited copy.
See also
Publish task lists to define and track work in your organization


