
With a Microsoft Exchange Server or Microsoft 365 account, you can work offline to avoid connection charges or stop Outlook from attempting to send and receive messages over a slow network connection.
Switch between working offline and working online
-
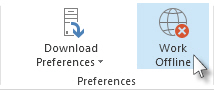
Click Send / Receive > Work Offline.
When Outlook switches between working online and offline, all email accounts are changed.
You know you’re working offline when Work Offline is highlighted on the ribbon or Working Offline appears on the status bar at the bottom of the Outlook window.

When you’re ready to work online again, click Send / Receive > Work Offline. The button text doesn’t change, but it’s only highlighted when you’re working offline. Working Offline on the status bar also goes away when you’re working online.
Change how much mail to keep offline
-
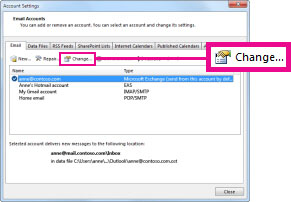
Click File > Account Settings > Account Settings.

-
Select an Exchange or Microsoft 365 account, and then click Change.
-
Under Offline Settings, move the slider to the desired amount of time, such as All, 12 months, 6 months, 3 months, or 1 month. Note: If you're using Outlook 2016, you can also select an amount of time as short as 3 days.
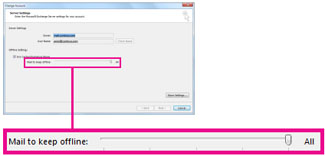
For example, if you move the slider to 3 months, only mail from the past three months will be synchronized to your Offline Outlook Data (.ost) file from the Exchange server. Items older than 3 months reside only in your mailbox on the server. You can change this setting at any time.
Cached Exchange Mode, which downloads a copy of your messages, must be turned on.
If you're using Outlook with an Microsoft 365 account, we recommend you use Cached Exchange Mode.
By default, Outlook configures Exchange and Microsoft 365 accounts to only synchronize 12 months of your email.
Changing the amount of data to synchronize can affect the time it takes Outlook to open as well as the amount of storage space Outlook uses on your computer. If you're running in a virtual desktop environment, we recommend you only synchronize one month of data.


