You've heard about Microsoft 365 Groups and how you can use them in Outlook, but perhaps you're not sure how to get started. In this article we're going to walk you through a few basic steps for how you and your team can get started with Microsoft 365 Groups in Outlook. We'll also give you some links to more in-depth content for when you're ready to do more.
If you're not sure what groups are, you may want to visit Learn about Microsoft 365 groups first.
To get the most from Microsoft 365 Groups in Outlook you need to have an Microsoft 365 plan that supports Exchange online and SharePoint online, such as Business Premium, E3 or E5.
Note: In order to use Microsoft 365 Groups in Outlook on Windows you need to be using Outlook in Cached Exchange Mode. For more information about that see Turn on Cached Exchange Mode.
Select a tab below to find more information about getting started with that feature.
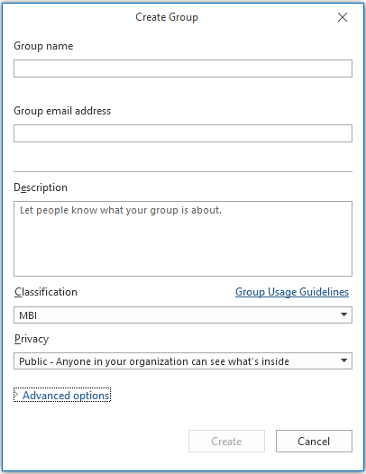
The first thing you need to do is to create your group. Creating a group in Outlook is a very simple process. The short version of the story is:
-
Click New Group from the groups section of the Ribbon. If you're using Outlook on the web instead of the desktop version you can start this process by clicking the drop arrow next to New and selecting Group. Alternatively, go to the navigation bar on the left margin and select the Groups icon located below the People icon. Then, select 'New group' in the top left corner.
-
Give your group a name.
-
Set the privacy setting. Groups are Private by default. This means they can only be viewed by members of the group and require a group owner's permission to join. Public groups can be viewed, and joined, by anybody in your organization. Neither setting exposes your groups to people outside the organization unless you specifically invite them as guests.
Tip: Groups are Private by default when they are creating using Outlook on the web. In coming months, they will be Private by default when created using any of the Outlook apps.
-
Decide if you want new members to follow the group (Advanced options). Members who follow the group will get copies of each group message in their personal inbox. Members who are merely joined will have to go to the group's shared inbox to participate in group conversations.
Do more:
-
For more information on creating a group see Create a group in Outlook.
-
For more information about joining a group someone else has created see Join a group in Outlook.
-
For more information about how to stop receiving group messages in your Inbox or to exit a group altogether see Leave a group in Outlook.
Once your group is created you can add members to the group. To add new members:
-
Go to your group in Outlook by finding it on the navigation pane at the left. It should be below your mailbox in the Groups section. If you're using Outlook on the web,
-
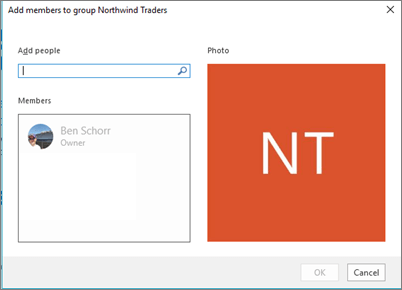
Once you're in your group click Add Members on the Ribbon. If you're using Outlook on the web click where it says how many members your group has, near the top right of the window, then click Add members. Alternatively, go to the navigation bar on the left margin and select the Groups icon located below the People icon. In the left pane, under Groups, select the group you want to invite people to join. Select 'Add members' icon next to the send email button and settings icon.
-
Type the name or email address of each person you want to add in the field provided. When you're done, click OK and they'll be added. Each of them will receive an email message welcoming them to the group and giving them convenient links to access group content.
Tip: If you want to add all of the members of an existing distribution list, just type the name of the distribution list and they'll all be added in one step.
Do more:
-
For more information about inviting guests from outside your firm to your group see Guest access in Microsoft 365 groups.
-
For more information on adding or removing members from your group see Add and remove group members in Outlook.
Conversations in Microsoft 365 Groups in Outlook happen in the shared inbox for the group. Users can read and reply to messages, and members can easily search or scroll back through the message history to get caught up on what's been discussed before. The shared inbox looks a lot like the personal inbox that Outlook users are familiar with. Each conversation appears separately in the message list at the left and clicking on one will open it in the reading pane. If a user marks a message, or conversation, as read it doesn't affect how the messages appear for other members of the group so you don't have to worry that other members may miss an important message.

Tip: A recent change in the way messages are displayed, and counted, in Outlook may have reset the number you see next to your group name in the Outlook navigation pane. If you want to reset that number to zero you can right-click the group and select Mark all as read.
Now that you've got your group created, let's start a new conversation. You can post a new message by opening the shared inbox for the group and clicking New Conversation on the Ribbon. Or you can simply send an email to the group's alias. All members of the group will be able to read the new message you've posted and any members who follow the group will get a copy of your message in their personal inbox.
Do more:
-
If you'd like to use Outlook on the web see Have a group conversation in Outlook.
Each Microsoft 365 Group gets a shared files library where you can store, share, and collaborate on documents, workbooks, presentations, or just about any kind of file.
Access the files library by going to your group in Outlook (on the left navigation pane) and click Files on the Ribbon. The files library will open in a browser and from here you can create new files, upload files from your computer and do just about anything else a SharePoint document library can do. Think about what kind of files would be useful to share with your group, and don't feel limited to Microsoft Office files. You can also share PDFs, photos or just about any other kind of file that your group would find useful.
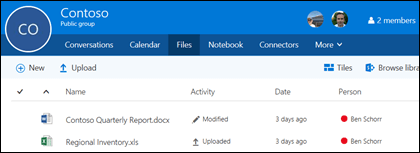
To download or delete a file just select it and those options will appear on the toolbar at the top.
Do more:
-
For more information about working with files in your group see Share group files.
Each Microsoft 365 Group gets its own shared OneNote notebook where they can gather ideas, collaborate and store research.
Go to your group in Outlook by finding it on the left navigation pane, or in Outlook on the web by going to the People tile. Once you're there click Notebook on the Ribbon to open the group's shared notebook.
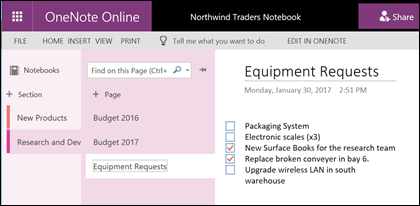
The first time you open the group's shared notebook it will open in the browser in OneNote for the web. You can make edits there, or if you have OneNote 2016 and you'd prefer to use that just click Edit in OneNote from the Ribbon. Once you've opened it in OneNote the notebook will sync to your list of open notebooks and you can access it directly from within OneNote without having to go to the group first.
Try going to your group's OneNote notebook and think about what might be useful for the group to collect ideas and collaborate on. For example you might have a section that you use to gather and comment on web content that is relevant to your team.
Note: Your group notebook is also available to you on your smartphone or tablet using OneNote for iOS or Android.
Do more:
-
To get started with OneNote see Basic tasks in OneNote 2016 for Windows.
Chances are good that your group has events, meetings, milestones or other items that would benefit from a shared calendar. Each Microsoft 365 Group has a shared calendar that all members can see and contribute to.
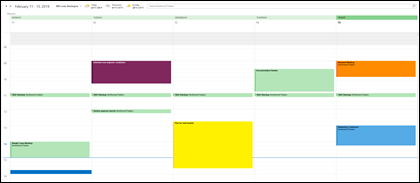
Working with the calendar of your group is no different than working with your personal calendar. If you select the calendar button on the navigation pane, you'll see your personal calendar, plus the shared calendars of any groups you're a member of. You can check the boxes next to each calendar you want to see and view them side by side or overlapped.
Adding an item to the shared calendar works just as it does on your personal calendar. Any meeting you add to the shared calendar will invite the other members of the group to that event as well, so they can have it on their own calendars. Appointments added to the shared Group calendar do not appear on the personal calendars of other members.
Now that you've got your shared calendar try adding any upcoming meetings or events that your group might be participating in.
Do more:
-
For more information on using your group's shared calendar see Schedule a meeting on a group calendar in Outlook.
So now that you have your group up and running, where do you go from there?
-
Microsoft Planner lets you assign and manage tasks for folks in your group. Get more information in Planner Help.
-
You can invite guests from outside your organization to join and collaborate in the group. See Guest access in Microsoft 365 groups.
-
Migrate your existing distribution lists to Microsoft 365 groups. See Why you should upgrade your distribution lists to groups in Outlook.
-
Add a Microsoft Team to your group for persistent chat. See Microsoft Teams Quick Start.
See also
Got questions?
Visit the Microsoft Tech Community to post questions and participate in conversations about Microsoft 365 Groups.
We're listening
Ben last updated this article on June 25th, 2021 as a result of your feedback. If you found it helpful, and especially if you didn't, please click the feedback controls below and leave us some constructive comments so we can continue to improve it. Thanks!


