Overview
The purpose of this article is to explain in a nutshell the RAID configuration employed by StorSimple Storage Management Appliance. Understanding this RAID configuration requires a grasp of RAID concepts as well as familiarity with how the OS views the disk space. The information contained in this article is applicable to all the 5000 and 7000 series models.
What is RAID?
RAID stands for Redundant Array of Independent Disks. RAID is a methodology of storing information on multiple disks in a way that offers superior performance, additional storage capacity and improved reliability over the older storage solutions. Specifically, one or more copies of redundant data are maintained in a RAID so that data can be restored in the event of a disk failure.
RAID Concepts
This section explains the terms associated with RAID used in the context of this article.
-
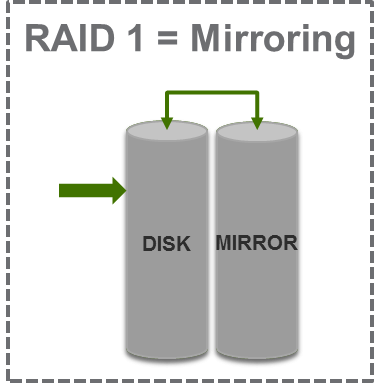
Mirroring - refers to writing the data to two or more disks at the same time. Even if one disk fails completely, the mirror preserves the data. Mirroring is classified as RAID 1 level.
-
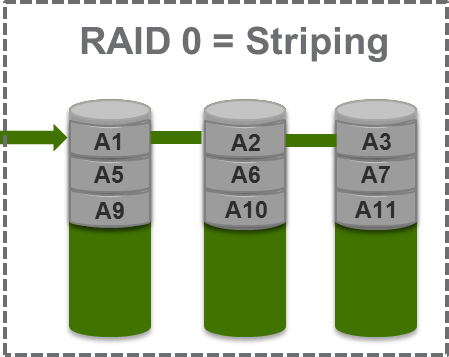
Striping/Stripe Size/Chunk Size - implies breaking up the data into chunks and writing the chunks to multiple disks in succession. A chunk is an "atomic" mass of data that is written to the devices. If we have 4K chunks and two disks in a RAID, chunks 0 and 2 are written to the first disk, and chunks 1 and 3 are written to the second disk. Overhead for large files is lower if chunks are large, but small files benefit from smaller chunks. Chunk size or Stripe size is specified in kilobytes. StorSimple uses a chunk size of 4MB in the current software version. The amount of space consumed by a stripe is the same on each physical disk. Striping, however, improves the performance by getting the data off more than one disk simultaneously. Striping is considered as RAID 0 level.
-
Levels - distinct storage methods that can be employed by a RAID and are numbered from 0 to 9. A two digit RAID level can be obtained by combining two or more of the above storage methods. Examples include RAID 10, RAID 50, etc. Each RAN level has its set of advantages and disadvantages.
StorSimple RAID Setup
This section explains the various RAID related parameters specific to StorSimple. In particular, it discusses the RAID level, layout, type, hot spare and how these are applicable to a StorSimple appliance model.
RAID Level
The various StorSimple appliance models contain a mix of HDDs and SSDs. Both the HDDs and SSDs are RAID 10 protected. RAID 10 or RAID 1+0 array is a two-digit RAID level obtained by combining RAID 1 and RAID 0 levels. The RAID 0, RAID 1 and RAID 10 levels are discussed in the following section.
RAID 0
RAID 0 is not technically a RAID as it does not provide any data redundancy. If a drive fails, all the data is damaged. RAID 0 does, however, implement striping for improved performance as shown below.
Striping takes a chunk of data and spreads it across multiple disks. The performance improves as three times the data can be written in a given time frame to the disks shown in the figure relative to the same data being written to a single disk. The overall storage capacity stays the same.
RAID 1
RAID level 1 ensures data redundancy by creating a mirror of data as shown in the figure.
In the event of a disk failure, the surviving disk will still have a full copy of the data that existed in the failed disk. However, this implementation cuts the overall storage capacity in half relative to when the disks are used independently. There is no improvement in the performance.
RAID 10 or RAID 1+0
In RAID 10 the data is mirrored onto two disks and then striped across multiple disks. RAID 10 offers full data redundancy, faster read and writes and faster rebuilding in the event of a disk failure with minimal performance degradation. However, the actual capacity of the RAID is reduced to half of the overall storage capacity thus driving up the cost. Additionally, it is recommended to use identical disks.
RAID Layout
RAID 10 can be implemented with multiple techniques; StorSimple has implemented a slightly different approach that guarantees the same level of redundancy and performance called RAID 10 'near' layout. In this implementation, the copies of a block of a data are near each other, i.e. at the same address on different disks or predictably offset.
For example, a near layout on 3 (odd number) and 4 (even number) drives would look like:
3 drives (odd) 4 drives (even)---------- --------------A1 A1 A2 A1 A1 A2 A2A2 A3 A3 A3 A3 A4 A4A4 A4 A5 A5 A5 A6 A6A5 A6 A6 A7 A7 A8 A8.. .. .. .. .. .. ..
The 3 and 4 drive examples can be mapped to the various StorSimple appliance models. The odd number disk implementation can only support on disk failure whereas in RAID 10 with an even number of disks, theoretically the array will function as long as one disk of each mirrored set is functional. However, StorSimple recommends not removing more than one disk (HDD or SSD) to retain high-availability of the appliance.
Hot Spare for RAID
RAID can handle the failure of 1 disk from each RAID set without damaging the data. However, if the failed disk is not replaced, the single working hard disk in this set will then become a single point of failure for the entire array. If that single disk then fails, all data stored in the entire array is lost.
StorSimple addresses this by providing a matched ‘hot spare’ HDD for the head unit (for all models) as well as one HDD for the EBOD enclosure (in case of a 7520). The hot spare gets activated when any of the redundant disks in the RAID array fails. The ‘hot spare’ when activated becomes the data drive and the replacement drive becomes the new ‘hot spare’.
With a ‘hot spare’, the rebuild process can be really quick. This reduces the Mean Time To Recovery (MTTR), thus reducing the probability of a second disk failure and the resultant data loss that would occur in any singly redundant RAID.
RAID Disk Selection
The performance and capacity of a RAID are heavily dependent upon the disks used in the array. In general, it is recommended that the disks have similar capacity and performance levels.
Consider the StorSimple Appliance Model 7520. This model has a head unit and an EBOD enclosure. The head unit contains 7 HDDs and 5 SSDs. All the HDDs have 3TB capacity and are of matched type (brand and model). The SSDs on the other hand have 400GB capacity and are matched as well.
The 7520 also has an EBOD enclosure with 12 additional matched HDDs that have a storage capacity of 3TB each.
RAID Layout for StorSimple Appliance
We will explain the RAID layout for StorSimple 7520 appliance. This model covers both the odd and the even configurations.
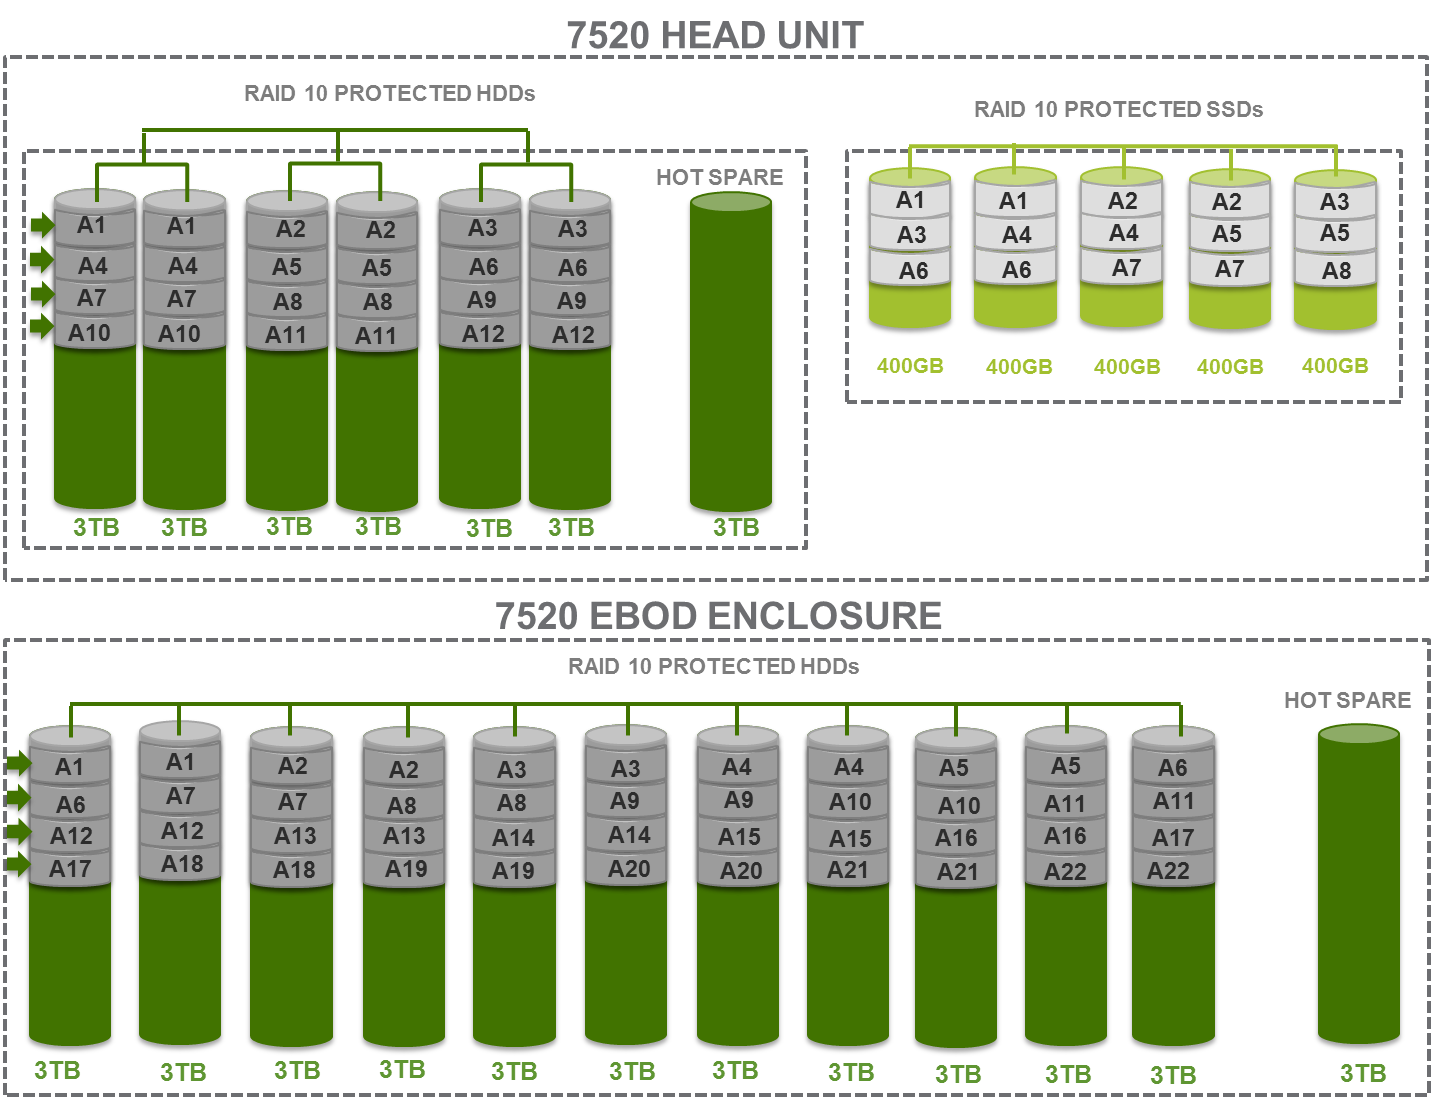
For the head unit, a RAID 10 configuration is implemented for 6 (out of 7) HDDs and the 7th acts as the ‘hot spare’. For the 5 SSDs, a RAID 10 configuration is employed. For the EBOD enclosure, the 11 HDDs (out of 12) have a RAID 10 layout while the 12th acts as the ‘hot spare’. In each case in the operating mode, the ‘hot spare’ remains unused until there is a disk failure when it gets activated.
The details of the layout are as shown in the following diagram.
StorSimple RAID Status
This section explains the various components associated with RAID that can be monitored via the Web UI.
RAID Status in Web UI
When using the Web UI to access your StorSimple appliance, the ‘Hardware’ page under the ‘Manage’ drawer will display the status of all the elements associated with the RAID. The following elements are related to the status of RAID.
RAID Components
For the head unit of all the models, the RAID elements are located under the ‘Shared Components’ as shown below.
In the above screenshot, the Local Storage (HDDs) displays the state of the logical storage pool created from HDDs present in the head unit. The Local Storage (SSDs) on the other hand, displays the state of the logical storage pool created from SSDs present in the head unit.
For the EBOD enclosure (when using 7520), the RAID status can be viewed under the ‘EBOD Enclosure Shared Components’ as shown below.
RAID Component Status
The RAID elements in Web UI can have a status of ‘Healthy’ (green), ‘Recovering’ (yellow), ‘Degraded’ (yellow) or ‘Failed’ (red).
-
Failed – This status implies that more than one disk in RAID has failed.
-
Degraded - This refers to the state when one disk in RAID has failed.
-
Recovering - This status is displayed when the RAID is in ‘Recovery’ or ‘Resync’ mode.
The ‘Recovery’ mode refers to the state following an unclean shutdown of the system/array. The entire array is then re-written to ensure that all the redundant data is correct.
The ‘Resync’ refers to the scenario when a disk has failed in an otherwise-in-sync system. The hot spare is now activated and the data from other drives will now be written to the hot spare to bring it in-sync.
It is possible to have ‘Recovery’ followed by a ‘Resync’ when a system has an unclean shutdown and drive replacement occurs. In each of the above case, the Web UI will report the RAID status as ‘Recovering’.
The rebuild duration in each of the above cases may last for several hours and is a function of your appliance model and the overall load on the system. Note that the recovery/resync process can become slow when it is competing with host I/O activity and heavy resource (CPU, memory, disk) usage.


