Summary
With Update Rollup 8 for Microsoft System Center 2012 R2 Virtual Machine Manager (VMM), you can use the storage tiering functionality that is provided by Windows Server 2012 R2 directly from inside VMM. This feature will help you improve your Storage Spaces experience by combining the best performance attributes of SSD (solid-state drive) with the best cost/capacity attributes of HDD (hard disk drive). After a tier is created, frequently accessed data will be automatically moved to SSDs, and infrequently data will be moved to HDDs. This functionality will help you use your resources efficiently and will reduce the overall storage cost of the deployment.
More Information
For more information about Update Rollup 8 for System Center 2012 R2 Virtual Machine Manager, click the following article number to view the article in the Microsoft Knowledge Base:
3096389 Update Rollup 8 for System Center 2012 R2 Virtual Machine Manager
What can I do with this feature?
By using VMM Update Rollup 8, you can create new file shares with tiers (SSD/HDD) from inside VMM. More information about how to use this functionality is available later in this article. If you create a file share with tiers out of band and then add it to VMM, VMM will now automatically recognize the storage tiers, and you will be able to see the tiers through the VMM console. Please be aware that, to create a storage space with storage tiers, the storage pool must have enough hard disks and SSDs to support the selected storage layout, and the disks must contain sufficient free space.
How do I use the feature?
Creating new file shares with tiers (SSD/HDD)
By using VMM Update Rollup 8, you can easily create file shares with tiers. To do this, follow these steps:
-
In the VMM console, open the Fabric workspace.
-
In the Fabric pane, click Storage, and then click Create File Share on the Home tab. This action opens a multipage wizard to create the file share. (Before Update Rollup 8, you were taken to a dialog box.)
-
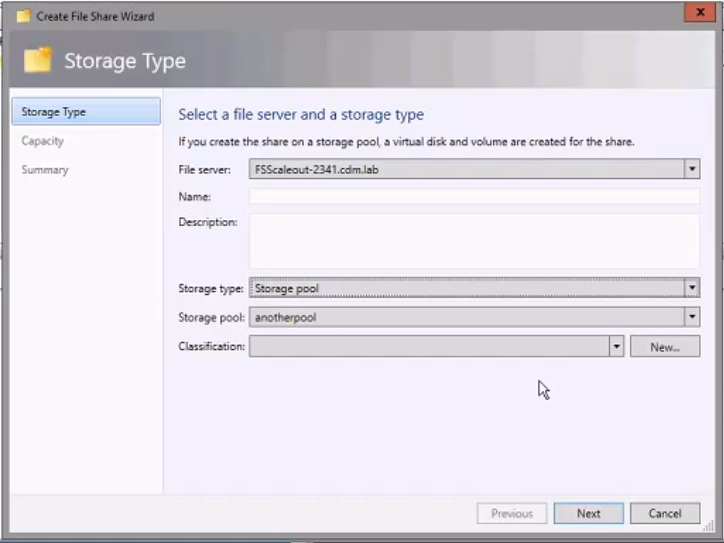
On the Storage Type page, select the file server to which you want to add the file share, and then specify the name and description of the file share.
-
Select the Storage Type as Storage Pool, select the appropriate storage pool from the list of available storage pools, and then specify the classification. Note The storage-tiering functionality will be enabled only when you select Storage Pool as the storage type. Storage tiering is not supported for the Local Path or Volume Storage type, and each of these options will work exactly as they did before Update Rollup 8.
-
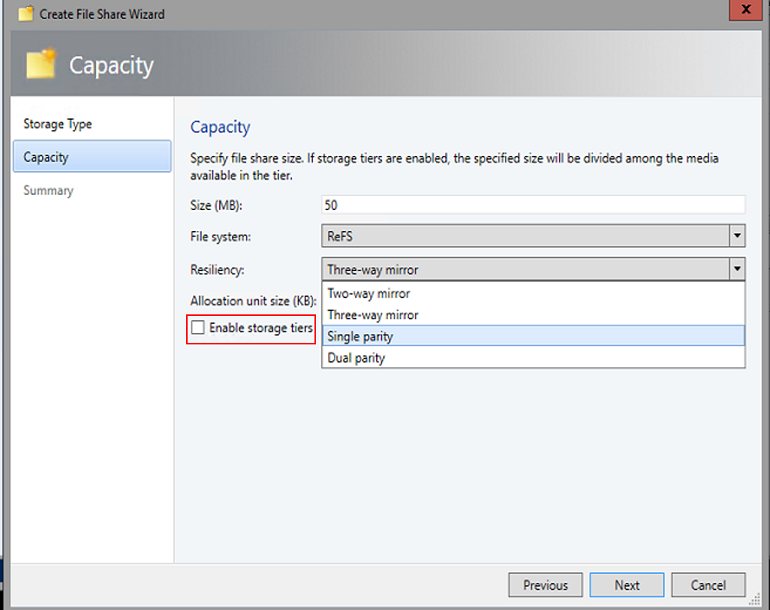
On the Capacity page, specify the size of the file share, the file system type, the storage resiliency method, and the allocation unit size. You will now see the Enable Storage Tiers check box.
-
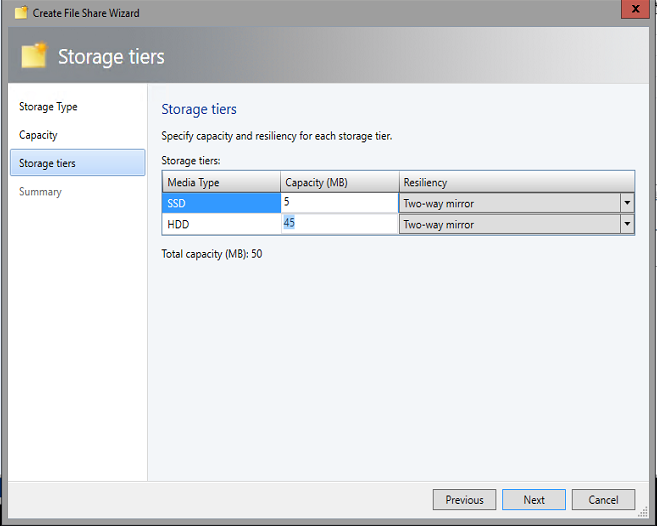
After you enable the check box for storage tiering, you have to specify the capacity and the resiliency method of each of the storage tiers on the Storage tiers page.
-
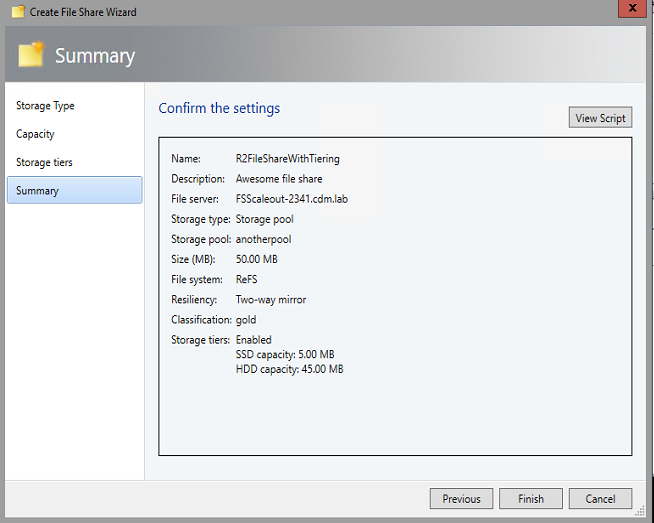
On the next page, verify the summary of your selections, and then click Finish.
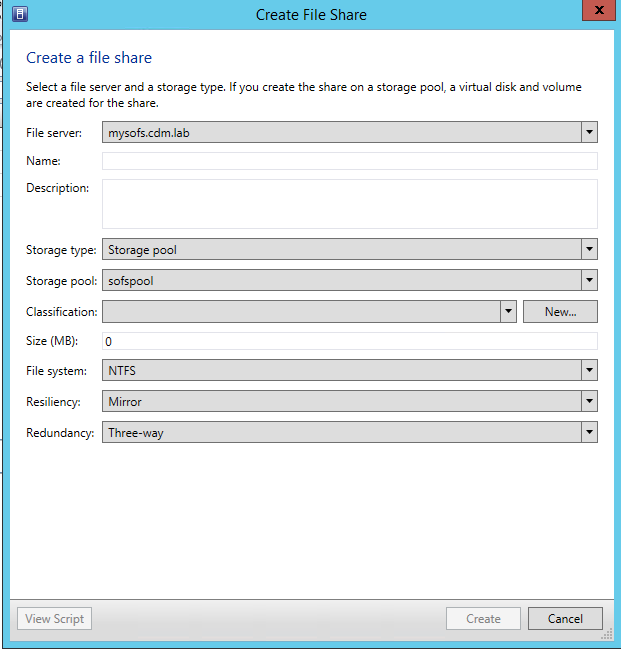
This is how the Create File Share page looked before Update Rollup 8:
PowerShell cmdlet that was used for creating a file share before Update Rollup 8
# Get Storage File Server $storageFileServer = Get-SCStorageFileServer -Name "mysofs.cdm.lab" # Get Storage Pool $storagePool = Get-SCStoragePool -Name "sofspool" # Get Storage Classification $storageClassification = Get-SCStorageClassification -Name "StorageClassification01"#Create the File Share $storageFileShare = New-SCStorageFileShare -Name "UR7FileShare" `
-Description "Single Dialog. No Wizard" `-StorageFileServer $storageFileServer `-StoragePool $storagePool `-StorageClassification $storageClassification `-FileSystem "CSVFS_NTFS" `-ResiliencySettingName "Mirror" `-PhysicalDiskRedundancy "3"
PowerShell cmdlet that is used for creating a file share after Update Rollup 8
# Get storage file server $storageFileServer = Get-SCStorageFileServer -Name "FSScaleout-2341.cdm.lab” # Get storage pool $storagePool = Get-SCStoragePool -Name "anotherpool” # Get storage classification $storageClassification = Get-SCStorageClassification -ID "StorageClassification01" #Create the file share $storageFileShare = New-SCStorageFileShare -Name "UR 8 File Share With Tiering" `
-Description "Awesome file share" `-StorageFileServer $storageFileServer `-StoragePool $storagePool `-StorageClassification $storageClassification `-FileSystem "CSVFS_ReFS" `-ResiliencySettingName "Mirror" `-PhysicalDiskRedundancy "1" `-MediaType @("SSD", "HDD") `-StorageTierSizeMB @(5, 45)

