The Microsoft OneDrive Learning Tools Interoperability (LTI) App integrates with your LMS to bring Microsoft OneDrive and Microsoft Office 365 directly into your most important workflows.
Microsoft OneDrive LTI App allows you to:
-
Attach Office 365 files including Word documents, PowerPoint presentations, and Excel from the Rich Content Editor
-
Distribute Office 365 cloud assignments.
-
View and organize your personal and course Microsoft Office files.
-
Create collaborations where course members can work together on shared documents in real time.
-
Access multiple Microsoft OneDrive accounts, including personal and school accounts.
-
Integrate Office 365 files with your course modules.
-
Use your Microsoft account for single sign-on with your LMS.
Important: If you have never used OneDrive and are accessing it within your LMS for the first time, OneDrive Picker will not appear nor display an error. To resolve this, visit https://onedrive.com/ and sign into your school account. After signing, you should be able to access the OneDrive Picker within your LMS.
Enable Microsoft OneDrive assignments
Educators can enable Microsoft OneDrive assignments to ensure that students are able to utilize Microsoft OneDrive within their courses.
-
Go to the home page of your course.
-
Check for Microsoft OneDrive on the course navigation.
Note: If you are able to see Microsoft OneDrive on the course navigation, then Microsoft OneDrive is already installed in your course (by admin or by you). If you cannot find Microsoft OneDrive in course settings, follow the steps below to configure Microsoft OneDrive into your course.
3. Get the Client ID from your Canvas administrator.
4. Go to the Settings section of your course navigation, select the Apps tab, and then select View App Configurations.
5. Select +App.
6. Select Configuration Type as By Client ID.
7. Enter your Client ID and select Submit.
Note: Microsoft OneDrive will appear in the list of apps. If it doesn’t appear, refresh the browser page for it to appear.
Create a Microsoft OneDrive Cloud Assignment
Cloud assignments are templated assignments. All students get their own copy of the assignment and can edit their own copy. When students submit the assignment, their own copy gets submitted and is available to the educator in the speed grader for assessment.
Microsoft OneDrive allows you to use Office files (Word, Excel, PowerPoint) to provide assignment instructions to students or assignment templates for students to edit and submit.
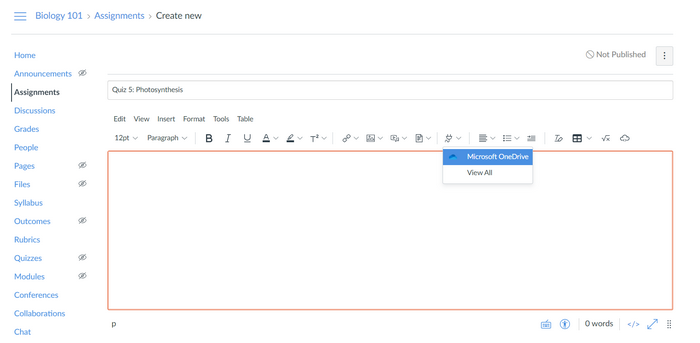
1. To include instructions about the assignment as an Office file within your assignment, select the Power Plug icon in the editor and select Microsoft OneDrive.
Note: For the first time, Microsoft OneDrive may not show up. In that case, you can choose View All and select Microsoft OneDrive from the popup.
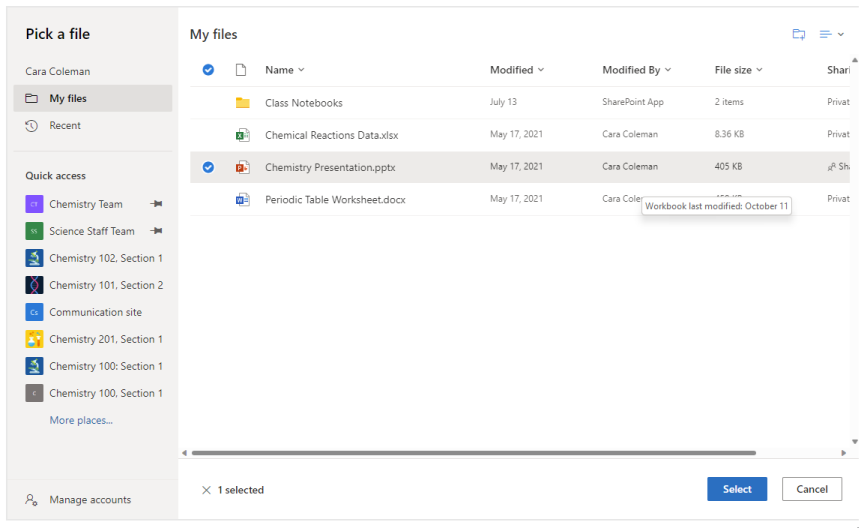
2. Select a file from the OneDrive file picker to embed or link the file.
Note: Files with .xls extensions cannot be embedded.
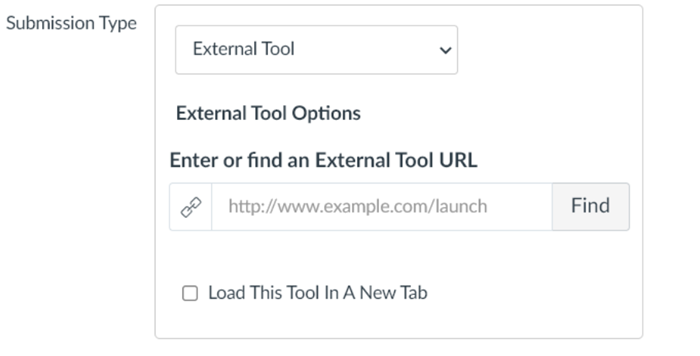
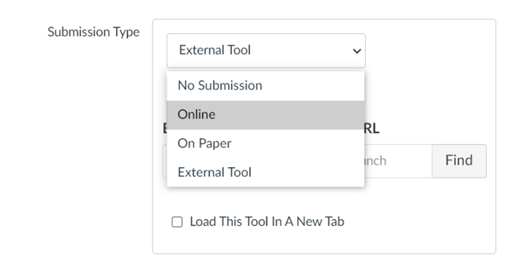
3. To add a templated assignment, select External Tool as the Submission Type and select Find.
Note: After selecting Find, a popup should open.
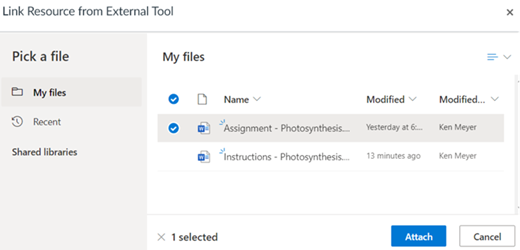
4. Select Microsoft OneDrive to open the OneDrive file picker.
5. Select the file you want to serve as the templated assignment and select Attach.
Note: It will attach the file and show the popup again.
6. Click or tap Select to confirm the selected file.
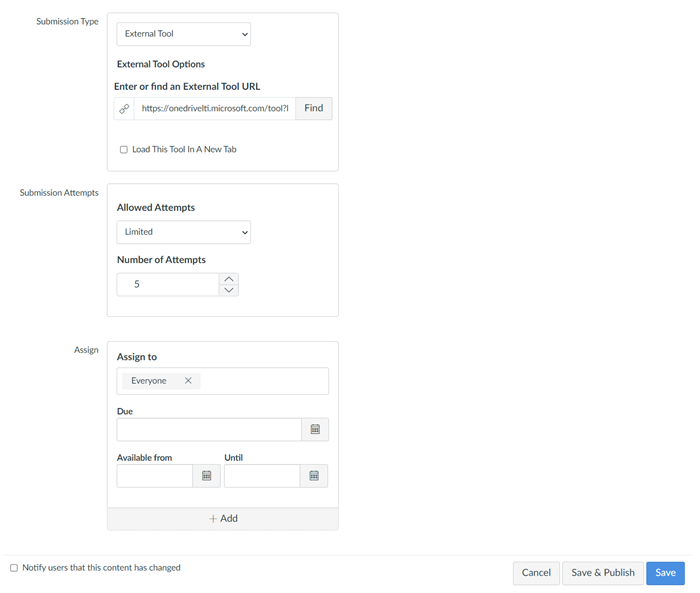
7. Select other options for Submission Attempts and Assign, then Save or Save & Publish.
Important: After a Microsoft OneDrive cloud assignment is published, it should not be edited. If you edit it, a new document will be created and shared with students. If the students have attempted the previous assignment and you share a new assignment, the previous work of the students will be lost.
A student will be able to edit and submit their own copy of an assignment.
1. Locate the assignment and select Edit Document on toolbar.
Note: This opens the document in new tab. The Canvas tab shows a popup asking you to select the Refresh button once you are done editing the assignment in new tab.
2. Close the tab where you are editing the assignment and go back to the Canvas tab.
Note: It is strongly encouraged that you close the tab after editing the assignment to ensure that all changes are successfully saved when you go back to Canvas tab to submit the assignment.
3. Select Refresh on the popup.
4. Check that all changes are visible and select Submit Assignment to submit your assignment.
Important: If you find that your changes are not reflected after selecting Refresh in Canvas, you should attempt the assignment again.
Create a Templateless Assignment
This type of assignment allows students to upload any file from their Microsoft OneDrive account to submit for the assignment. Students are only able to upload Word, Excel and PowerPoint files.
-
Create a new assignment.
-
Add assignment instructions.
-
Select Online for the submission type.
4. Select the File Uploads box.
5. Select other options for Submission Attempts and Assign, then Save or Save & Publish.
-
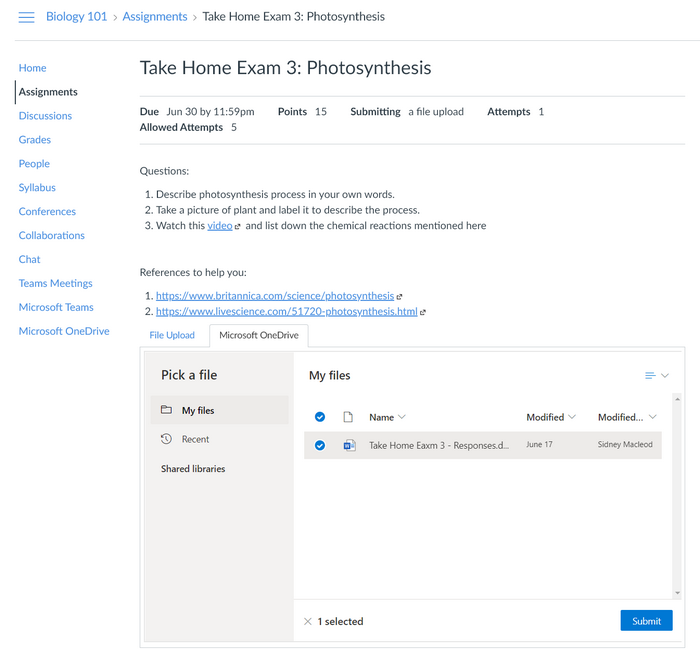
Go to the assignment and select Start Assignment.
-
Select Microsoft OneDrive tab, choose a file, and select Submit.
3. Select Submit Assignment to submit your assignment.
Note: Submitted assignments can be accessed on top right of the page.
Collaborate using Microsoft OneDrive
Collaborations allow students to work collaboratively on a given document. Students and educators can start a collaboration. The document under collaboration remains accessible to educators even if the educator is not added to the collaboration.
-
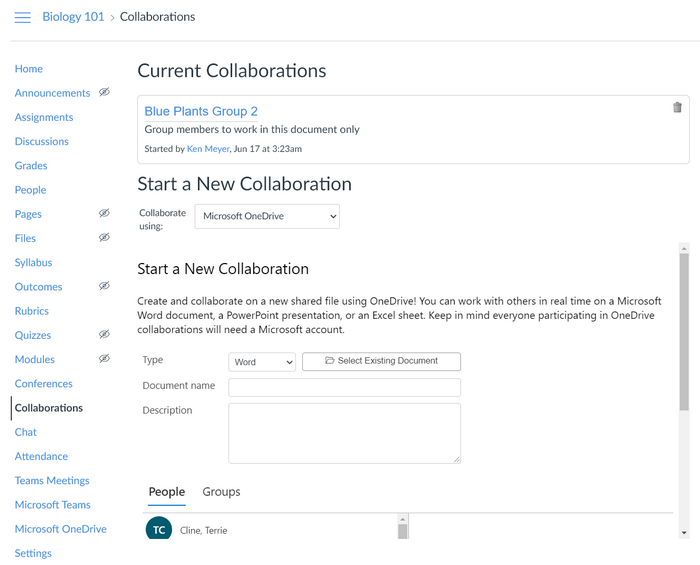
To start the collaboration, select Microsoft OneDrive from the dropdown.
-
Choose your Type, Document type, and insert Description.
-
Tap or click Select Existing Document.
Note: This opens OneDrive file picker.
4. Select the file to collaborate on and click or tap Select.
5. Assign the collaboration to students and select Save.
Notes:
-
This creates the collaboration for selected users, including the educator.
-
If you are using private mode of Safari browser, you will not be able to assign a collaboration to a group of students.
-
If you are using Firefox browser, a dialog box will appear asking you to Resend or Cancel. You will need to Cancel to create the collaboration.
-
Select Collaborations from the course navigation.
-
Select the collaboration that you will work on.
Note: This opens the collaboration document in new tab where you can see other students editing the same document.
Add Microsoft Office files to your course modules
Microsoft OneDrive LTI allows educators to add Microsoft Office files to their Canvas course modules.
-
Select the + icon on the top right of the module.
-
Select External Tool from the dropdown.
-
Choose Microsoft OneDrive from the list.
Note: OneDrive file picker will appear.
4. Choose the file that you would like to include and click or tap Select.
Note: The selected file will be added to the course module.
Manage your accounts
Microsoft OneDrive allows you to add multiple M365 accounts to your Canvas account with a given school. This is useful if you teach in multiple schools and your files are present across different OneDrive accounts associated with those schools.
Important:
-
You can only add official school accounts. Personal OneDrive accounts are not yet supported.
-
Some configuration needs to be done by your school administrator to support this functionality. If you are unable to add additional school accounts, please check with your administrator.
-
Go to your course and select Microsoft OneDrive from the course navigation.
Note: Your connected Microsoft OneDrive account should be visible.
2. Select Manage Accounts to add or remove an account.
Note: You will not be able to remove a Microsoft OneDrive account if there is only a single Microsoft OneDrive account connected.
Use incognito or private browsing mode
When using a shared device, you may access OneDrive in private browsing mode or incognito mode. Here is what you should know for the best experience.
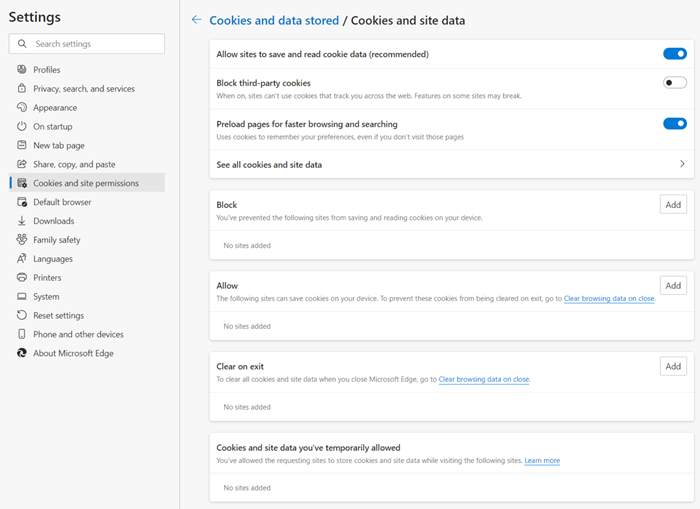
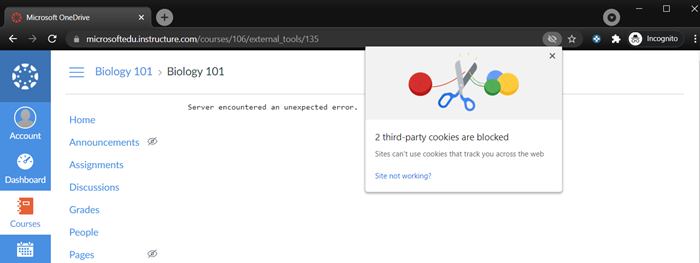
Microsoft OneDrive works in private mode in Microsoft Edge browser. Ensure that you have not blocked cookies (which are enabled by default).
Cookies are disabled by default in the Chrome browser incognito mode. You can either enable cookies for all sites in the settings or allow cookies for Microsoft OneDrive.
-
To change the default setting, select Allow all cookies.
Note: If cookies are not disabled while accessing Microsoft OneDrive in incognito mode, you will receive an error message.
2. Select the eye icon within the address bar.
Note: A popup should appear.
3. Select the link within the popup and Allow cookies.
Note: You will need to relaunch Microsoft OneDrive to begin using it in incognito mode.
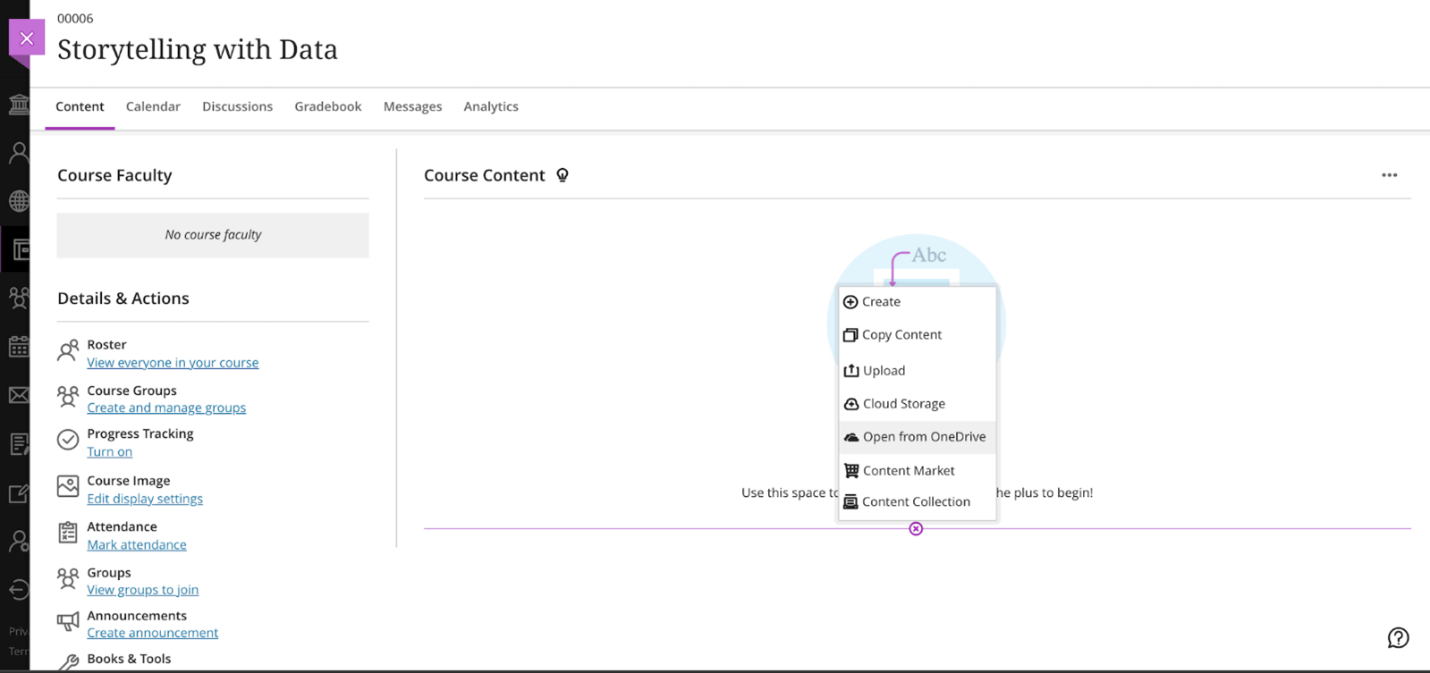
Note: To start using OneDrive on Blackboard Learn Ultra, your administrator needs to register the OneDrive LTI tool for Blackboard Learn Ultra.
Add Microsoft Office files to your course content
-
In your course content page in your Blackboard course, select the plus icon.
-
Select Open from OneDrive.
-
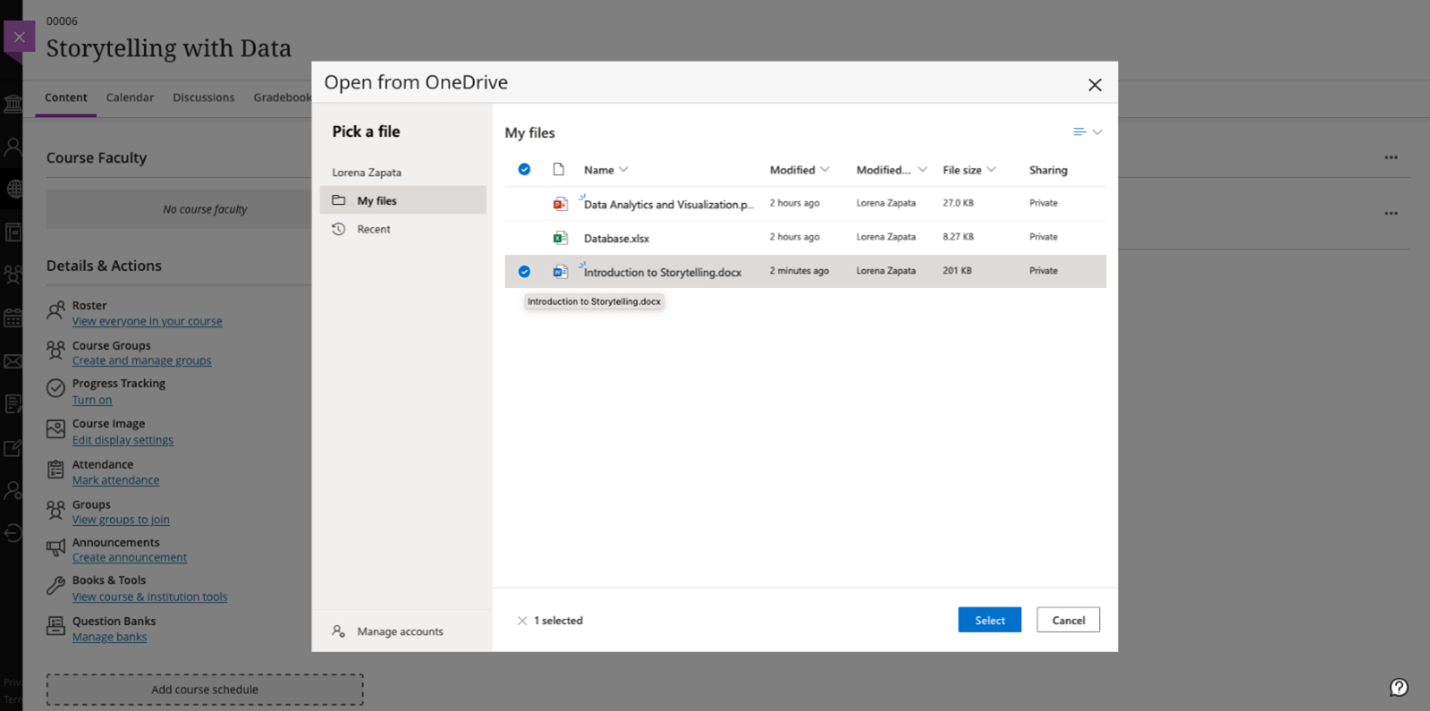
If you haven't already, sign in to your Microsoft account.
-
Select the file you'd like to add to your course and choose Select.
-
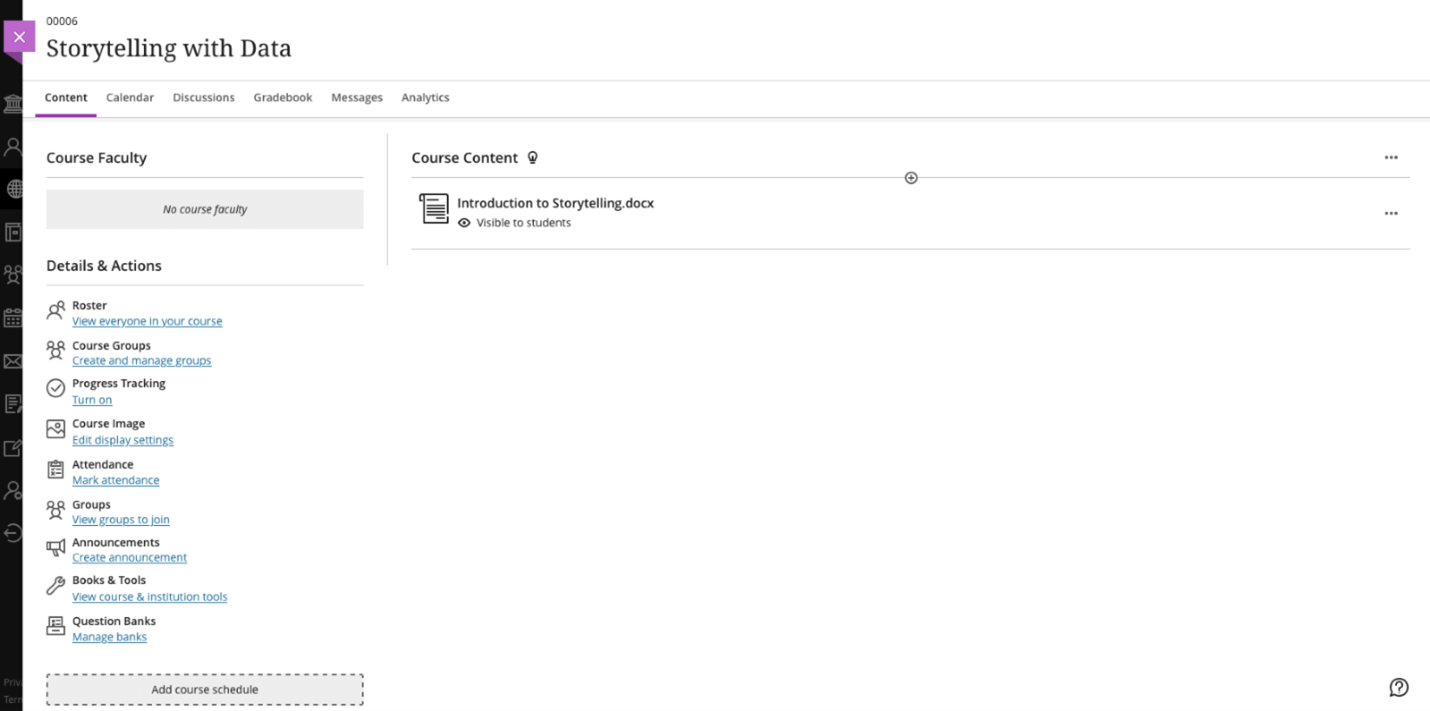
The file is now in the course content and you can open it from Blackboard.
Note: To start using OneDrive in Brightspace, your administrator needs to deploy OneDrive LTI for Brightspace LMS.
Embed Microsoft Office files into your course assignments as Attachments
You can embed files from your OneDrive into assignments providing a rich viewer experience for your students.
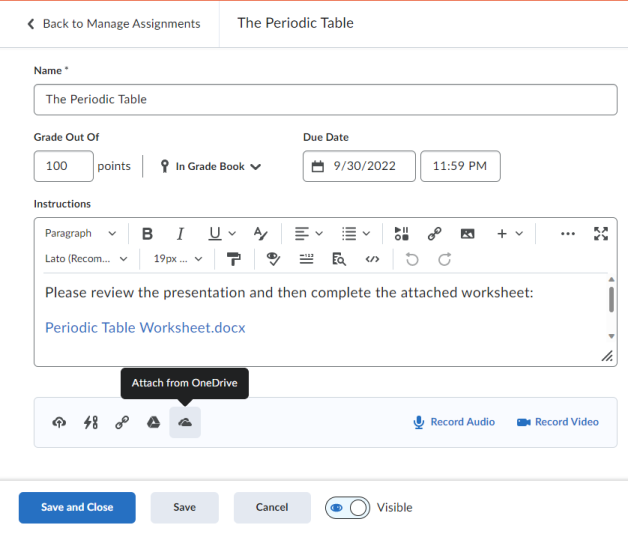
1) From the Brightspace course assignment editor, select the Attach from OneDrive icon on the Quicklink Bar.
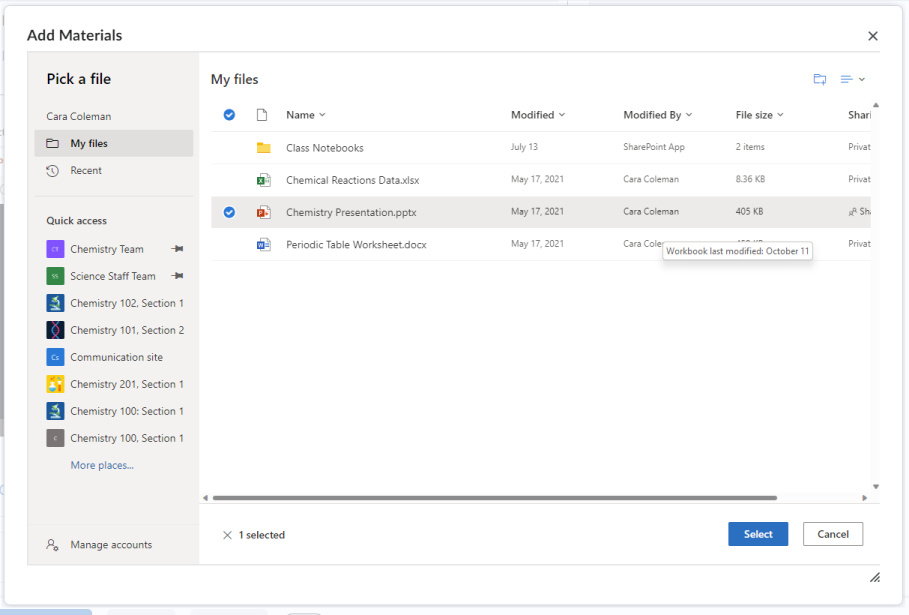
2) Choose the document, or video you wish to attach from the OneDrive File Picker, and then click Select.
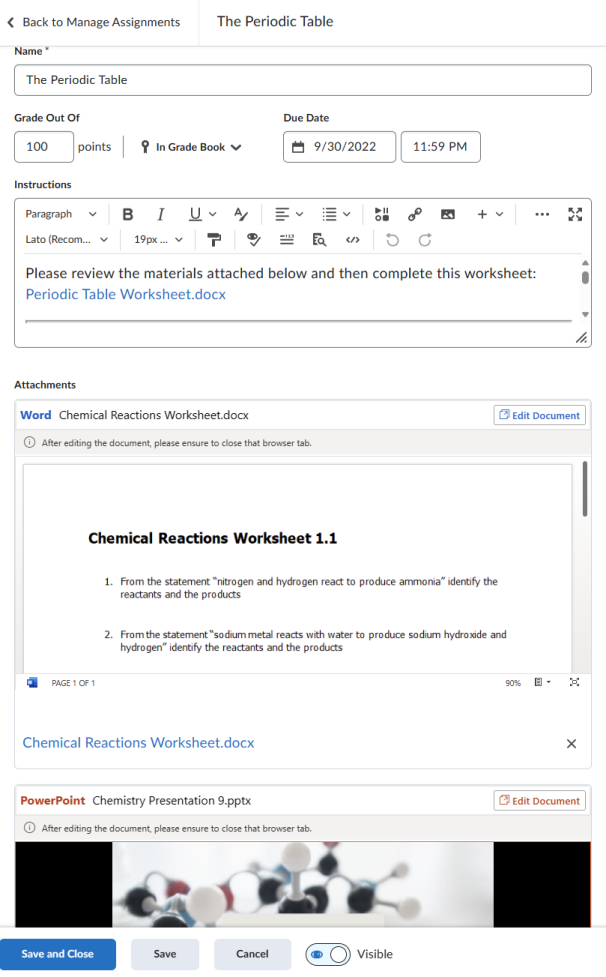
3) The document or video will appear embedded in the Attachments section. You can add as many attachments as you wish to an assignment. Educators can open and edit attached documents, while students can only open and view the document.
Add Microsoft Office file links to your content using the Quicklink button
You can use the Quicklink button in the Brightspace Editor to add OneDrive file links to course Content, Assignments, Announcements, Discussions and more.
1) From the Brightspace Editor, click the Quicklink button
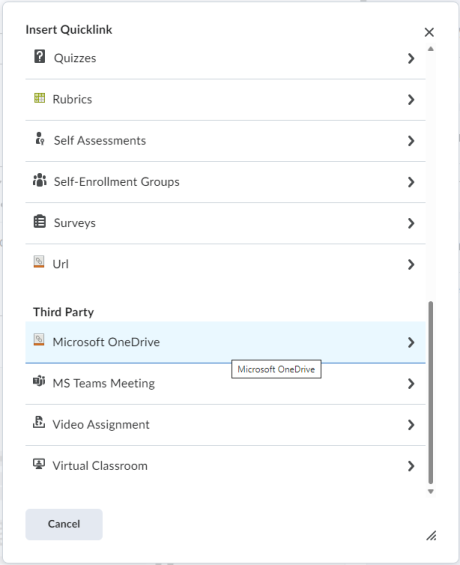
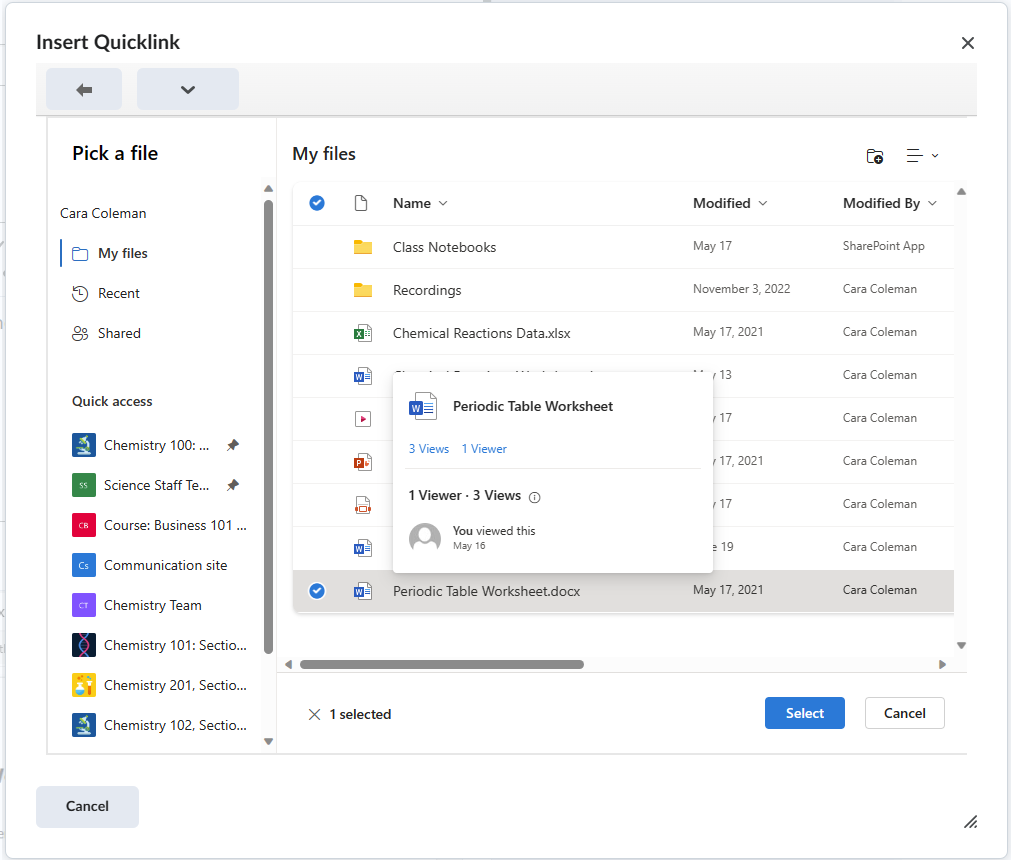
2) Select Microsoft OneDrive from the Insert Quicklink (Third Party) dialog.
3) Choose the document or video you wish to link in your content from the OneDrive File Picker, and then click Select.
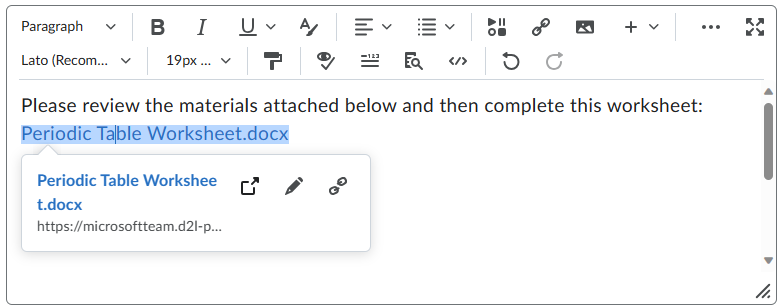
4) Your OneDrive document link will be inserted into your content in the editor. Educators can view or edit the document, while students can open and view the document by clicking the link.
Embed Microsoft Office files in your content using the Insert Stuff button
You can use the Insert Stuff button in the Brightspace Editor to link or embed OneDrive documents or video into course Content, Assignments, Announcements, Discussions and more.
1) From the Brightspace Editor, click the Insert Stuff button.
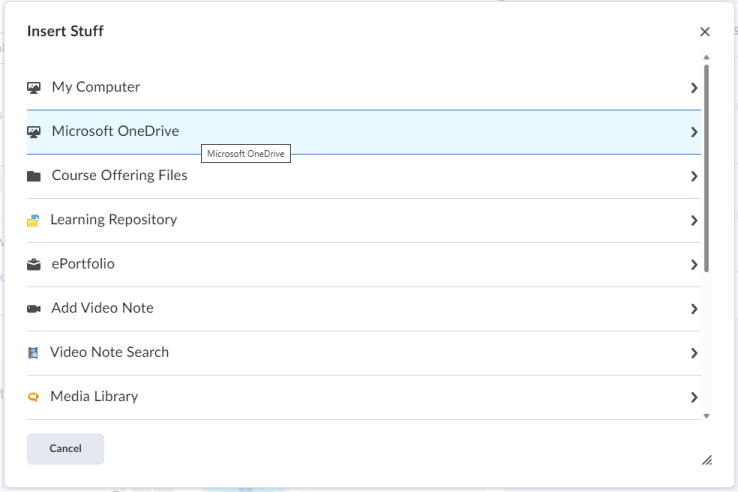
2) Select Microsoft OneDrive from the Insert Stuff dialog
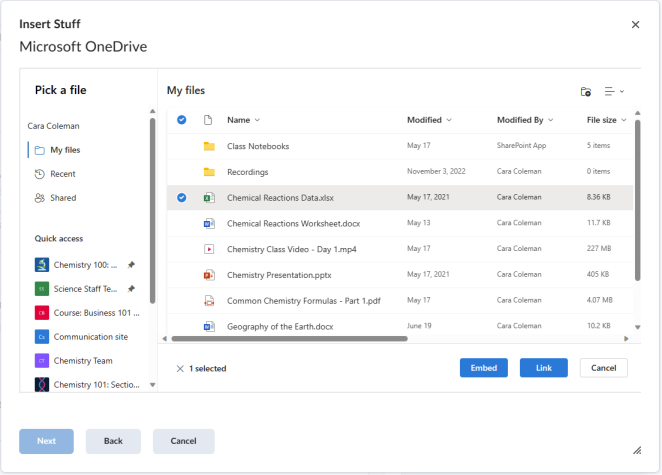
3) Choose the file you wish to link in your content from the OneDrive File Picker, and then click Embed.
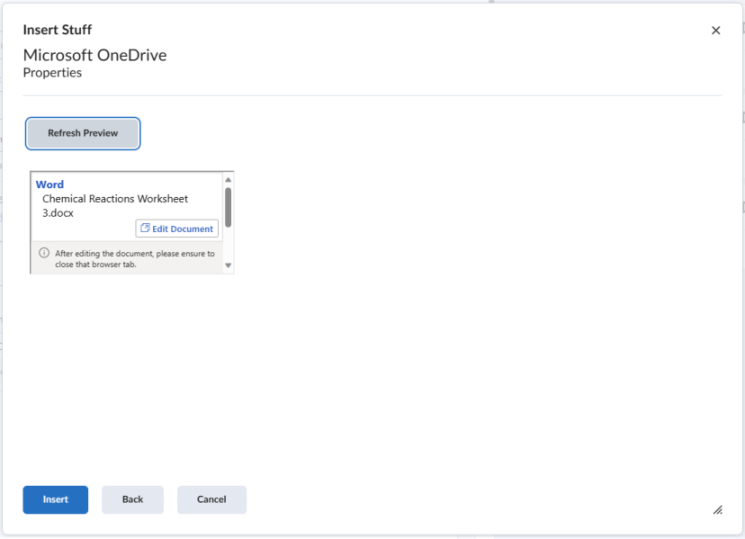
4) Confirm the file you want to embed in the Insert Stuff preview, and click Insert.
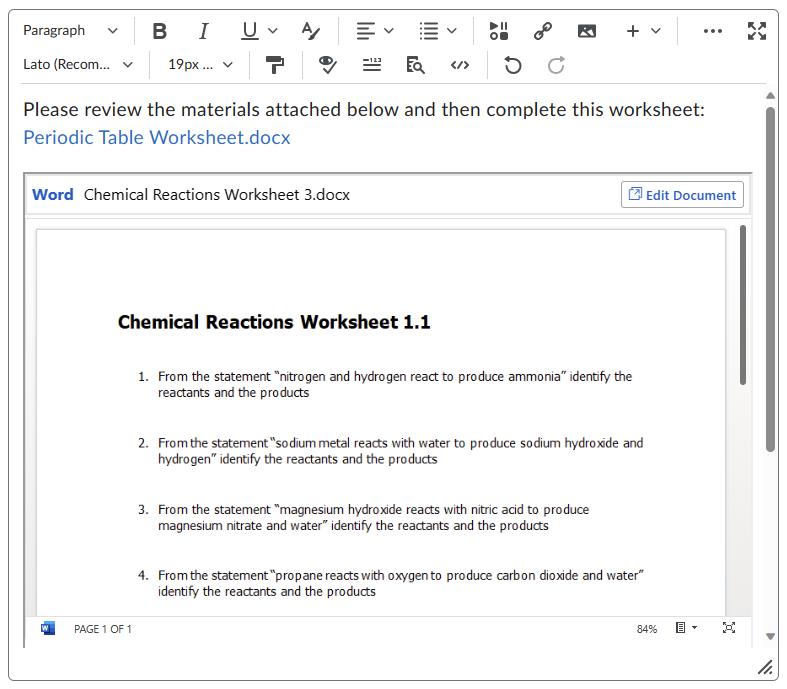
5) Your document will appear in the content editor as a preview. Educators can view and edit embedded documents, while students can only view the document.
Tips:
-
You may need to adjust the size of embedded Office Document frame in Brightspace Editor so that the document content is more visible and accessible to your audience.
-
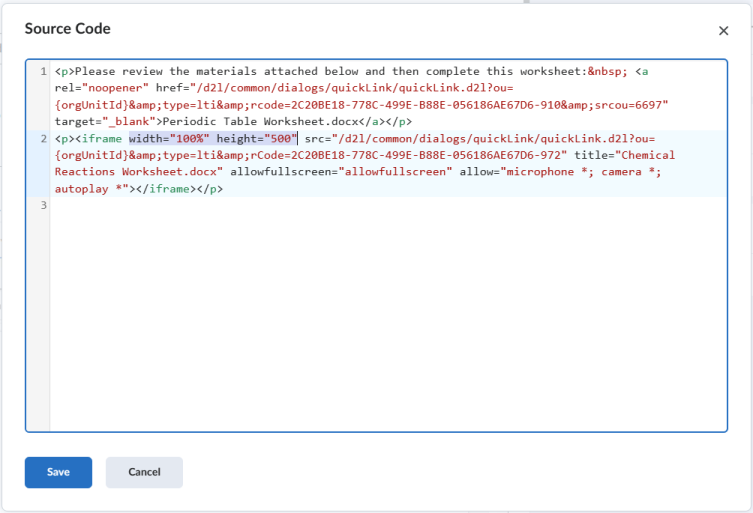
1) Click the Source Code button in the Editor menu bar (it may be in the ... menu)
-
-
2) Locate the <iframe> tag for the embedded document you want to size (the title property will have the name of the Office Document you selected to embed), and add width="" and height="" properties to in the tag. The width property can be either the number of pixels or percentage, while the height property works best as a number of pixels. In the example below, the width is set to 100% and the height is set to 500 pixels.
-
Important: To start using OneDrive in Schoology Learning, your administrator needs to deploy OneDrive LTI for Schoology Learning.
Embed Microsoft Office files into your Course Materials
You can embed M365 files from OneDrive or any of your Teams, SharePoint Sites into Course Materials providing a rich document viewer and editor experience for your students. Videos and PDF files can also be embedded directly as course materials from OneDrive.
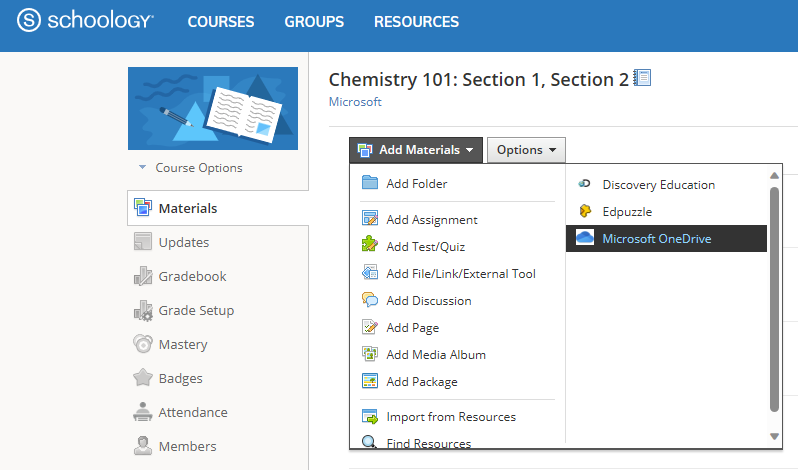
1) From the Materials list in a Course, select the Add Materials drop down menu, and choose the Microsoft OneDrive option.
2) Choose the file you wish to embed in your course from the OneDrive File Picker, and then click Select.
4) From the Course Materials list view, you can also select the Gear Icon dropdown on the left to edit additional properties of the item such as its title in the list, section assignment, or individual assignment.
Link or Embed Microsoft Office files into your Assignments, Pages, Discussions and other Course Materials
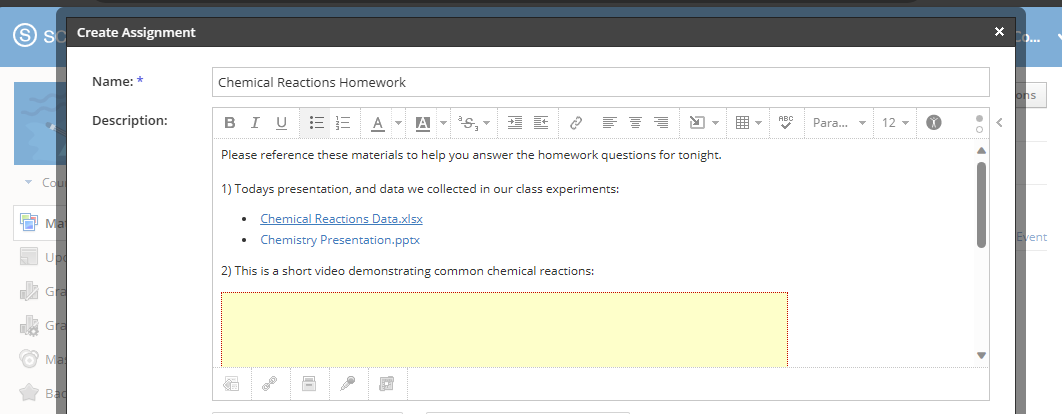
You can embed M365 files from OneDrive or any of your Teams, SharePoint Sites into Assignments, Pages, Discussions or anywhere you can access the Microsoft OneDrive tool in the Schoology Learning Rich Text Editor. This allows you to craft rich content including multiple document links or rich embedded document experiences for your students. Videos and PDF files can also be linked or embedded directly into the Schoology Learning Rich Text Editor.
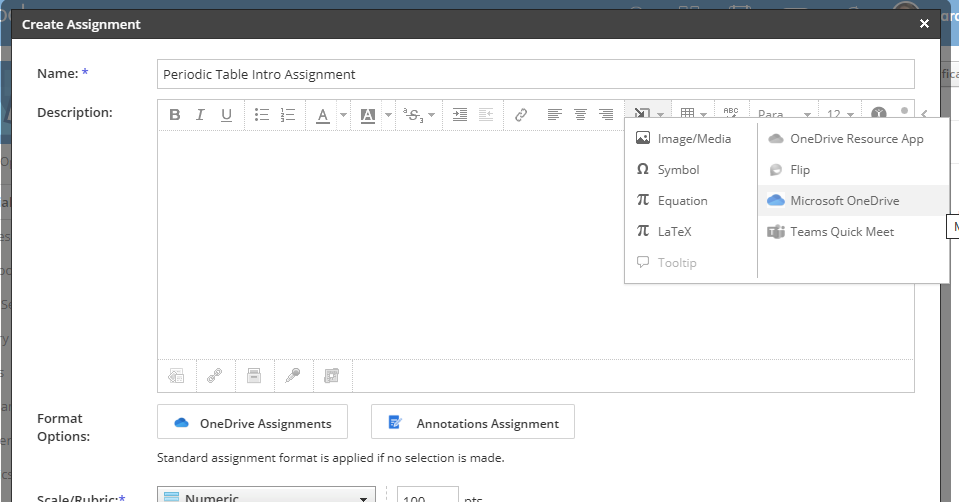
1) In the Schoology Learning Rich Text Editor, click the Insert Content button, and choose Microsoft OneDrive.
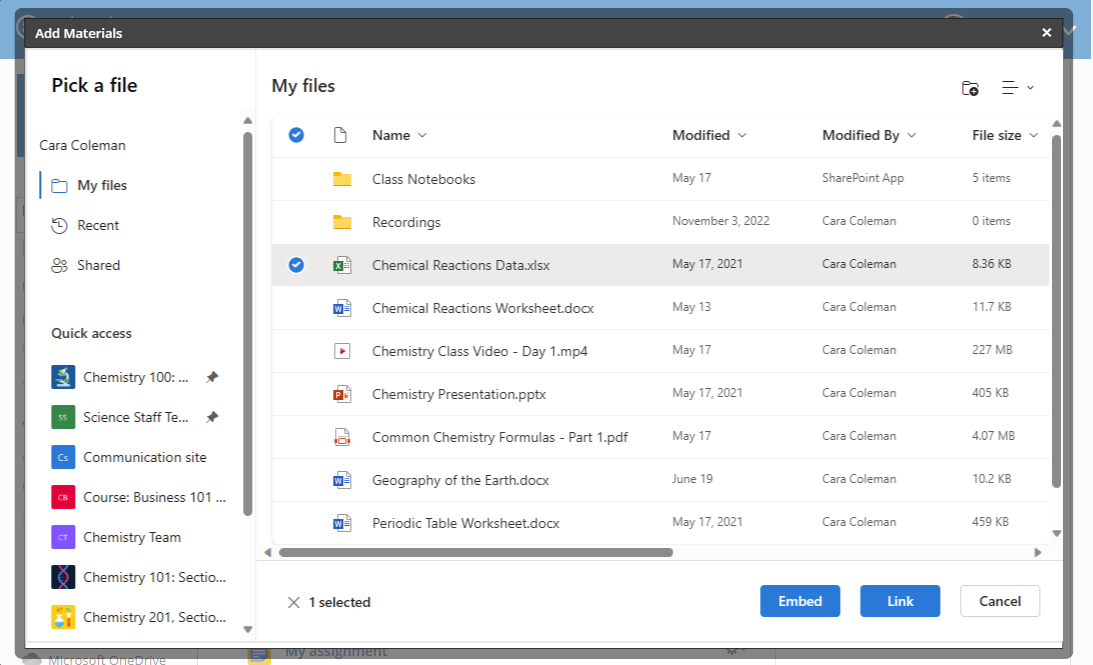
2) In the OneDrive File Picker, choose a file, and then click the Link or Embed button to add the file to the Rich Text Editor.
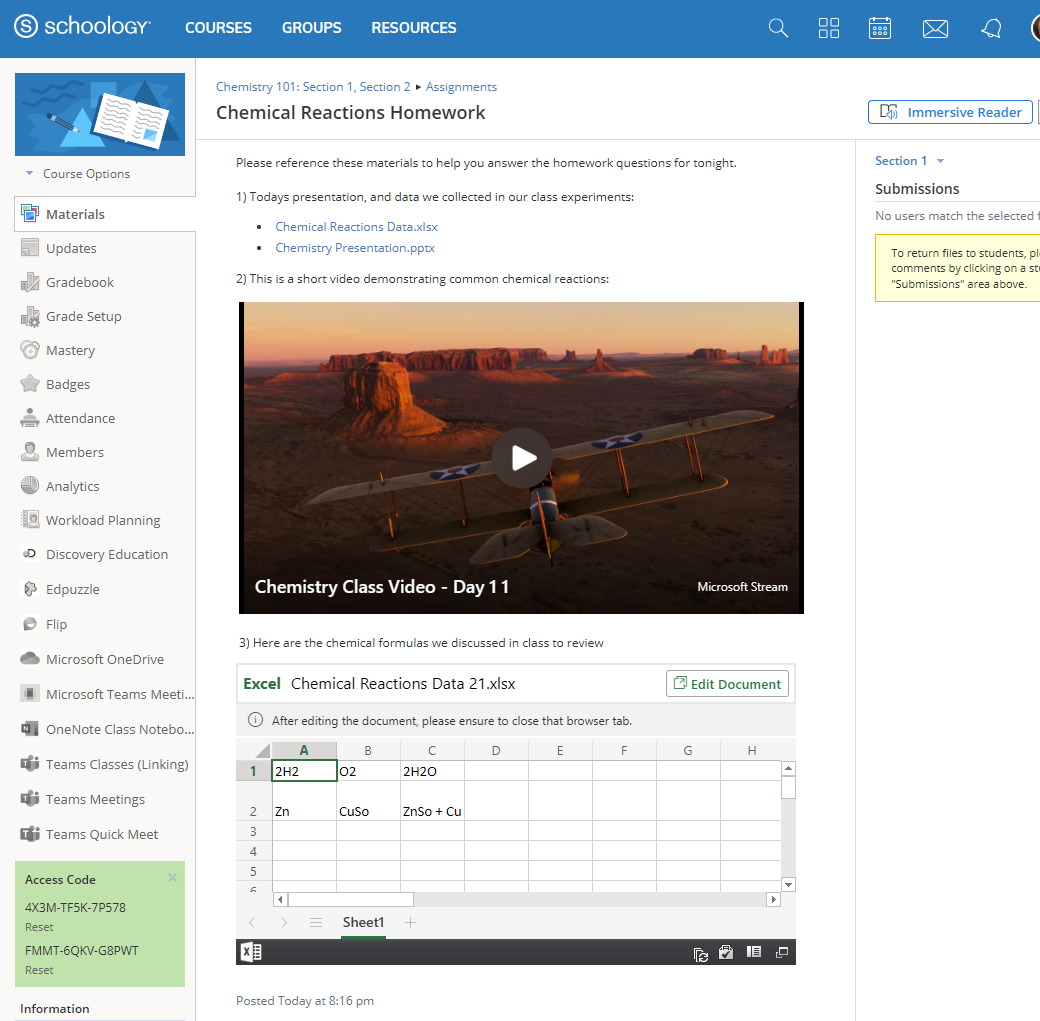
3) Your selected document will be linked or embeded in the editor at the current location of your cursor. You can link or embed multiple documents and use the Rich Text Editor to reposition or further format your content.
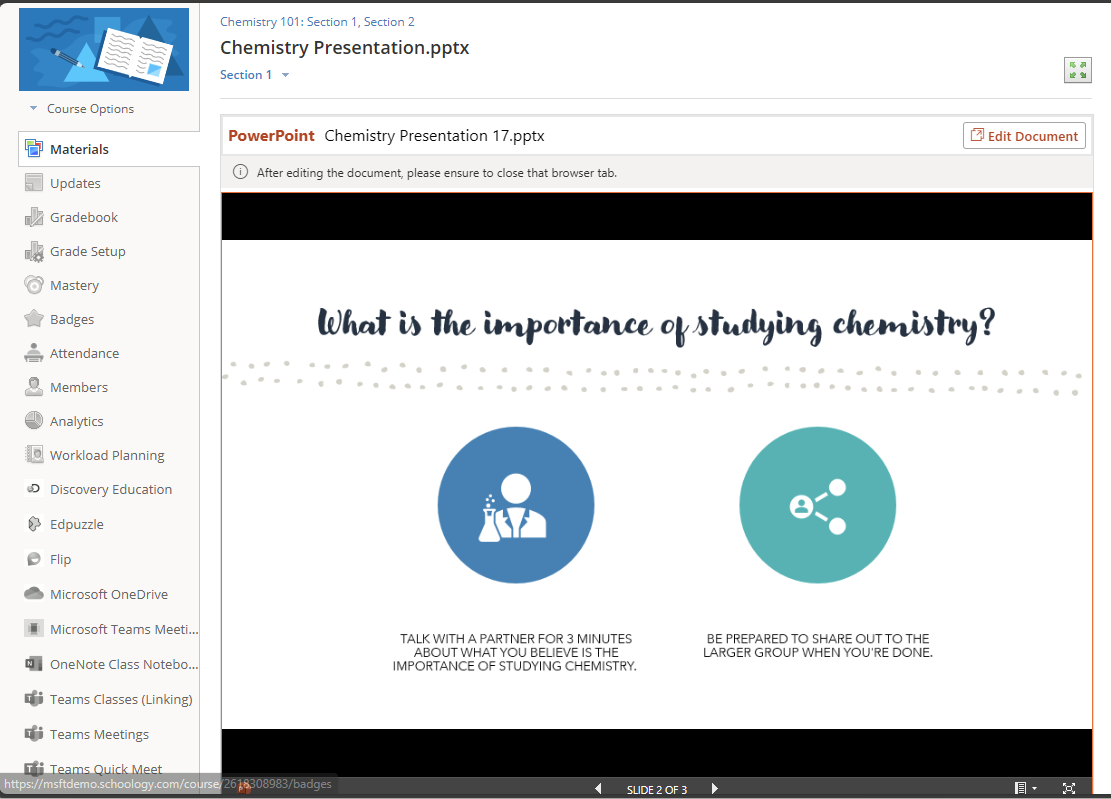
4) After saving your Assignment (or other item), you can preview and further edit your content in Schoology. (example shown below is an Assignment preview). Educators can view and edit embedded and linked documents, while students can only view the document.


