
Note
This method uses Developer tab check box content controls in Word for Windows (desktop).
After you insert a check box in a document, you can change the check box symbol from an X to a checkmark or other symbol, or make other changes, such as the color or size of the checkbox.
Change the check box symbol
- In your document, click the check box.
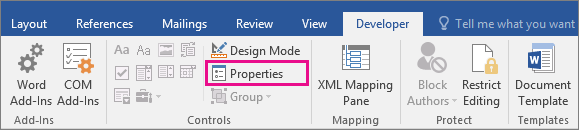
- On the Developer tab, click
 Properties.
- In the Content Control Properties dialog box, select Change next to Checked symbol.
- Select a character such as the
 check mark and click OK.
 - If you don’t see the symbol you’re looking for, try opening the Font dropdown and choosing a different font, such as Wingdings 2 or Segoe UI Symbol.
- Repeat the same steps for each check box.
Tip
If the developer tab isn't already visible, see Show the Developer tab.
Other check box changes you can make
In your document, select the check box.
On the Developer tab, click
Properties.
Do any of the following in the Content Control Properties box:
To display explanatory text above the check box when the mouse hovers over it, enter text in the Title box.
Select
 Color to have a color when the mouse hovers over it.
If you don't want the content control box displayed, select None in the Show as box. Note that text entered into the Title box won't be displayed.
To change size, color, or border style of the check box, select the Use a style to format text typed into the empty control box, and then click New Style.
- Select a font size for the check box under Formatting.
- Select a color in the Color list.
- Select Format > Border to select a different border.
Select OK.
Repeat the same steps for each check box.