Original publish date: September 9, 2025
KB ID: 5067315
Important:
-
An improvement was included in Windows updates released on and after October 28, 2025, that refined User Account Control (UAC) prompt requirements while still addressing the security vulnerability, CVE-2025-50173. This improvement addressed an issue that created unexpected UAC prompts for some apps, including Autodesk AutoCAD.
-
Before attempting the resolution steps included in this article, make sure you've installed the latest Windows updates and checked to see if the latest update resolves your issue.
|
Change date |
Description |
|---|---|
|
11/24/2025 |
Added information about Windows updates released on and after October 28, 2025, that resolve this issue for some apps, such as Autodesk AutoCAD. |
Symptoms
Beginning with the September 2024 Windows security update, Windows Installer (MSI) began requiring a User Account Control (UAC) prompt for your credentials when repairing an application. This requirement was further enforced in the August 2025 Windows security update to address the security vulnerability, CVE-2025-50173.
Due to the security hardening included in the August 2025 update, non-admin users might experience problems when running some apps:
-
Apps that initiate an MSI repair silently (without displaying user interface) would fail with an error message. For example, installing and running Office Professional Plus 2010 as a non-admin would fail with Error 1730 during the configuration process.
-
Non-admin users could receive unexpected User Account Control (UAC) prompts when MSI installers perform certain custom actions. These actions might include configuration or repair operations in the foreground or background, including during the initial installation of an application. These actions include:
-
Running MSI repair commands (such as msiexec /fu).
-
Installing an MSI file after a user signs into an app for the first time.
-
Running Windows Installer during Active Setup.
-
Deploying packages via Microsoft Configuration Manager (ConfigMgr) that rely on user-specific "advertising" configurations.
-
Enabling Secure Desktop.
-
Resolution
To address these issues, the September 2025 Windows security update (and later updates) reduces the scope for requiring UAC prompts for MSI repairs and enables IT admins to disable UAC prompts for specific apps by adding them to an allowlist.
After installing the September 2025 update, UAC prompts will only be required during MSI repair operations if the target MSI file contains an elevated custom action. This requirement is further refined after installing Windows updates released on and after October 28, 2025, so that UAC prompts will only be required if the elevated custom actions are executed during the repair flow. Therefore, installing the latest Windows updates will resolve this issue for apps that do not execute such elevated custom actions.
Since UAC prompts will still be required for apps that perform elevated custom actions during an MSI repair flow, after installing the September 2025 update, IT admins will have access to a workaround that can disable UAC prompts for specific apps by adding MSI files to an allowlist.
How to add apps to an allowlist to disable UAC prompts
Warning: Be aware that this opt-out method effectively removes this defense-in-depth security feature for those programs.
Important: This article contains information about how to modify the registry. Make sure that you back up the registry before you modify it. Make sure that you know how to restore the registry if a problem occurs. For more information about how to back up, restore, and modify the registry, see How to back up and restore the registry in Windows.
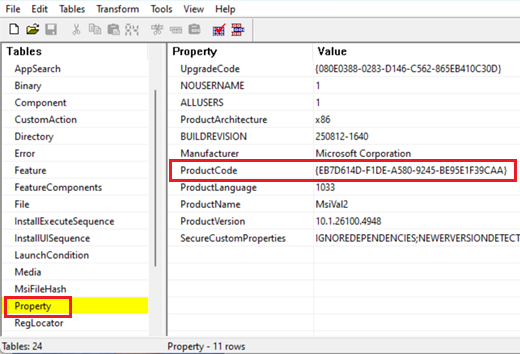
Before you start, you will need to obtain the product code of the MSI file you would like to add to the allowlist. You can do this by using the ORCA tool that is available in Windows SDK:
-
Download and install Windows SDK Components for Windows Installer Developers.
-
Navigate to C:\Program Files (x86)\Windows Kits\10\bin\10.0.26100.0\x86 and run Orca-x86_en-us.msi. This will install the ORCA tool (Orca.exe).
-
Run Orca.exe.
-
In the ORCA tool, use File > Open to browse to the MSI file you would like to add to the allowlist.
-
Once the MSI tables are open, click Property in the list on the left and note the ProductCode value.
-
Copy the ProductCode. You will need it later.
Once you have the product code, follow these steps to disable UAC prompts for that product:
-
In the Search box, type regedit, and select Registry Editor in the search results.
-
Locate and select the following subkey in the registry:
HKEY_LOCAL_MACHINE\SOFTWARE\Policies\Microsoft\Windows\Installer
-
On the Edit menu, point to New, and then select DWORD Value.
-
Type SecureRepairPolicy for the name of the DWORD, and then press Enter.
-
Right-click SecureRepairPolicy, and then select Modify.
-
In the Value data box, type 2, and select OK.
-
Locate and select the following subkey in the registry:
HKEY_LOCAL_MACHINE\SOFTWARE\Policies\Microsoft\Windows\Installer
-
On the Edit menu, point to New, and then click Key.
-
Type SecureRepairWhitelist for the name of the key, and then press Enter.
-
Double-click the SecureRepairWhitelist key to open it.
-
On the Edit menu, point to New, and then click String Value. Create String Values that contain the ProductCode you took note of earlier (including braces {}) of the MSI files you would like to add to the allowlist. The NAME of the String Value is the ProductCode and the VALUE can be left blank.


