You can organize a cluttered schedule by creating separate calendars, view shared calendars, or share your calendar with someone else.
Do any of the following:
Track two or more separate schedules in your own calendar
Keep your work and personal events separate by using two separate calendars in Outlook. Each calendar operates independently, but you can show the events from both calendars simultaneously.
Important: If you create a new calendar under your Exchange calendar, the new calendar will also sync with the Exchange server. However, if you create a meeting on the new Exchange calendar, responses to this meeting aren't counted.
-
In the left navigation pane, click Calendar
-
Right-click My Calendars and click New Folder.
-
Right-click the newly created calendar, which is named Untitled Folder, and click Rename Folder. Type a name for the new calendar, and press Enter.
-
Tips:
-
New events you create are saved in the calendar currently selected in the navigation pane.
-
To see or hide a calendar, simply select or clear the check box next to the calendar name.
-
To delete a calendar you created, right-click the calendar, and click Delete Folder.
-
Share your calendar with someone else
-
In the left navigation pane, click Calendar.
-
Right-click the Calendar and click Sharing Permissions.
-
Click the plus sign icon (+), type the name of the user, and select the user from the search results.
-
Click Add.
-
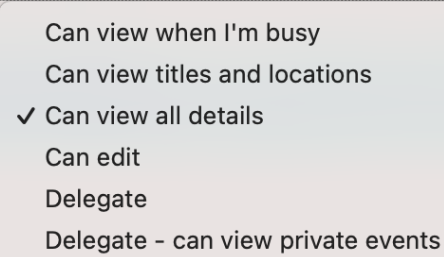
In the list, click the Permissions applied to the user you added, and then click the access level you want.
-
Click Done.
Note: When you delegate or share an address book, calendar, or mail folder, delegates or users who share those folders could view your private contacts, events, or e-mail messages by using other software applications. To help protect your privacy, put private items in a separate, non-shared address book, calendar, or mail folder.
View a calendar that someone has shared with you
Important: To open another person's calendar, both you and the other person must have Microsoft Exchange account and the account owner must grant you permission.
-
In the left navigation pane, click Calendar.
-
On the File menu, click Open > Shared Calendar.
-
Type the name of the person who granted you access, click the person's name, and then click Open.
-
Notes:
-
If you have a shared calendar selected in the navigation pane, new items you create are saved in that shared calendar.
-
To remove another user's shared calendar, right-click the calendar, and then click Remove.
-


