Insert or select a picture in your document.
On the Picture Format tab, select
 Transparency.
The gallery shows thumbnail-sized versions of seven preset transparency options for your picture (0%, 15%, 30%, 50%, 65%, 80% or 95%).
Select a preset option, or choose Picture Transparency Options to customize the transparency level in the Format Picture pane.
In the Format Picture pane when using Picture Transparency Options, drag the Transparency slider to decrease or increase the opacity of the picture, or set a percentage value in the box.
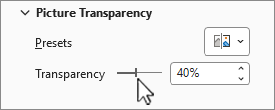
You can vary the percentage of transparency from 0 (fully opaque, the default setting) to 100% (fully transparent).
Note
If you don't see the Picture Format tab, be sure you have a picture selected.
- Insert or select a picture in your document.
- Select the Picture Format tab, and choose
Transparency.
A gallery of preset transparency options for the picture appears.
- Choose a preset option, or select Picture Transparency Options below the gallery for more detailed choices.
The Format Picture pane opens on the right side.
- In the Format Picture pane, drag the slider under Picture Transparency decrease or increase the opacity of the picture, or set a percentage value in the box.
You can vary the percentage of transparency from 0 (fully opaque, the default setting) to 100% (fully transparent).
Note
If you don't see the Picture Format tab, be sure you have a picture selected.
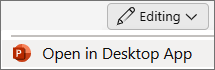
Setting picture transparency isn't currently possible in Microsoft 365 for the web. You can, however, set transparency in the desktop app.
- To open the desktop app, at the top of the ribbon, select
 Editing > Open in Desktop App.
Don't have the PowerPoint desktop app? Try or buy Microsoft 365.
See Also
Add a background or watermark to slides
Remove the background of a picture
Change the brightness, contrast, or sharpness of a picture
Change the color of a picture
Apply an artistic effect to a picture
