
Access databases can help you store and track almost any kind of information, such as inventory, contacts, or business processes. Let's walk through the ways you can create an Access desktop database, add data to it, and then learn about next steps for customizing and using your new database.
In this article
- Choose a template
- Create a database from scratch
- Add a table
- Copy and paste data
- Import or link to data
- Organize data with the Table Analyzer
- Next steps
Choose a template
Access templates have built-in tables, queries, forms, and reports that are ready to use. Templates are one of the first things that you see when you start Access, and you can search online for more templates.
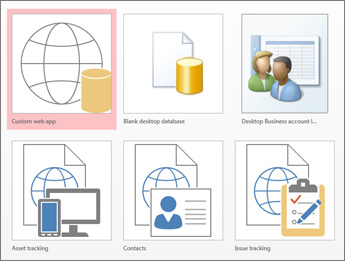
- In Access, select File > New.
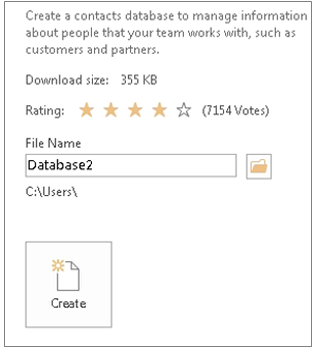
- Select a desktop database template, and then enter a name for your database under File Name. If you don't see a template that works for you, use the Search online templates box.
- You can use the default location that Access shows below the File Name box, or select the folder icon to choose one.
- Select Create.
Depending on the template, you might need to do one of the following to get started:
If Access displays a Login dialog box with an empty list of users:
- Select New User.
- Fill in the User Details form.
- Select Save & Close.
- Select the user name that you just entered, and then select Login.
If Access displays a Security Warning message in the message bar, and you trust the source of the template, select Enable Content. If the database requires a login, sign in again.
For more information, see Create an Access desktop database from a template.
Create a database from scratch
If none of the templates fit your needs, you can start with a blank desktop database.
- In Access, select New > Blank desktop database.
- Type a name for your database in the File Name box.
- You can use the default location that Access shows below the File Name box, or select the folder icon to choose one.
- Select Create.
Add a table
In a database, your information is stored in multiple related tables. To create a table:
When you open your database for the first time, you see a blank table in Datasheet view where you can add data. To add another table, select Create > Table. You can start entering data in the empty field (cell), or you can paste data from another source such as an Excel workbook.
To rename a column (field), double-click the column heading, and then type the new name.
Tip
Meaningful names help you know what each field contains without seeing its contents.
Select File > Save.
- To add more fields, type in the Click to Add column.
- To move a column, select it by clicking its column heading, and then drag it where you want it. You can also select adjacent columns and drag them together to a new location.
For more information, see Introduction to tables.
Copy and paste data
You can copy and paste data from another program such as Excel or Word into an Access table. This works best when the data is separated into columns. If the data is in a word processing program such as Word, use tags to separate the columns or convert the data into a table format before you copy it.
If the data needs editing, such as separating full names into first and last names, do that first in the source program.
Open the source and copy the data by pressing Ctrl+C.
Open the Access table where you want to add the data in Datasheet view, and then paste it by pressing Ctrl+V.
Double-click each column heading, and then type a meaningful name.
Select File > Save, and then give your new table a name.
Note
Access sets the data type of each field based on the information that you paste into the first row of each column, so make sure that the information in the following rows matches the first row.
Import or link to data
You can import data from other sources, or you can link to data from Access without moving the information from where it is stored. Linking can be a good option if multiple users update the data and you want to make sure that you're seeing the latest version, or if you want to save storage space. For most formats, you can choose whether to link to or import data. For more information, see Import or link to data in another Access database.
The process differs slightly depending on the data source, but these instructions will help you get started:
On the External Data tab, in the Import & Link group, select New Data Source, and then select the data format that you'll import from or link to from the listed submenu options.
Note
If you still can't find the right format, you might need to export the data first to a file format that Access supports, such as a delimited text file.
Follow the instructions in the Get External Data dialog box.
When you link, some formats are available as read-only. Here are the external sources that you can import data from or link to:
| Source | Import | Link |
|---|---|---|
| Excel | Yes | Yes (read-only) |
| Access | Yes | Yes |
| ODBC Databases, such as SQL Server | Yes | Yes |
| Text or comma-separated value (CSV) files | Yes | Yes (add new records only) |
| SharePoint List | Yes | Yes |
| XML | Yes | |
| Data Services | Yes (read-only) | |
| HTML Document | Yes | Yes |
| Outlook folder | Yes | Yes |
For more information, see Import or link to data in another Access database.
Organize data with the Table Analyzer
You can use the Table Analyzer Wizard to quickly identify redundant data. The wizard then provides a simple way to organize the data into separate tables. Access preserves the original table as a backup.
- Open the Access database that contains the table that you want to analyze.
- Select Database Tools > Analyze Table. The first two pages of the wizard contain a short tutorial with examples. If you see a check box labeled Show introductory pages?, select it, and then select Back twice to see the introduction. If you don't want to see the introductory pages again, clear Show introductory pages?.
For more information, see Normalize your data by using the Table Analyzer.
Next steps
The rest of the design process varies depending on what you want to do, but you will probably want to consider creating queries, forms, reports, and macros. These articles can help: