Sometimes you can work faster by leaving your fingers on the keyboard and not switching over to the mouse or touch pad. You probably already use shortcuts like Ctrl+C for Copy and Ctrl+S for Save, but you might not know a lot of the other shortcuts. Here they are:
In this article
Ribbon shortcuts
These shortcuts were introduced with the Publisher ribbon. Some tabs are contextual and appear only when you’ve inserted or selected an object such as a shape or a table. The double-letter shortcuts make it possible to use keyboard shortcuts with contextual tabs.
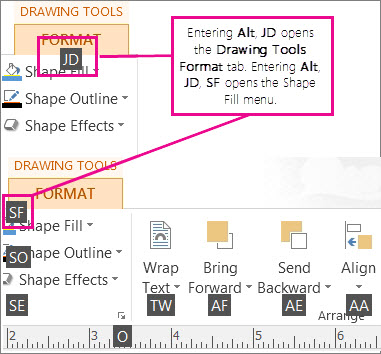
To use these, first selected the object, then press Alt, press the two letter context menu shortcut, and then press the remaining keys if any. For example to open the Shape Effects menu and add a shadow to a shape you select the shape, press Alt, JD to open the Drawing Tools – Format tab, SE to open the Shape Effects menu, S to select the Shadow Gallery, and then tab through the shadow options to apply the shadow to your shape.
Shape and Picture Effects
Shape effects
| To do this |
Press |
| Open the Shape Effects Menu |
Alt, JD, SE |
| Open the Shape Effects – Shadow Gallery |
Alt, JD, SE, S - then tab through options |
| Open the Shape Effects – Reflection Gallery |
Alt, JD, SE, R - then tab through options |
| Open the Shape Effects – Glow Gallery |
Alt, JD,SE,G- then tab through options |
| Open the Shape Effects – Soft Edges Gallery |
Alt, JD,SE,E - then tab through options |
| Open the Shape Effects – Bevel Gallery |
Alt, JD,SE,B - then tab through options |
| Open the Shape Effects – 3-D Rotation Gallery |
Alt, JD,SE,D - then tab through options |
| Open the Shape Styles Gallery |
Alt, JD,ST - then tab through options |
Picture effects
| To do this |
Press |
| Open the Picture Effects Menu |
Alt, JP,PE |
| Open the Picture Effects – Shadow Gallery |
Alt, JP,PE,S - then tab through options |
| Open the Picture Effects – Reflection Gallery |
Alt, JP,PE,R - then tab through options |
| Open the Picture Effects – Glow Gallery |
Alt, JP,PE,G - then tab through options |
| Open the Picture Effects – Soft Edges Gallery |
Alt, JP,PE,E - then tab through options |
| Open the Picture Effects – Bevel Gallery |
Alt, JP,PE,B - then tab through options |
| Open the Picture Effects – 3-D Rotation Gallery |
Alt, JP,PE,D - then tab through options |
| Open the Picture Styles Gallery |
Alt, JP,K - then tab through options |
| Clear Picture Style |
Alt, JP,K,C |
Text Effects
Text fill dropdown
| To do this |
Press |
| Open Text Fill Dropdown |
Alt, JX,TI |
| No Fill |
Alt, JX,TI,N - then tab through options |
| More Fill Colors… |
Alt, JX,TI,M - then tab through options |
| Fill Effects… |
Alt, JX,TI,F - then tab through options |
| Tints |
Alt, JX,TI,T - then tab through options |
| Sample Font Color |
Alt, JX,TI,S |
Text outline dropdown
| To do this |
Press |
| Open Text Outline Dropdown |
Alt ,JX,TO |
| No Outline |
Alt ,JX,TO,N |
| More Outline Colors… |
Alt, JX,TO,M - then tab through options |
| Outline Effects… |
Alt. JX.TO.O - then tab through options |
| Sample Line Color |
Alt, JX,TO,S - then tab through options |
| Weight |
Alt, JX,TO,W - then tab through options |
| Dashes |
Alt, JX,TO,D - then tab through options |
Text effects dropdown
| To do this |
Press |
| Open Text Effects Dropdown |
Alt, JX,TE |
| Shadow |
Alt, JX, TE,S - then tab through options |
| Reflection |
Alt, JX, TE,R - then tab through options |
| Glow |
Alt, JX, TE,G - then tab through options |
| Bevel |
Alt, JX, TE,B - then tab through options |
Top of Page
Create, open, close, or save a publication
Create, open, close a publication
| To do this |
Press |
| Open a new instance of Publisher |
CTRL+N |
| Display the Open Publication dialog box |
CTRL+O |
| Close the current publication |
CTRL+F4 or CTRL+W |
| Display the Save As dialog box |
CTRL+S |
Top of Page
Edit or format text or objects
Edit or format text
| To do this |
Press |
| Display the Find and Replace task pane, with the Find option selected |
F3 or CTRL+F or SHIFT+F4 |
| Display the Find and Replace task pane, with the Replace option selected |
CTRL+H |
| Check spelling |
F7 |
| Display the Thesaurus task pane |
SHIFT+F7 |
| Display the Research task pane |
ALT + click a word |
| Select all the text (If the cursor is in a text box, this selects all text in the current story; if the cursor is not in a text box, this selects all the objects on a page.) |
CTRL+A |
| Make text bold |
CTRL+B |
| Italicize text |
CTRL+I |
| Underline text |
CTRL+U |
| Make text small capital letters, or return small capital letters to upper and lower case |
CTRL+SHIFT+K |
| Open the Font dialog |
CTRL+SHIFT+F |
| Copy formatting |
CTRL+SHIFT+C |
| Paste formatting |
CTRL+SHIFT+V |
| Turn Special Characters on or off |
CTRL+SHIFT+Y |
| Return character formatting to the current text style |
CTRL+SPACEBAR |
| Apply or remove subscript formatting |
CTRL+= |
| Apply or remove superscript formatting |
CTRL+SHIFT+= |
| Increase space between letters in a word (kerning) |
CTRL+SHIFT+] |
| Decrease space between letters in a word (kerning) |
CTRL+SHIFT+[ |
| Increase font size by 1.0 point |
CTRL+] |
| Decrease font size by 1.0 point |
CTRL+[ |
| Increase to the next size in the Font Size box |
CTRL+SHIFT+> |
| Decrease to the next size in the Font Size box |
CTRL+SHIFT+< |
| Center a paragraph |
CTRL+E |
| Align a paragraph on the left |
CTRL+L |
| Align a paragraph on the right |
CTRL+R |
| Align a paragraph on both sides (justified) |
CTRL+J |
| Distribute a paragraph evenly horizontally |
CTRL+SHIFT+D |
| Set newspaper alignment for a paragraph (East Asian languages only) |
CTRL+SHIFT+J |
| Display the Hyphenation dialog box |
CTRL+SHIFT+H |
| Insert the current time |
ALT+SHIFT+T |
| Insert the current date |
ALT+SHIFT+D |
| Insert the current page number |
ALT+SHIFT+P |
| Prevent the word from getting hyphenated if it occurs at the end of a line |
CTRL+SHIFT+0 (zero) |
Copy text formats
| To do this |
Press |
| Copy formatting from the selected text |
CTRL+SHIFT+C |
| Apply copied formatting to text |
CTRL+SHIFT+V |
Copy, cut, paste or delete text or objects
| To do this |
Press |
| Copy the selected text or object |
CTRL+C or CTRL+INSERT |
| Cut the selected text or object |
CTRL+X or SHIFT+DELETE |
| Paste text or an object |
CTRL+V or SHIFT+INSERT |
| Delete the selected object |
DELETE or CTRL+SHIFT+X |
Undo or redo an action
| To do this |
Press |
| Undo what you last did |
CTRL+Z or ALT+BACKSPACE |
| Redo what you last did |
CTRL+Y or F4 |
Nudge an object
| To do this |
Press |
| Nudge a selected object up, down, left, or right |
Arrow keys |
| If the selected object has a cursor in its text, nudge the selected object up, down, left, or right |
ALT+arrow keys |
Layer objects
| To do this |
Press |
| Bring object to front |
ALT+F6 |
| Send object to back |
ALT+SHIFT+F6 |
Snap objects
| To do this |
Press |
| Turn Snap to Guides on or off |
F10, SHIFT+R, SHIFT+S, SHIFT+M |
Select or group objects
| To do this |
Press |
| Select all objects on the page (If your cursor is in a text box, this selects all the text in a story) |
CTRL+A |
| Group selected objects, or ungroup grouped objects |
CTRL+SHIFT+G |
| Clear the selection from selected text |
ESC |
| Clear the selection from a selected object |
ESC |
| Select the object within the group — if that object contains selected text |
ESC |
Top of Page
Work with pages
Select or insert pages
If your publication is in Two-Page Spread view, these commands apply to the selected two-page spread. Otherwise, these apply only to the selected page.
| To do this |
Press |
| Display the Go To Page dialog box |
F5 or CTRL+G |
| Insert a page or a two-page spread. If you are creating a newsletter, it opens the Insert publication type Pages dialog box |
CTRL+SHIFT+N |
| Insert duplicate page after the selected page |
CTRL+SHIFT+U |
Move between pages
| To do this |
Press |
| Display the Go To Page dialog box. |
F5 or CTRL+G |
| Go to the next page |
CTRL+PAGE DOWN |
| Go to the previous page |
CTRL+PAGE UP |
| Switch between the current page and the master page |
CTRL+M |
Use the master page
| To do this |
Press |
| Switch between the current page and the master page. |
CTRL+M |
Show or hide boundaries or guides
| To do this |
Press |
| Turn Boundaries on or off. |
CTRL+SHIFT+O |
| Turn Horizontal Baseline Guides on or off (not available in web view) |
CTRL+F7 |
| Turn Vertical Baseline Guides on or off (East Asian languages only—not available in web view) |
CTRL+SHIFT+F7 |
Zoom
| To do this |
Press |
| Switch between the current view and the actual size |
F9 |
| Zoom to full page view |
CTRL+SHIFT+L |
Top of Page
Printing
Using Print Preview
These keyboard shortcuts are available when you're in Print view and affect the print preview pane.
| To do this |
Press |
| Switch between the current view and the actual size |
F9 |
| Scroll up or down |
UP ARROW or DOWN ARROW |
| Scroll left or right |
LEFT ARROW or RIGHT ARROW |
| Scroll up in large increments |
PAGE UP or CTRL+UP ARROW |
| Scroll down in large increments |
PAGE DOWN or CTRL+DOWN ARROW |
| Scroll left in large increments |
CTRL+LEFT ARROW |
| Scroll right in large increments |
CTRL+RIGHT ARROW |
| Scroll to the upper left corner of the page |
HOME |
| Scroll to the lower right corner of the page |
END |
| Display the Go To Page dialog box |
F5 or CTRL+G |
| Go to the previous page |
CTRL+PAGE UP |
| Go to the next page |
CTRL+PAGE DOWN |
| Go to the next window (if you have multiple publications open) |
CTRL+F6 |
| Exit Print Preview and display the Print view |
CTRL+P |
| Exit Print Preview |
ESC |
Print a publication
| To do this |
Press |
| Open the Print dialog view. |
CTRL+P |
Top of Page
Work with web pages and email
Insert hyperlinks
| To do this |
Press |
| Display the Insert Hyperlink dialog box (make sure your cursor is in a text box) |
CTRL+K |
Send e-mail
After you choose Send as Message (File > Share > Email), you can use the following keyboard shortcuts.
Important
Outlook needs to be open before you can send email messages. If Outlook isn't open, the message will be stored in your Outbox folder.
| To do this |
Press |
| Send the current page or publication |
ALT+S |
| Open the Address Book (cursor must be in the message header) |
CTRL+SHIFT+B |
| Open the Design Checker (cursor must be in the message header) |
ALT+K |
| Check the names on the To, Cc, and Bcc lines (cursor must be in the message header) |
CTRL+K |
| Open the Address Book with the To box selected (cursor must be in the message header) |
ALT+. (period) |
| Open the Address Book with the Cc box selected (cursor must be in the message header) |
ALT+C |
| Open the Address Book with the Bcc box selected (cursor must be in the message header and the Bcc field must be visible) |
ALT+B |
| Go to the Subject box |
ALT+J |
| Open the Outlook Message Options dialog box |
ALT+P |
| Open the Custom dialog box to create an email message flag (cursor must be in the email message header) |
CTRL+SHIFT+G |
| Move the cursor to the next field in the email message header (cursor must be in the email message header) |
TAB |
| Move the cursor to the previous field in the email message header |
SHIFT+TAB |
| Alternate between the insertion point in the email message header and the Send button in the Mailing toolbar |
CTRL+TAB |
| Open the Address Book when the cursor is in the e-mail message header |
CTRL+SHIFT+B |
Top of Page
Automate tasks
Work with macros
| To do this |
Press |
| Display the Macros dialog box. |
ALT+F8 |
Work with Visual Basic
| To do this |
Press |
| Display the Visual Basic editor |
ALT+F11 |
Top of Page
