
To import and export XML data in Excel, use an XML map that associates XML elements with data in cells. This association helps you get the results you want. To create an XML map, you need an XML schema file (.xsd) and an XML data file (.xml). After creating the XML map, you can map XML elements the way you want.
Tip
For more information about using XML with Excel, see the overview of XML in Excel.
- Locate or create XML schema and XML data files
- Use sample XML schema and XML data files
- Create an XML Map
- Map XML elements
Note
Excel for Windows desktop is the only version that offers XML mapping features. These tools aren't available in Excel for Mac or Excel for the web.
XML maps are a legacy feature. For many scenarios, use Power Query in Excel to import and transform XML data, especially for complex or nested XML structures.
Locate or create XML schema and XML data files
If another database or application created an XML schema or XML data file, you might already have them available. For example, you might have a line-of-business application that exports data into these XML file formats, a commercial web site or web service that supplies these XML files, or a custom application developed by your IT department that automatically creates these XML files.
If you don't have the necessary XML files, you can create them by saving the data you want to use as a text file. You can then use both Access and Excel to convert that text file to the XML files you need. Here's how:
Access
Import the text file you want to convert and link it to a new table.
- Select File > Open.
- In the Open dialog box, select and open the database in which you want to create a new table.
- Select External Data > Text File, and follow the instructions for each step, making sure that you link the table to the text file.
Access creates the new table and displays it in the Navigation Pane.
Export the data from the linked table to an XML data file and an XML schema file.
- Select External Data > More > XML File (in the Export group).
- In the Export - XML File dialog box, specify the file name and format, and select OK.
Exit Access.
Excel
- Create an XML Map based on the XML schema file you exported from Access.
If the Multiple Roots dialog box appears, make sure you choose dataroot so you can create an XML table. - Create an XML table by mapping the dataroot element. See Map XML elements for more information.
- Import the XML file you exported from Access.
Alternatively, you can use Power Query to import XML data directly without creating an XML schema file.
Note
- There are several types of XML schema element constructs Excel doesn't support. The following XML schema element constructs can't be imported into Excel:
- <any> This element allows you to include elements that aren't declared by the schema.
- <anyAttribute> This element allows you to include attributes that aren't declared by the schema.
- Recursive structures A common example of a recursive structure is a hierarchy of employees and managers in which the same XML elements are nested several levels. Excel doesn't support recursive structures more than one level deep.
- Abstract elements These elements are meant to be declared in the schema, but never used as elements. Abstract elements depend on other elements being substituted for the abstract element.
- Substitution groups These groups allow an element to be swapped wherever another element is referenced. An element indicates it's a member of another element's substitution group through the <substitutionGroup> attribute.
- Mixed content This content is declared by using mixed="true" on a complex type definition. Excel doesn't support the simple content of the complex type but does support the child tags and attributes defined in that complex type.
Use sample XML schema and XML data files
The following sample data includes basic XML elements and structures you can use to test XML mapping if you don't have XML files or text files to create the XML files. Here's how you can save this sample data to files on your computer:
- Select the sample text of the file you want to copy, and press Ctrl+C.
- Start Notepad, and press Ctrl+V to paste the sample text.
- Press Ctrl+S to save the file with the file name and extension of the sample data you copied.
- Press Ctrl+N in Notepad and repeat steps 1-3 to create a file for the second sample text.
- Exit Notepad.
Sample XML data (Expenses.xml)
<?xml version="1.0" encoding="UTF-8" standalone="no" ?>
<Root>
  <EmployeeInfo>
    <Name>Jane Winston</Name>
    <Date>2001-01-01</Date>
    <Code>0001</Code>
  </EmployeeInfo>
  <ExpenseItem>
    <Date>2001-01-01</Date>
    <Description>Airfare</Description>
    <Amount>500.34</Amount>
  </ExpenseItem>
  <ExpenseItem>
    <Date>2001-01-01</Date>
    <Description>Hotel</Description>
    <Amount>200</Amount>
  </ExpenseItem>
  <ExpenseItem>
    <Date>2001-01-01</Date>
    <Description>Taxi Fare</Description>
    <Amount>100.00</Amount>
  </ExpenseItem>
  <ExpenseItem>
    <Date>2001-01-01</Date>
    <Description>Long Distance Phone Charges</Description>
    <Amount>57.89</Amount>
  </ExpenseItem>
  <ExpenseItem>
    <Date>2001-01-01</Date>
    <Description>Food</Description>
    <Amount>82.19</Amount>
  </ExpenseItem>
  <ExpenseItem>
    <Date>2001-01-02</Date>
    <Description>Food</Description>
    <Amount>17.89</Amount>
  </ExpenseItem>
  <ExpenseItem>
    <Date>2001-01-02</Date>
    <Description>Personal Items</Description>
    <Amount>32.54</Amount>
  </ExpenseItem>
  <ExpenseItem>
    <Date>2001-01-03</Date>
    <Description>Taxi Fare</Description>
    <Amount>75.00</Amount>
  </ExpenseItem>
  <ExpenseItem>
    <Date>2001-01-03</Date>
    <Description>Food</Description>
    <Amount>36.45</Amount>
  </ExpenseItem>
  <ExpenseItem>
    <Date>2001-01-03</Date>
    <Description>New Suit</Description>
    <Amount>750.00</Amount>
  </ExpenseItem>
</Root>
Sample XML schema (Expenses.xsd)
<?xml version="1.0" encoding="UTF-8" standalone="no" ?>
<xsd:schema xmlns:xsd="http://www.w3.org/2001/XMLSchema">
  <xsd:element name="Root">
    <xsd:complexType>
      <xsd:sequence>
        <xsd:element minOccurs="0" maxOccurs="1" name="EmployeeInfo">
          <xsd:complexType>
            <xsd:all>
              <xsd:element minOccurs="0" maxOccurs="1" name="Name" />
              <xsd:element minOccurs="0" maxOccurs="1" name="Date" />
              <xsd:element minOccurs="0" maxOccurs="1" name="Code" />
            </xsd:all>
          </xsd:complexType>
        </xsd:element>
        <xsd:element minOccurs="0" maxOccurs="unbounded" name="ExpenseItem">
          <xsd:complexType>
            <xsd:sequence>
              <xsd:element name="Date" type="xsd:date"/>
              <xsd:element name="Description" type="xsd:string"/>
              <xsd:element name="Amount" type="xsd:decimal" />
            </xsd:sequence>
          </xsd:complexType>
        </xsd:element>
      </xsd:sequence>
    </xsd:complexType>
  </xsd:element>
</xsd:schema>
Create an XML map
Create an XML map by adding an XML schema to a workbook. You can copy the schema from an XML schema file (.xsd), or Excel can try to infer one from an XML data file (.xml).
Select Developer > Source.
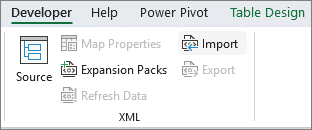
If you don't see the Developer tab, see Show the Developer tab.In the XML Source task pane, select XML Maps, and then select Add.
In the Look in list, select the drive, folder, or Internet location that contains the file you want to open.
Select the file, and then select Open.
- For an XML schema file, Excel creates an XML map based on the XML schema. If the Multiple Roots dialog box appears, choose one of the root nodes defined in the XML schema file.
- For an XML data file, Excel tries to infer the XML schema from the XML data, and then creates an XML map.
Select OK.
The XML map appears in the XML Source task pane.
Map XML elements
Map XML elements to single-mapped cells and repeating cells in XML tables so you can create a relationship between the cell and the XML data element in the XML schema.
Select Developer > Source.
If you don't see the Developer tab, see Show the Developer tab.In the XML Source task pane, select the elements you want to map.
To select nonadjacent elements, select one element, and then hold down Ctrl and select each element you want to map.To map the elements, complete the following steps:
Right-click the selected elements, and select Map element.
In the Map XML elements dialog box, select a cell and select OK.
Tip
You can also drag the selected elements to the worksheet location where you want them to appear.
Each element appears in bold type in the XML Source task pane to indicate the element is mapped.
Decide how you want handle labels and column headings:
When you drag a nonrepeating XML element onto the worksheet to create a single-mapped cell, a smart tag with three commands is displayed, which you can use to control the placement of the heading or label:
My Data Already Has a Heading Select this option to ignore the XML element heading, because the cell already has a heading (to the left of the data or above the data).
Place XML Heading to the Left Select this option to use the XML element heading as the cell label (to the left of the data).
Place XML Heading Above Select this option to use the XML element heading as the cell heading (above the data).When you drag a repeating XML element onto the worksheet to create repeating cells in an XML table, the XML element names are automatically used as column headings for the table. However, you can change the column headings to any headings that you want by editing the column header cells.
In the XML Source task pane, select Options to further control XML table behavior:
Automatically Merge Elements When Mapping When this check box is selected, Excel automatically expands XML tables when you drag an element to a cell adjacent to the XML table.
My Data Has Headings When this check box is selected, existing data can be used as column headings when you map repeating elements to your worksheet.Note
- If all XML commands are dimmed, and you can't map XML elements to any cells, the workbook might be shared. Select Review > Share Workbook to verify that and to remove it from shared use as needed.
If you want to map XML elements in a workbook you want to share, map the XML elements to the cells you want, import the XML data, remove all of the XML maps, and then share the workbook. > - If you can't copy an XML table that contains data to another workbook, the XML table might have an associated XML Map that defines the data structure. This XML Map is stored in the workbook, but when you copy the XML table to a new workbook, the XML Map isn't automatically included. Instead of copying the XML table, Excel creates an Excel table that contains the same data. If you want the new table to be an XML table, complete the following steps: > 1. Add an XML Map to the new workbook by using the .xml or .xsd file you used to create the original XML Map. You should save these files if you want to add XML Maps to other workbooks. > 1. Map the XML elements to the table to make it an XML table. > > - When you map a repeating XML element to a merged cell, Excel unmerges the cell. This is expected behavior, because repeating elements are designed to work with unmerged cells only.
You can map single, nonrepeating XML elements to a merged cell, but mapping a repeating XML element (or an element that contains a repeating element) to a merged cell isn't allowed. The cell is unmerged, and the element is mapped to the cell where the pointer is located.
Tip
- You can unmap XML elements you don't want to use, or to prevent the contents of cells from being overwritten when you import XML data. For example, you could temporarily unmap an XML element from a single cell or repeating cells that have formulas you don't want to overwrite when you import an XML file. When the import is complete, you can map the XML element to the formula cells again, so you can export the results of the formulas to the XML data file.
- To unmap XML elements, right-click their name in the XML Source task pane, and select Remove element.
Show the Developer tab
If you don't see the Developer tab, follow these steps to display it:
- Select File > Options.
- Select the Customize Ribbon category.
- Under Main Tabs, check the Developer box, and select OK.
See also
Delete XML map information from a workbook