
When you enable an add-in, it adds custom commands and new features to Microsoft 365 programs that help increase your productivity. Because add-ins can be used by attackers to do harm to your computer, you can use add-in security settings to help protect yourself.
Note: This article only applies to Microsoft 365 applications running on Windows.
View installed add-ins
-
Select File > Get Add-ins.
Alternatively, you can also view your add-ins directly from the Home tab by selecting Add-ins.

-
You can directly install add-ins from this page or select More Add-ins to explore.
-
In the Office Add-ins dialog, select My Add-ins tab.
-
Select an add-in you want to view the details for and right-click to select Add-in details option.
Click a heading below for more information.
-
Active Application Add-ins Add-ins registered and currently running on your Microsoft 365 program.
-
Inactive Application Add-ins These are present on your computer but not currently loaded. For example, XML schemas are active when the document that refers to them is open. Another example is the COM add-in: if a COM add-in is selected, the add-in is active. If the check box is cleared, the add-in is inactive.
-
Document Related Add-ins Template files referred to by open documents.
-
Disabled Application Add-ins These add-ins are automatically disabled because they are causing Microsoft 365 programs to crash.
-
Add-in The title of the add-in.
-
Publisher The software developer or organization responsible for creating the add-in.
-
Compatibility Look here for any compatibility issues.
-
Location This file path indicates where the add-in is installed on your computer.
-
Description This text explains the add-in function.
Note: Microsoft Outlook has one add-in option in the Trust Center: Apply macro security settings to installed add-ins. InfoPath has no security settings for add-ins.
To disable or remove an add-in follow these steps:
-
Select File > Get Add-ins.
Alternatively, you can select Home > Add-ins. -
You can directly install add-ins from this page or select More Add-ins to explore.
-
In the Office Add-ins dialog, select My Add-ins tab.
-
Select an add-in you want to remove and right click to select Remove option.
You can see and change add-in settings in the Trust Center, descriptions of which are in the following section. Add-in security settings may have been determined by your organization so not all options may be available to change.
-
Select File > Get Add-ins.
-
Select More Add-ins>Manage My Add-ins.
-
Select Trust Center > Trust Center Settings > Add-ins.
-
Check or uncheck the boxes you want.
-
Require Application Add-ins to be signed by Trusted Publisher Check this box to have the Trust Center check that the add-in uses a publisher's trusted signature. If the publisher's signature hasn’t been trusted, the Microsoft 365 program doesn’t load the add-in, and the Trust Bar displays a notification that the add-in has been disabled.
-
Disable notification for unsigned add-ins (code will remain disabled) When you check the Require Application Extensions to be signed by Trusted Publisher box, this option is no longer grayed out. Add-ins signed by a trusted publisher are enabled, but unsigned add-ins are disabled.
-
Disable all Application Add-ins (may impair functionality) Check this box if you don't trust any add-ins. All add-ins are disabled without any notification, and the other add-in boxes are grayed out.
Note: This setting takes effect after you exit and restart your Microsoft 365 program.
While working with add-ins, you may need to learn more about digital signatures and certificates, which authenticate an add-in, and trusted publishers, the software developers who often create add-ins.
Use the following instruction to manage and install add-ins.
To install a new add-in:
-
Select File > Get Add-ins.
Alternatively, in Word, Excel and PowerPoint you can view your add-ins by selecting Home > Add-ins.
-
You can directly install popular add-ins on the page or go to More Add-ins to explore.
-
Select the add-in and select Add.
Or browse by selecting Store tab in the Office add-in dialog to find other add-ins to install and select Add for that add-in.
To manage your add-ins:
-
Select File > Get Add-ins and from the bottom, select More Add-ins.
Or select Home > Add-ins > More add-ins. -
In the Office dialog, select My Add-ins tab. If you are not able to see your add-ins, select Refresh to reload your add-ins.
-
Select Manage My Add-in to manage and select Upload to browse and add an add-in from your device.
Notes: The information in this section only applies to the following applications:
-
Office on the web (Excel, Outlook, PowerPoint, and Word) running in Chromium-based browsers, such as Microsoft Edge or Google Chrome
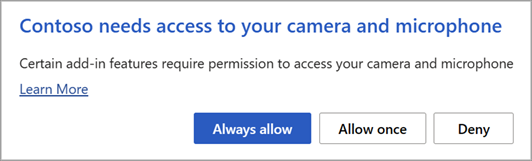
When an installed add-in requires access to your device capabilities, such as your camera, geolocation, or microphone, you’ll be shown a dialog with the option to Allow, Allow Once, or Deny permission.
-
If you select Allow, the add-in will have access to the requested device capabilities. The permission you grant persists until you uninstall the add-in or until you clear the cache of the browser where the add-in is running.
-
If you select Allow Once, the add-in will have access to the requested device capabilities until the browser tab or window in which it’s running is closed.
-
If you select Deny, the add-in won't be able to access the requested device capabilities. The next time the add-in requires access, you’ll be shown a dialog requesting your permission.
If you want to change an add-in's access to your device capabilities after selecting Allow, you must first uninstall the add-in or clear your browser cache.
If you've subscribed to an add-in through the Microsoft 365 Store that you don't want to continue, you can cancel that subscription.
-
Open the Microsoft 365 application and go to the Home tab of the ribbon.
-
Select Add-ins and then select More Add-ins >My Add-ins tab to view your existing add-ins.
-
Select the app you want to cancel and select Manage My Add-ins.
-
Under the Payment and Billing section choose Cancel Subscription.
-
Select OK and then Continue.
Once that's complete you should see a message that says "You have cancelled your app subscription" in the comments field of your apps list.
Some add-ins might not be compatible with your organization's IT department policies. If that is the case with add-ins recently installed on your Microsoft 365 program, Data Execution Prevention (DEP) will disable the add-in and the program might crash.
See also
Taking linked notes
If you're looking for Help on linking notes in OneNote to a Word or PowerPoint document, see Take linked notes.
Excel Windows Add-ins
If you're looking for Help on specific Excel Add-ins, such as Solver or Inquire, see Help for Excel for Windows add-ins.
If you're looking for additional help with Excel add-ins using the COM Add-ins dialog box, see Add or remove add-ins in Excel.


