

This article explains how to do some of the more popular formatting tasks, such as changing the font, embedding a link, showing or hiding paragraph marks, and pasting text and images into your email message.
Change the font
The default font and size depend on your Outlook settings. You can change them when composing a message.
- In the email message, highlight the text where you want to change the font.
- On the toolbar, select the font and font size from the drop-down lists.
- Add some color by selecting the Font color drop-down list and choosing a color.
For information on changing font sizes, see Change the font size in Outlook for Mac.
Embed a link
Hyperlinked text is underlined and displayed in a blue font, but you can edit the font, size, color, and style.
- Highlight the word or words that you want to turn into a link.
- On the toolbar, select the ellipsis (...) and select Insert link.
- Enter the URL that you want to use, and then click OK. The text you selected earlier becomes a hyperlink that the recipient selects to go directly to the web page.
- To edit the URL, right-click or Ctrl+click the hyperlinked text, and select Manage Link Settings > Edit.
- To edit the format of the hyperlink, select the hyperlinked text and select any of the buttons on the toolbar to apply formatting.
Paste text and images into your message
Select and copy the content you want to add to your message.
Go to your email message, and select Clipboard > Paste.
At the bottom of the pasted text you'll see a paste control icon. Click it to reveal your paste options
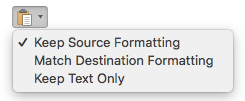
Keep Source Formatting keeps all of the original formatting and images.
Match Destination Formatting changes the font to match what you're using in your message. Images are unchanged.
Tip
If the font size increases when you paste text into your message, use this paste option to solve the problem.
Keep Text Only removes all of the formatting and images and leave only the text.
Select the desired choice.
Add a list
You select your bullet or number format by using the list buttons on the ribbon. You can also promote or demote sections of the list with the indent buttons to create a nested list.
- Place your cursor where you want a bulleted list.
- On the toolbar, select the ellipsis (...) and select Bullet list or Number list.
- Choose a bullet or number style and start typing.
- Press Enter every time you want a new bullet, or press Enter twice to end the bulleted list.
Insert a table
You can insert a table by specifying the number of rows and columns.
Here's the most basic way to insert a table:
- Place your cursor where you want the table.
- On the toolbar, select the ellipsis (...), select Add a table, and select the number of rows and columns for your table.
- Click and the table appears in the message.
- When you click in the table, the Table tab appears on the right. On the Table tab, choose different Table Styles, Table Options, Table Width, Table Align, add or remove borders from the table, choose Rows and Column styles.
- You can also select the table and right-click to insert columns and rows, merge cells, and split cells.
Copy formatting from one location and apply it to another
You can quickly apply the same formatting, such as color, font style and size, and border style, to multiple pieces of text or graphics, from one location to another.
- Select the text or graphic that has the formatting that you want to copy.
- On the toolbar, select the ellipsis (...) and select Format painter.
- Use the brush to paint over a selection of text or graphics to apply the formatting.