
Troubleshoot camera issues in Microsoft Teams Free for desktop and on the web. These steps are intended for Windows users and Teams personal accounts only. For work or school users, learn more about why your camera isn’t working.
Make sure you have the latest updates by reviewing Teams Free system requirements.
Camera troubleshooting for personal accounts
| What you see | Most likely cause | Try this first |
|---|---|---|
| No camera preview or no video feed | Windows camera privacy is blocking Teams or the browser | Allow camera access in Windows privacy settings |
| No camera preview in Teams on the web | The browser has not been allowed to use the camera | Allow camera access from the browser address bar or site settings |
| A gray screen, lock icon, or manufacturer privacy screen | Camera privacy mode is enabled | Open the camera shutter, press the camera privacy key, or disable privacy mode in the manufacturer app |
| Only your background appears | The physical camera view may be covered, or Teams may be showing a background effect over an privacy screen | Turn off background effects and confirm the camera is not covered |
| Background blur appears, but your face does not | Blur may be hiding the underlying privacy screen or covered camera view | Turn off blur and check the physical camera |
| The camera is detected sometimes, fails intermittently, or is not detected at all | Camera driver or advanced camera feature issue | Try basic camera driver mode in Windows camera settings |
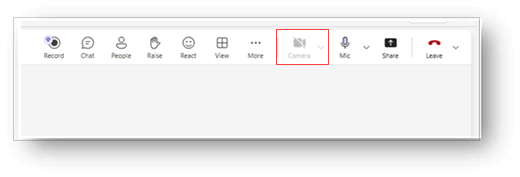
If you see that your camera icon is disabled, check Windows camera privacy settings
If Teams cannot show a camera preview, Windows may be blocking camera access.
Open Settings
 in Windows.
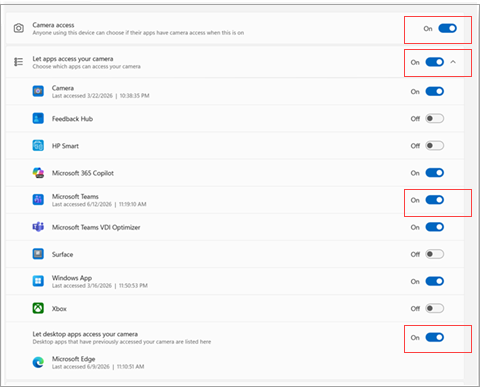
Go to Privacy & security > Camera.
Set your permissions to allow access.
If you use the Teams desktop app, set the toggle to On for Camera access, Microsoft Teams, and Let apps access your camera.
If you use Teams on the web, make sure desktop apps and your browser are allowed to access the camera. Set the toggle to On for Camera access, Let apps access your camera, Microsoft Teams, and Let desktop app access your camera
Close Teams and reopen the app. If the camera still does not appear, restart Windows and try again.
If you see the camera icon is disabled, allow camera access in your browser
When you join Teams from a browser, both Windows and the browser must allow camera access. If the browser blocks the camera, Teams may open normally, but show no video feed.
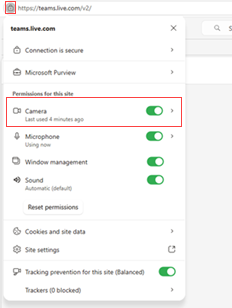
Open Teams on the web.
Next to the website address, select the site permissions menu.
Set Camera to Allow.
Refresh the Teams page and rejoin the meeting or call.
If prompted again, select Allow when the browser asks to use your camera.
If you see a privacy screen, lock icon, or gray image, check camera privacy mode
If there is an indication that the camera is blocked, check the camera privacy mode. Many Windows laptops include a physical camera shutter, slider, or keyboard shortcut that disables the camera. This can make Teams appear broken even when Windows and Teams have permission to use the camera.
Look around the camera lens for a physical shutter or slider and make sure the lens is open.
Check your keyboard for a camera privacy key. On some devices, pressing the function key combination toggles camera privacy mode on or off.
Open the built-in Windows Camera app. If the Camera app also shows a privacy screen, gray image, or lock icon, the issue is likely outside Teams.
Disable camera privacy mode using the device shortcut or the manufacturer app, then reopen Teams.
If you only see your background, turn off background effects and check the camera lens
If Teams only shows your selected background, the camera may be covered or Teams may be applying a background effect over a manufacturer privacy screen. This can make the issue look different from a normal missing camera problem.
Turn off background effects in Teams.
Confirm the camera shutter is open and the lens is not covered.
Open the Windows Camera app to confirm that the camera can show a real image.
Return to Teams and turn the video on again.
If your background is blurry but your video is missing, turn off blur
Background blur can hide what the camera is actually showing. If your face is missing but the background appears blurred, turn off blur so you can see whether the camera is covered, disabled by privacy mode, or showing a privacy screen.
Open the Teams video settings or meeting pre-join screen.
Turn off Blur or any selected background effect.
Check whether the camera now shows a real image, a gray screen, a lock icon, or a covered camera view.
If you see a privacy screen, follow the camera privacy mode steps above.
If you use a Lenovo laptop, check Lenovo Vantage privacy settings
Some Lenovo devices use Lenovo Vantage to control camera privacy. When privacy mode is enabled, Teams may show a gray OEM screen with a lock icon instead of the camera image.
Open Lenovo Vantage.
Find the camera or privacy settings.
Turn off camera privacy mode.
If your device supports it, press the camera privacy shortcut key, often F8, to toggle privacy mode.
Open the Windows Camera app to verify the camera image appears, then return to Teams.
Are you using a virtual camera?
Virtual cameras can change what Teams receive from your device. If a virtual camera is selected, Teams may show an unexpected image, no video feed, or a feed from another app instead of your physical camera.
Open the Teams video settings or meeting pre-join screen.
Check which camera is selected.
If the selected camera is a virtual camera, select your built-in or connected physical camera instead.
Turn video off and back on, or restart Teams, then test the camera again.
If the camera is intermittent or not detected, try basic camera driver mode
If Teams sometimes detects the camera, the camera works briefly and then stops, or Windows cannot reliably detect the camera. The issue may be related to the camera driver or an advanced manufacturer camera feature.
Open Settings
in Windows.Go to the camera settings for your device.
Open Advanced camera options.
Enable Basic camera driver mode.
Restart Teams and test your camera again.
Basic camera driver mode may turn off some advanced camera features provided by the device manufacturer, but it can improve reliability when Teams cannot consistently use the camera.
If you still need help
If these steps do not fix the issue, use Give feedback in Teams. Include a screenshot, logs if available, a clear description of what you see, and the troubleshooting steps you already tried. This helps Microsoft investigate and debug the problem more effectively.
Contact us
For more help, contact support or ask a question in the Microsoft Teams Community.