Using SharePoint Server 2016 or SharePoint Server 2013, you can copy files, update copies from the Manage Copies page, change the settings to prompt for updates, and unlink copies and delete them.
If you're not sure which version of SharePoint you're using, see Which version of SharePoint am I using?
Note: If you don't see other sites listed when you attempt to copy items, your organization doesn't allow copying across sites. If you're a SharePoint admin or global admin for your organization, see Allow or prevent custom script to learn how to enable cross-site copying in the SharePoint admin center.
-
Copy a file to a different library in SharePoint Server 2016 or SharePoint Server 2013
-
Update copies from the Manage Copies page in SharePoint Server 2016 or SharePoint Server 2013
-
Unlink a copy from its source, and delete it in SharePoint Server 2016 or SharePoint Server 2013
Copy a file to a different library in SharePoint Server 2016 or SharePoint Server 2013
SharePoint Server 2016 and 2013 provide the Send to option for copying to another library or location. Send to copies one file at a time to another library. Send to doesn't provide the option to copy folders. The destination copy will have a connection to the original file.
Note: Send to copies the published version of a document. For more info on versions, see How does versioning work in a list or library?
-
In a document library, click to the left of the file name to select a file.
-
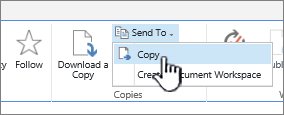
In the ribbon, click Files > Send To in the Copies section. The option is available when one, and only one, file is selected.
-
Select Copy or Other Location.
-
Do one of the following:
-
When the Destination document library or folder field appears, it should have the base URL of your site. If so, go to the end of it and type in the name of the library you want to copy the file to.
-
If the library you want to send your file to is in the Quick Launch bar, right click the name of the library, and pick Copy shortcut.
Paste the destination library URL into the Destination document library or folder field in the Copy dialog box.
-
If you can't get the previous methods to work, try this workaround:
Open the document library you want to send the files to, and copy the address from the address bar. You may need to edit the URL to remove extra characters.
Paste the URL into NotePad, and remove the content after the name of the library you want to copy to as shown in this illustration.
1. The base URL for the library.
2. The name of the library, with %20 characters replacing spaces in the name.
3. Extra content not needed. Delete this part.
Note: Some URLs exceed 255 characters, and can't be used. If you can, use the Quick Launch bar or add the name of the library to the base URL in the Destination field to get your shortcut, as the address bar can contain additional content.
-
-
Check the destination URL with (Click here to test). The destination library will open in another tab or window. You can leave it open to check your copy later, or close it.
-
If you want the copy to have another file name, type it into the optional File name for the copy field.
-
Optionally, you can also choose to ask the author to send out updates when the file is checked in, or set up an alert on the source document. For more on alerts, see Create an alert
-
Click OK when you're done. Click OK on the Copy Progress page to start the copy.
-
If the copy was successful, click Done. If it failed, note the error and correct it.
-
Check to be sure your file copied to the new destination successfully. If you want to delete the source copy, you need to unlink the copy, then delete it.
Update copies from the Manage Copies page in SharePoint Server 2016 or SharePoint Server 2013
If a file was copied to one or more different libraries, you can update all of the different copies from one location on the Manage Copies page, which is accessible from any copy of an item.
-
If a library that contains a copy that you want to update is not already open, click its name on the Quick Launch.
If the name of your library does not appear, click Settings
-
Click to the left of the name of the file you want to update to select it, and then click the Files tab.
-
In the ribbon, click Manage Copies.
-
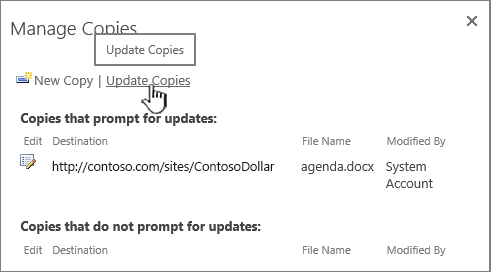
To update all copies that already prompt for updates, click Update Copies.
-
In the Destinations section, under Copies, select the copies that you want to update, and then click OK.
Note: If you want to update copies that are listed on the Manage Copies page under Copies that do not prompt for updates, first you must change the update settings for these copies. For more information about how to do this, see Change the settings for a copy to make it prompt for updates.
Change the settings for a copy to make it prompt for updates in SharePoint Server 2016 or SharePoint Server 2013
If you created a copy of a file by using the Send To command and you did not choose to be prompted for updates, this copy cannot receive updates from the source file. You can change this setting and make the copy available for updates.
-
If the library that contains a copy that you want to update is not already open, click its name on the Quick Launch.
If the name of your library does not appear, click Settings
-
Click to the left of the name of the file you want to update to select it, and then click the Files tab.
-
In the Copies section of the ribbon, click Go To Source.
-
In the ribbon, click Manage Copies.
-
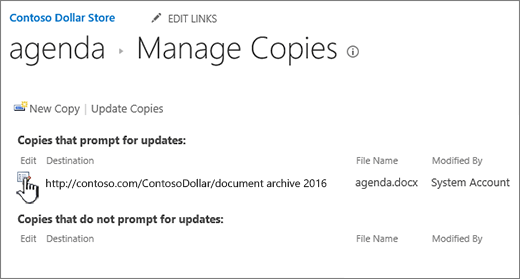
Click Edit next to the item.
-
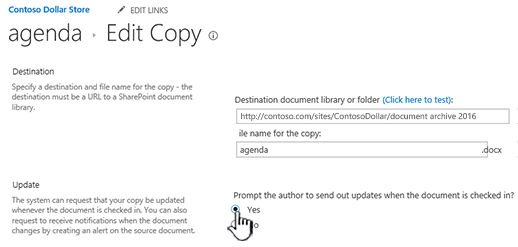
Click Yes under Prompt the author to send out updates when the document is checked in? in the Update section.
-
Click OK.
Unlink a copy from its source, and delete it in SharePoint Server 2016 or SharePoint Server 2013
If you want to completely delete an item that is a copy of another item, first you must ensure that this item is removed from the source file's list of items to update. Otherwise, the item may be recreated whenever someone chooses to update any existing copies of the source file. It is also recommended that you unlink the copy from its source file. After you have completely unlinked the source file and its copy, you can delete the copy.
-
If the library that contains a copy that you want to update is not already open, click its name on the Quick Launch.
If the name of your library does not appear, click Settings
-
Click to the left of the name of the file you want to update to select it, and then click the Files tab.
-
In the Copies section of the ribbon, click Go To Source.
-
In the ribbon, click Manage Copies.
-
Click Edit next to the item.
-
Click Remove Link.
-
In the confirmation dialog, click OK.
This action removes the copy from the list of copies that can be updated from the source file.
-
Return to the library that contains the copy that you want to unlink from the source file.
-
Right-click name of the copy that you want to unlink, and then click Properties.
-
At the top of the page, click Unlink, and then click OK.
This action removes the copy's link to its parent source file.
-
To delete, right-click the name of the copy, click Delete, and then click OK.


