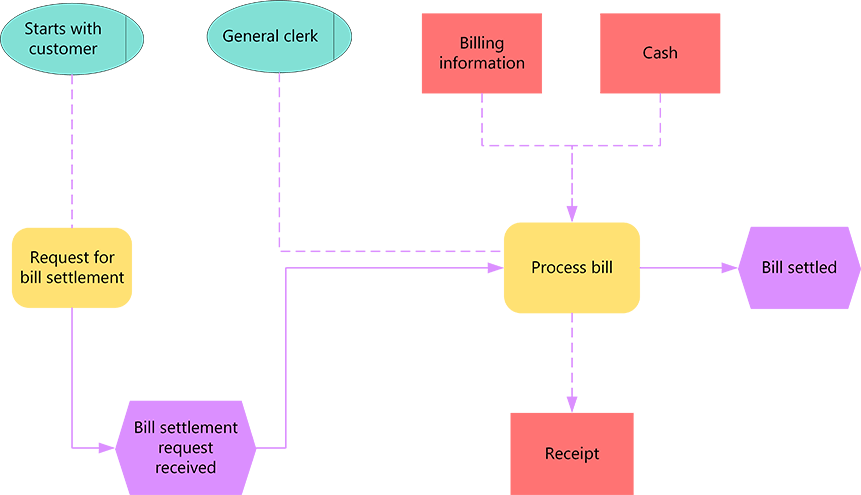
Event-driven Process Chain (EPC) diagrams illustrate business process work flows and are an important component of the SAP R/3 modeling concepts for business engineering. EPC diagrams use graphical symbols to show the control-flow structure of a business process as a chain of events and functions. Use the EPC Diagram template or EPC diagram shapes in Visio to create a high-level, visual model of your business process.
The building blocks used in EPC diagrams are:
-
Functions, which are the basic building blocks of the diagram. Each function corresponds to an executed activity.
-
Events, which occur before or after a function is executed or both. Functions are linked by events.
-
Connectors, which associate activities and events. There are three types of connectors: AND, OR, and exclusive OR (XOR).
After it is completed, you can use the EPC diagram as a reference for modeling the SAP R/3 system.
Create an EPC diagram
-
Open Visio.
-
Create a new diagram from the EPC diagram template, which can be found in the Business category.
-
From EPC Diagram Shapes, drag the shapes that you want to represent your business process onto the drawing page.
-
Connect the shapes:
-
Drag a shape from a stencil onto the drawing page and position it near another shape.
-
While still holding down the mouse button, move the pointer over one of the blue triangles. The triangle turns dark blue.
-
Release the mouse button. The shape is placed on the drawing page, and a connector is added and glued to both shapes.
Tip: To reverse the direction of the arrow on a connector, you can reverse the ends of a connector by clicking the Reverse Ends command. In order to be able to do that, you have to first add the Reverse Ends command to the ribbon. For more information, see Reverse the direction of a connector arrow.
-
-
To add text to a shape, select it, and then type. When you finish typing, click outside the text block.
Notes:
-
To edit text, double-click the shape, place the cursor where you want to change the text, and then edit as necessary.
-
To hyperlink a shape to supporting or explanatory documents, right-click the shape and select Hyperlink.
-
To align multiple shapes vertically or horizontally, select the shapes you want to align, and then on the Home tab, click Align and select an option.
-
To distribute three or more shapes at regular intervals, select the shapes, and then on the Home tab, click Position and select one of the three Distribute options.
-
Create an EPC diagram
Note: In Visio for the web, EPC shapes are only available to Visio Plan 1 and Visio Plan 2 subscribers. They are not available to users of Visio in Microsoft 365.
-
Open Visio for the web.
-
Select New blank drawing.
-
In the Shapes pane, in the search box, enter EPC, then press Enter.
-
In the results, select EPC Diagram Shapes, then select Add.
-
Drag the shapes that you want to represent your business process onto the drawing page.
-
Connect the shapes as usual. For general information about connecting shapes, see Add connectors between shapes.
-
To add text to a shape, select it, and then type. When you finish typing, click outside the text block.
For information about working with shapes, see Manage shapes in Visio for the web.


