Review dashboard with Viva Goals

A Review Dashboard is a way to visually organize collections of data and can be utilized at all levels of the organization to help with the different types of communication:
-
Organization: All-hands meetings and Quarterly Business Reviews
-
Team: Standups and Bi-weekly progress updates
-
Individual: One-on-Ones
Your colleagues can review the data displayed in the Review Dashboard, fostering collaboration, and allowing you to address risks and stay focused on reaching company goals.
Create a Review Dashboard
Review Dashboards can be created at all levels.
Tip: There is no limit to the number of dashboards you can create, and they can be cloned, renamed, shared, and presented all from within the tool.
-
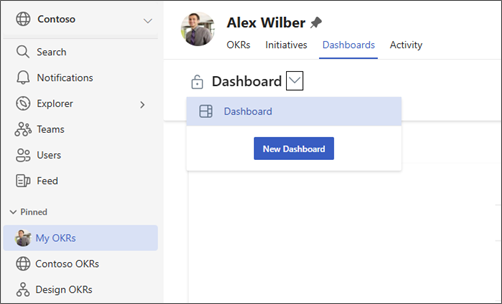
Select My company, My team, or my OKRs.
-
Select the Dashboards tab.
-
Select the expander arrow next to the title of your dashboard to choose an existing view, or select New Dashboard to create a new view.
You can Rename, Clone, Clone and Move, and Set as default your Dashboard from the command bar.
Share and present your dashboard
-
To share your dashboard, select Share on the command bar.
-
Choose Copy link to get a shareable link to your dashboard.
-
Choose Manage access to determine who can view and edit your dashboard.
Present your dashboard
Select Present on the command bar to enter presenter mode. This gives you a more streamlined view to present your dashboard.
Add or customize a panel
Panels are collections of data that you can use to separate different data sets within your dashboard.
To add a new panel:
-
Select Add another panel to the dashboard.
-
Enter a title.
-
Select a widget from the following options: OKR Detail, Custom Embed, Text Block, KPI List, OKR List, Initiative List.
-
Select your options and enter your details in the pane.
-
Select Save.
To edit an existing panel:
-
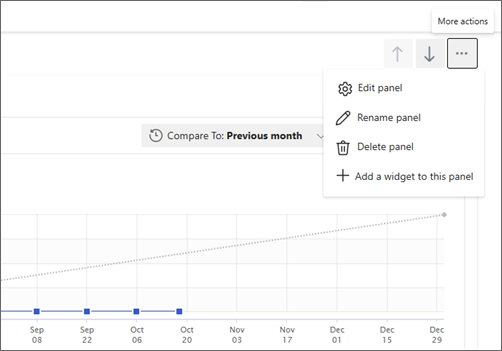
Select the More actions ellipses.
-
Select Edit panel from the drop down.
-
Make your desired changes.
-
Select Save.
You can also rename, delete or add a widget to your panel.
Add or customize a widget
Widgets are visual representations of different data points. You can combine multiple widgets within a single panel.
To add a new widget:
-
Navigate to a panel.
-
Select Edit panel > Add widget, or select the More ellipses button > Add a widget to this panel.
-
Select a widget.
-
Configure the settings (each widget will have unique settings).
Warning: Progress graphs for "Find a baseline" key results will remain flat in dashboards since we are determining a new baseline, not tracking progress.
-
Select Save.
To edit an existing widget:
-
Navigate to the panel with the desired widget.
-
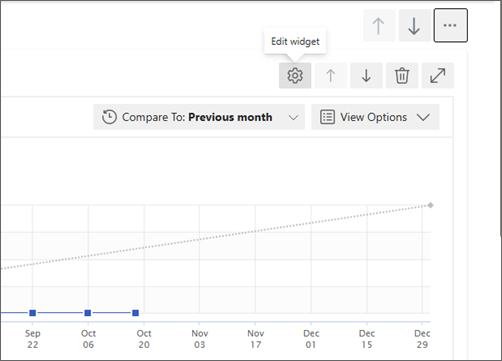
Hover over the widget and select the Edit widget icon.
-
Modify the settings you want to change.
-
Select Save.
Tip: Use the arrow keys to configure the widgets within your dashboard and rearrange the panels themselves.
Connect and learn from experts and peers
Join the discussion and see the latest events in the Viva Goals Community.
Learn more
Create Objectives, Key Results, and Initiatives in Viva Goals


