

Sometimes the label at the top of a column is wider than the data that the column stores. You can expand a column to match the size of the heading. However, you often see fewer columns on a page. When wrapping or vertically formatting text doesn't resolve this problem, use rotated text and cell borders instead.
Rotate text and borders in column headings
You can angle text to fit long headings into small columns.
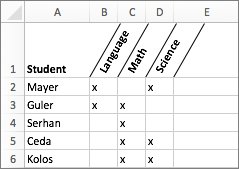
Select the cells that you want to format.
On the Home tab, in the Cells group, select Format, and then select Format Cells. Or, right-click the cell and select Format Cells.
On the Border tab, apply vertical borders to the left, right, and middle of the range.
On the Alignment tab, in the Orientation box, enter a degree value or drag the indicator to the angle that you want.
Note
A positive angle between 30 and 60 degrees usually works well.
Under Horizontal alignment, select Center, and then select OK.
Tip
To reduce all the columns to their smallest possible width, select them. Then on the Home tab, in the Cells group, select Format, and then select AutoFit Column Width.
Split a column to create a dual-label corner cell
Use an angled border to create a dual-label corner cell, such as the one shown in the following image.

To put text in the upper-right part of the cell, select the cell that you want to format, and then type 10 space characters. You can adjust this later, as needed.
Type the first label, which corresponds to the column labels.
To create two line breaks in the cell, hold down CONTROL + OPTION and press RETURN two times.
Type the second label, which corresponds to the row labels down the left side of the table, and then press RETURN. You can adjust this later, as needed.
Select the cell that you want to format.
On the Home tab, in the Cells group, select Format, and then select Format Cells. Or, right-click the cell and select Format Cells.
Under Border, select the upper-left-to-lower-right angled border button.
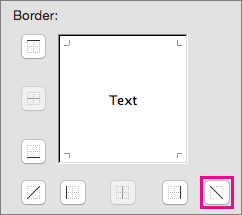
Select OK.