
Use add-ins in Outlook
Outlook add-ins provide solutions to help you better interact with Outlook and complete tasks on your messages and appointments without leaving Outlook.
Some add-ins are installed by your email administrator, but you can install other ones from the Office Store.
Select a tab option below for the version of Outlook you're using. What version of Outlook do I have?
Note: If the steps under this New Outlook tab don't work, you may not be using new Outlook for Windows yet. Select Classic Outlook and follow those steps instead.
In Outlook, you have the option to:
Install add-ins from the store | Install custom add-ins | Add-ins installed by IT Admin | Use an add-in | Delete an add-in
Install an add-in from the Office Store
-
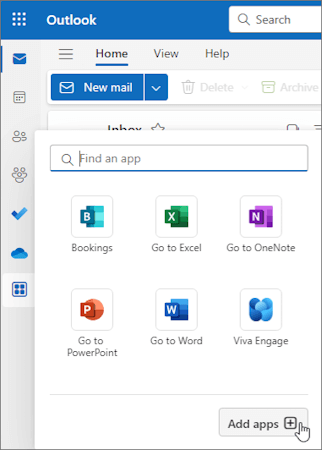
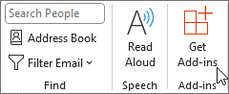
In Outlook, go to the navigation bar and select More Apps > Add apps.
Tip: You can also access the Store from the Apps button to install an add-in directly from a message or appointment. For guidance on how to locate the Apps button to access add-ins while reading or composing a mail item, see Use an add-in in Outlook.
-
In the Apps page, search for the add-in you want from the available list. Alternatively, if you're after a specific add-in, enter its name in the search box. When you find the add-in you want to install, select it to learn more about the add-in and review its privacy policy.
-
When you're ready to install the add-in, select Add.
Install a custom add-in from a file
-
In your preferred browser, go to https://aka.ms/olksideload. This opens Outlook on the web, then loads the Add-Ins for Outlook dialog after a few seconds.

Note: Installing custom add-ins from an XML file is currently only available through the Add-Ins for Outlook dialog. The team is working to support this functionality in the new Store in Outlook (All Apps > Add Apps).
-
Select My add-ins.
-
In the Custom Addins section, select Add a custom add-in, then choose Add from file.
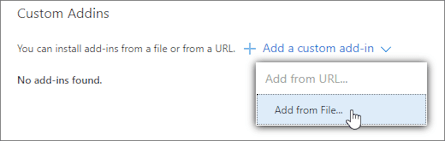
Note: The Add from URL option is no longer available to install a custom Outlook add-in. As a workaround, open the URL in your preferred browser to download the add-in file, then use the Add from File option to install it.
-
Select the XML file for the add-in.
-
Select Open to install the add-in.
Add-ins installed by your IT admin
If you're part of an organization and a new add-in is installed for you by your IT admin, the add-in will be available on the read or compose surface where it's designed to work. For guidance on how to access an add-in, see Use an add-in in Outlook.
Use an add-in in Outlook
The location of where an add-in is installed depends on whether you’re reading or composing a mail item.
Tip: If you moved from classic Outlook for Windows to the new Outlook for Windows, note that the location of add-ins is different. While add-ins are accessed from the ribbon or app bar in classic Outlook, access to add-ins in new Outlook for Windows depends on whether you're reading or composing a mail item. For guidance on how to use add-ins in classic Outlook, see Use add-ins in Outlook.
Use an add-in while reading a message
-
Select a message in the Reading Pane or open a message in a separate window.
-
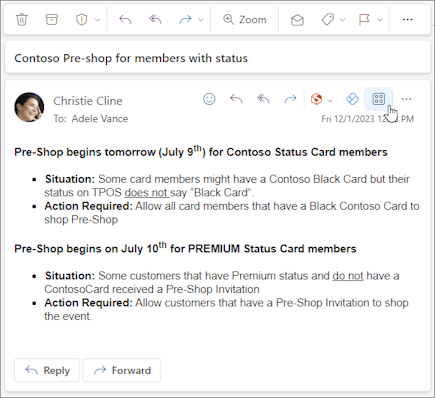
From the action bar of the message, select Apps.
-
Select the add-in you want to use.

Tip: Customize your action bar to quickly access your add-ins. In the message action bar, select the ellipsis button (...), then choose Customize actions. In the Addins section, check the boxes for the add-ins you want to see in the action bar.
Use an add-in while composing a message
-
Create a new message or reply to an existing one.
-
From the ribbon, select the Message tab, then choose the add-in you want to use.

If the add-in doesn’t appear in the ribbon, select Apps to view your installed add-ins.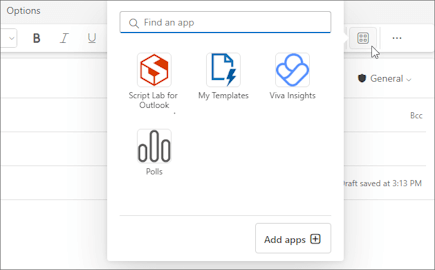
Use an add-in while viewing or scheduling a meeting or appointment
-
Open an existing appointment or create a new one.
Tip: If you want to use an add-in on an existing meeting or appointment, you must open the meeting or appointment in a pop-up window to view the ribbon.
-
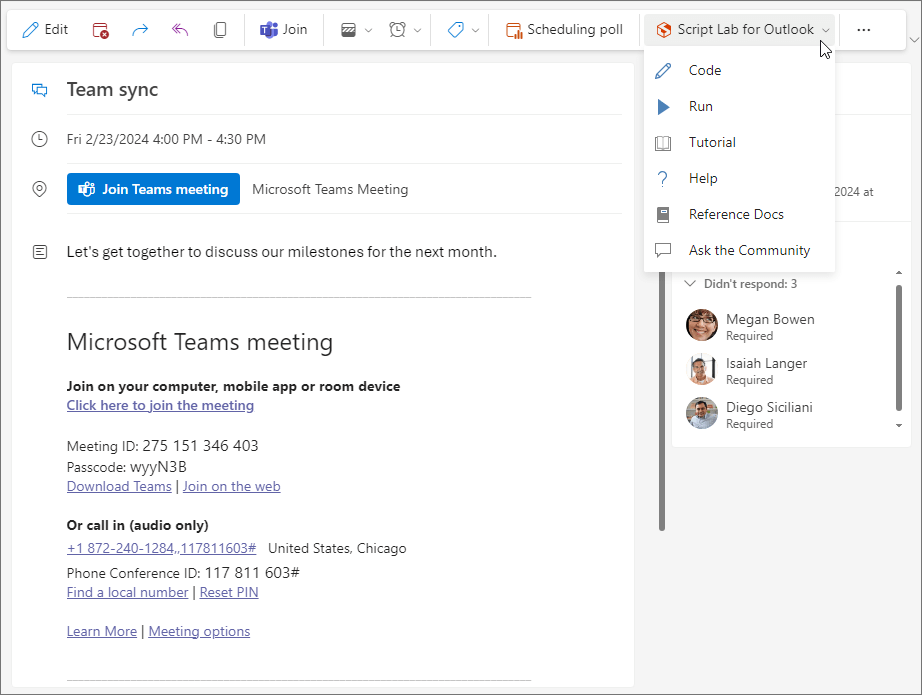
From the ribbon, select the add-in you want to use.
Delete an add-in
-
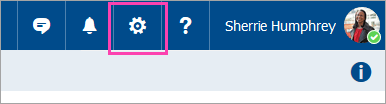
Go to the navigation bar and select

-
On the Apps page select Manage your apps.
-
Under Manage your apps, find the app you want to delete and select More options > Remove.
In Outlook, you have the option to:
Install add-ins from the store | Install custom add-ins | Use an add-in
Install an add-in from the Office Store
-
Open Outlook.
-
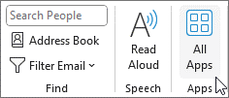
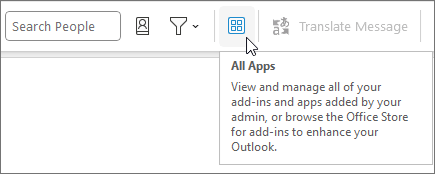
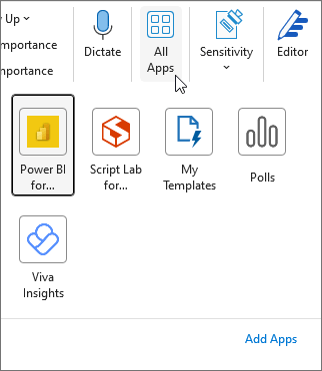
From the ribbon, select Home > All Apps. If the Simplified Ribbon is configured in your Outlook client, select the ellipsis button (...) from the ribbon, and then choose All Apps.
Notes:
-
Starting in Outlook for Windows Version 2303 (Build 16215.10000), the All Apps button replaces the Get Add-ins buttonon the ribbon to view installed add-ins and access the Office Store. If you’re using an earlier version of Outlook, you'll see the Get Add-ins button instead.
-
If you don't see All Apps on the ribbon, your administrator may have turned off add-ins for your organization.
-
-
Depending on your Outlook version or account type, select Add Apps or Get Add-ins.
-
The dialog that appears varies depending on whether you had the Add Apps or Get Add-ins option available to you.
If you selected Add Apps, the Apps dialog appears.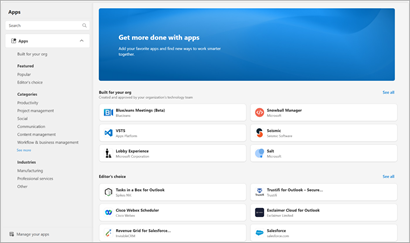
If you selected Get Add-ins, the Add-Ins for Outlook dialog appears.
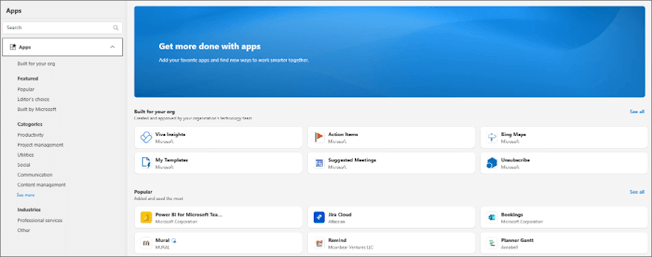
Search for the add-in you want from the available list. Alternatively, if you're after a specific add-in, enter its name in the search box. When you find the add-in you want to install, select it to learn more about the add-in and review its privacy policy. -
When you're ready to install the add-in, select Add.
Install a custom add-in from an XML file
-
In your preferred browser, go to https://aka.ms/olksideload. This opens Outlook on the web, then loads the Add-Ins for Outlook dialog after a few seconds.
Note: Installing custom add-ins from an XML file is currently only available through the Add-Ins for Outlook dialog. The team is working to support this functionality in the new Store in Outlook (All Apps > Add Apps).
-
Select My add-ins.
-
In the Custom Addins section, select Add a custom add-in, then choose Add from File.
Note: The Add from URL option is no longer available to install a custom Outlook add-in. As a workaround, open the URL in your preferred browser to download the add-in file, then use the Add from File option to install it.
-
Select the XML file for the add-in.
-
Select Open to install the add-in.
Use an add-in in Outlook
Depending on the type of add-in you've installed, the add-in will appear in one of the following areas in Outlook.
Important:
-
Ensure that the Reading Pane in Outlook is set to Right or Bottom. Otherwise, add-ins will be unavailable. To configure your Reading Pane, select View > Reading Pane.
-
If you’re moving from classic Outlook for Windows to the new Outlook for Windows, note that the location of add-ins is different for each client. The location of add-ins in the new Outlook for Windows depends on whether you’re reading or composing a mail item. For guidance on how to use add-ins in the new Outlook for Windows, see Use add-ins in new Outlook for Windows.
Add-ins on the ribbon
Certain add-ins are added to the ribbon of the appropriate read or compose surface of a message or appointment. To use this type of add-in, perform the following:
-
In Outlook, navigate to the ribbon.
Tip: If you want to use an add-in on a meeting or appointment, you must open the meeting or appointment in a pop-up window to view the ribbon.
-
Select the appropriate ribbon tab. The tab varies depending on your current mail surface.
-
If you're reading a message, select the Home tab.
-
If you’re composing a message, select the Message tab.
-
If you’re viewing or scheduling an appointment, select the Appointment tab.
-
If you’re viewing or scheduling a meeting, select the Meeting tab.
-
-
Select the add-in button from the ribbon. If the add-in doesn’t appear on the ribbon, select All Apps to view your installed add-ins.
Add-ins in the app bar
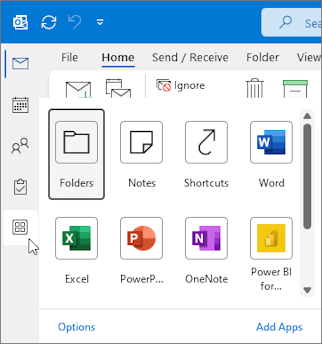
Certain add-ins are added to the app bar in Outlook. To use this type of add-in, navigate to the app bar on the left side of Outlook. Then, choose the add-in you want to run.

If the add-in’s icon doesn’t appear in the app bar, select More Apps to view your installed add-ins.
Note: Outlook on the web is only available if you're using a work or school account and you have a valid license.
In Outlook, you have the option to:
Install add-ins from the store | Install custom add-ins | Add-ins installed by IT Admin | Use an add-in
Install an add-in from the Office Store
-
In Outlook, navigate to the app bar on the left side of the client. Then, select More Apps > Add apps.
-
In the Apps page, search for the add-in you want from the available list. Alternatively, if you're after a specific add-in, enter its name in the search box. When you find the add-in you want to install, select it to learn more about the add-in and review its privacy policy.
-
When you're ready to install the add-in, select Add.
Instructions for classic Outlook on the web
-
Select

-
For free add-ins, use the toggle controls to turn them on or off. For paid add-ins and free trials, select Get it to finish your purchase.
You can also install more add-ins from the Office Store.
Install a custom add-in from a file
-
In your preferred browser, go to https://aka.ms/olksideload. This opens Outlook on the web, then loads the Add-Ins for Outlook dialog after a few seconds.
Note: Installing custom add-ins from an XML file is currently only available through the Add-Ins for Outlook dialog. The team is working to support this functionality in the new Store in Outlook (All Apps > Add Apps).
-
Select My add-ins.
-
In the Custom Addins section, select Add a custom add-in, then choose Add from file.
Note: The Add from URL option is no longer available to install a custom Outlook add-in. As a workaround, open the URL in your preferred browser to download the add-in file, then use the Add from File option to install it.
-
Select the XML file for the add-in.
-
Select Open to install the add-in.
Add-ins deployed by admins
If you're part of an organization and a new add-in is installed for you by your IT admin, the add-in will be available on the read or compose surface where it's designed to work. For guidance on how to access an add-in, see the section Use an add-in in Outlook.
Use an add-in in Outlook
The location of where an add-in is installed depends on whether you’re reading or composing a mail item.
Tip: If you’re moving from classic Outlook for Windows to the new Outlook for Windows, note that the location of add-ins is different for each client. While add-ins are accessed from the ribbon or app bar in classic Outlook for Windows, access to add-ins in the new Outlook for Windows depends on whether you're reading or composing a mail item. For guidance on how to use add-ins in classic Outlook for Windows, see the Classic Outlook tab. For new Outlook, follow the steps under New Outlook.
Use an add-in while reading a message
-
Select a message in the Reading Pane or open a message in a separate window.
-
From the action bar of the message, select Apps.
-
Select the add-in you want to use.
Tip: Customize your action bar to quickly access your add-ins. In the message action bar, select the ellipsis button (...), then choose Customize actions. In the Addins section, check the boxes for the add-ins you want to see in the action bar.
Use an add-in while composing a message
-
Create a new message or reply to an existing one.
-
From the ribbon, select the Message tab, then choose the add-in you want to use.
If the add-in doesn’t appear in the ribbon, select Apps to view your installed add-ins.
Use an add-in while viewing or scheduling a meeting or appointment
-
Open an existing appointment or create a new one.
Tip: If you want to use an add-in on an existing meeting or appointment, you must open the meeting or appointment in a pop-up window to view the ribbon.
-
From the ribbon, select the add-in you want to use.
Frequently asked questions
Installed add-ins are turned on by default, but you'll be prompted to give consent the first time you run them if they need to access your data. Most add-ins only have access to the data in the email message that you're working in.
When you install an add-in in new Outlook, it will appear in other versions of Outlook as well. For example, if you install an add-in in new Outlook, you will also see the add-in when you open Outlook on the web.
All add-ins are validated by Microsoft, including those that you install from the Office Store. For more information, see the privacy statement and the terms and conditions section in the add-in’s consent form.
An add-in might send data to its own service, but only to complete the task you've requested. All add-ins are required to comply by their privacy policies and Microsoft standards. For more details, see the add-in's privacy statement.
Go to the Office Store, and search for the add-in you're looking for. Then, select the add-in to find information such as its overview, requirements, ratings, and reviews.
Related articles


Need more help?
Want more options?
Explore subscription benefits, browse training courses, learn how to secure your device, and more.


Communities help you ask and answer questions, give feedback, and hear from experts with rich knowledge.


