If you have a campaign in SharePoint, you and your team can:
Create a site campaign
Manage news posts in a site campaign
See how your campaign and relevant posts are performing
Delete a site campaign
How campaigns work in SharePoint
A campaign is a series of news posts that focus on a shared goal. This goal might be creating a newsletter, updating your team on a new project, or driving awareness for a new initiative. Use a campaign to organize your news posts into a central folder. You can publish them across a multitude of channels - including SharePoint, Outlook, Engage, and Teams - and get aggregated analytics across them. By using campaigns, you and your team can:
Plan and organize your news posts in one central place.
Create news post content by using the provided SharePoint templates or your saved templates.
Publish seamlessly to SharePoint, Outlook, Teams, and Viva Engage.
Collaborate easily with your team across multiple news posts.
Track aggregated performance by using reporting and insights.
Note
To create a campaign in the existing Amplify App experience, see Create a campaign in Microsoft Viva Amplify.
Note
Amplify app campaigns and SharePoint site campaigns are not interchangeable. SharePoint news posts can only be associated with site campaigns; Amplify app publications can only be associated with Amplify app campaigns.
Before you begin
Create a SharePoint site or use an existing site. Campaigns reside in a SharePoint site.
Make sure you have permissions to create campaigns. Site members and owners can create campaigns, while site viewers can only view published news posts. Campaigns inherit their SharePoint site permissions, so membership management is simplified.
Note
News posts and aggregated reporting are the core of every campaign. Campaigns only support news posts (pages can't be created within a campaign yet).
Create a site campaign
In a new or existing SharePoint site, select the Site settings icon , and then select Site campaigns.
Tip
In the SharePoint Publish experience Getting started with Publish in SharePoint, you can also select campaigns in the navigation bar, and select Create campaign to create a campaign in a site.
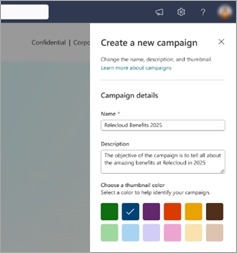
At the top of the Site campaigns page, select Create campaign, and then add a campaign name. You can optionally add a description or choose a thumbnail. Select Create to create your campaign. If you're creating a campaign from the SharePoint Publish experience, make sure to select a site where you want your campaign to be located.
Tip
You can change the name and description of your campaign after it's created by going to the Campaign overview page and selecting Campaign settings.
After the campaign is created you can create a news post by selecting Create blank or View all templates (to use a Microsoft template or a template that you saved on the site).
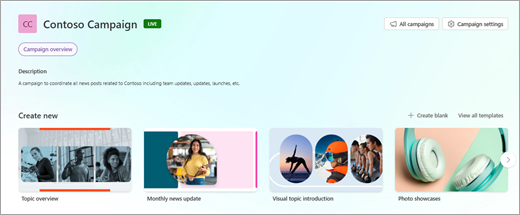
After you create your news post, continue with your regular content creation and publish the post to your selected distribution channels. If you want to amplify, don't forget to publish your news post first. Then, you can amplify your news posts further across different channels. To learn more, see Promote a SharePoint news post with Amplify for more visibility.
Manage news posts in a site campaign
You can associate any existing news post to a campaign if the news post is part of the site the campaign belongs to. First, make sure the news post is published. Then you can associate it to an existing campaign by selecting Amplify. Under the channel selection panel, in the campaign association section, select the campaign you want to associate it with, and then save your changes. Or you can create a new campaign to associate your news post to.
Note
After you associate a news post to a campaign, you can't undo it.
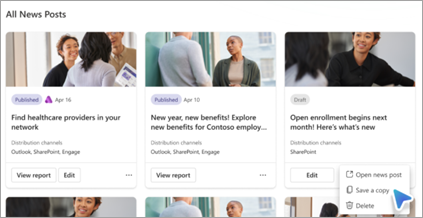
- You can copy an existing news post to a campaign. Select Save a copy on a news post and your news post is copied in that campaign.
See how your campaign and relevant posts are performing
Select Analytics to access campaign analytics. There, you'll find campaign analytics across all your news posts, as well as reports for individual news posts. You can view them across the whole news posts or broken down by channel. You can also view analytics data over time through analytics graphs.
Note
If you use the Send as email feature to send a news post as email, it doesn't aggregate towards campaign analytics. Use the Amplify specific experience to send an email if you want your analytics to be aggregated to your campaign.
Unique viewers—Number of unique users who viewed this news post.
Total views—Number of times users viewed this page.
Average time spent per user—Average time users spent reading this news post.
Page traffic by time—Average number of unique viewers to this news post per hour.
Promotions—Number of times this news post was shared, forwarded, or tagged.
Reactions—Number of reactions this news post received through distribution channels.
Unique viewers who clicked a link—Number of unique viewers who opened a link from this news post.
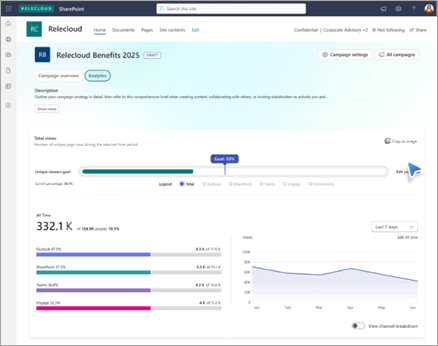
See View usage data for SharePoint pages and news.
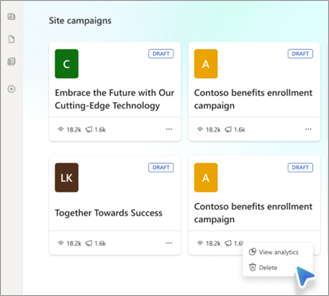
Delete a site campaign
You can delete a campaign from the Site campaign page. On the selected campaign, select the More menu, and then select Delete. When you delete a campaign, all news posts that were part of it are removed from that campaign. However, the news posts themselves aren't deleted. You can still access them directly on their original SharePoint site, but they no longer link to, or are managed under, the campaign because you deleted it.