
Remove students from a Class Notebook you created with the Class Notebook Wizard. Removing a student removes their access to the notebook's shared content. Their private work remains in the notebook unless you choose to delete it while removing the student.
Important
These steps apply to Class Notebooks created with the Class Notebook Wizard. If the Class Notebook was created in Microsoft Teams,remove the student from the class team instead. If it was created through the Microsoft 365 LTI in your LMS, remove the student from the LMS course roster. The Class Notebook roster updates from that source.
Remove a student in the Class Notebook Wizard
- Go to aka.ms/classnotebook and sign in with your school account.
- Select Add or remove students.
- Select the Class Notebook you want to update.
- Clear the checkbox next to each student you want to remove.
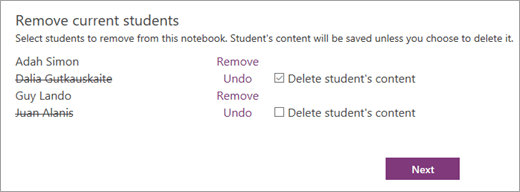
- To permanently delete a student's private notebook content, select Delete student's content. Leave it unchecked if you want to keep their content in the notebook.
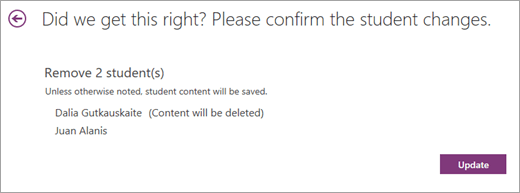
- Select Next, review the students to remove, then select Update.
Learn more
Add students to a Class Notebook in OneNote
Getting started with OneNote Class Notebook: A walkthrough for educators