Your IT Administrator is responsible for setting up your classes. When you log into Schoology with your Microsoft 365 school account, your classes will be available on the Course Dashboard.
How to add a Teams assignment
1. Log into Schoology.
2. Choose your course from the course menu.
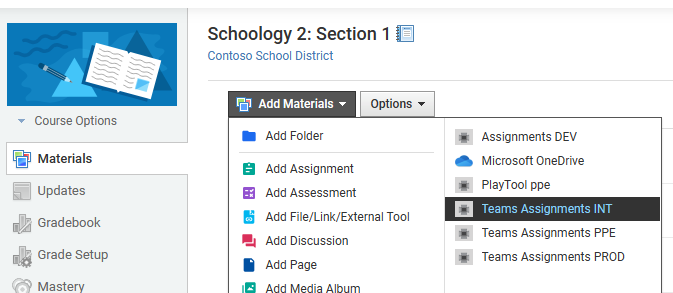
3. With Materials selected in the primary menu, choose the Add Materials button and select an option from the dropdown menu. Select the Teams Assignment option.
Note: Ensure pop-ups are enabled on your browser so you can log into your Microsoft 365 school account.
4. Microsoft Teams for Education will open in a window. If your course does not have a connected team, you will be asked to connect one to link assignments and grades.
You will be brought to the web version of Teams to create a new assignment.
Creating a new assignment in Teams
With Teams now open and your class team synced to Schoology, you can now proceed with the steps to create an assignment in Microsoft Teams.
Learn more about creating a new assignment in Microsoft Teams for Education
1. Navigate to the desired class team, then select Assignments.
2. Select Create > New Assignment.
3. At a minimum, you must give the assignment a title. This is required. You can optionally add a tag, which will make this assignment easier to search for in the future.
Adding assignment instructions
Microsoft Teams for Education now has Instructions AI which employs Artificial Intelligence to form assignment instructions for you.
Learn more about using AI to create assignment instructions in Microsoft Teams.
You can still type out instructions in the text box and insert images or gifs with the Add images icon.
Notes:
-
Assignments only supports the following image file types .png, .jpeg, and .gif.
-
On mobile, images will resize to the screen.
-
On desktop you can use sizing handles on images to resize them.
You can also attach existing files, links, or assignment integrations and create and name a new file right from here for students to turn in
Note: You can add up to five files for students to edit. The total number of resources you can add to an assignment is 10, whether editable or non-editable. Read-only reference files can be up to 500 MB in size. Files for students to edit can be up to 50 MB in size.
-
Select Attach to attach resources to the assignment. Choose a file from your OneDrive, upload a file from your device, or choose one of the other options set by your admin, such as MakeCode.
Note: If you're assigning a Class Notebook page, check what version of OneNote your students are using to ensure that their assignment pages will lock after the assignment due date passes.
-
Select +New to create a blank Word (.docx), Excel (.xlsx), PowerPoint (.pptx), or Whiteboard document, or a new video recording to hand out to your students.
-
Select Apps to attach content from an app to the assignment. Admins can manage Teams apps in the Microsoft Teams admin center.
-
Select Learning Accelerators to add Reading Progress, Search Progress and other Learning Accelerators to the Assignment.
-
By default, Students can't edit attached documents, meaning the document is read-only. This is a great option for reference materials.
To let students edit a separate copy of the attached file, select More options> Students edit their own copy. This way, students can edit their own copy of the file and turn it in for a grade. Only Word (.docx), Excel (.xlsx), PowerPoint (.pptx), WhiteBoard, ClassNotebook Page, and MakeCode files or Reading Progress assignments allow students to edit their own copies.
Note: If you have older documents with the file extension .doc, .xls, or .ppt, students won't be able to edit them. You can either attach them as read-only reference material or create a new file in Teams, copy in the old content, and save it. All new files you create in Teams or other Microsoft 365 apps will have the correct extension.
Assign to
The Assign to field is where you choose the class for this assignment. By default, the class team you are in will be selected.
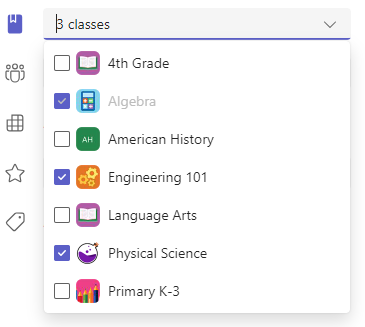
Multiclass publish allows educators to create an assignment for multiple classes with the same due date.
Do this by navigating to the Assign to field and check the boxes for classes the assignment will be published to.
Points and grading rubrics
You can select which grading scheme, grading categories, and points the assignment is worth.
If you have configured the class to use Grading Categories, you need to select a Grading Category for assignment with points.
Select the amount of points this assignment is worth, if any. You can use points on any number-based scale including whole numbers of 100 and set your own denominator.Examples: 88/100 or decimals 3.7/4.0.
-
Select Add rubric to create a rubric.
Note: You can now use AI to create a grading rubric. Learn more about using AI grading rubrics in Microsoft Teams Education.
-
Select Manage grading categories to create or edit the grading categories for the class.
Setting up Grading Schemes
Letter grading and grading categories must be set as a Grading Scheme in the Grade settings section to display these options.
1. Under Assignments, select the settings icon.
2. Navigate down to Grade settings.
3. Choose Add Schemes or Manage schemes.
Note: If no other grading schemes other than "Points" have been set, this link will read Add Schemes. Once you have gone through the steps to add a new scheme, the link will change to Manage schemes.
4. Choose Add Scheme.
5. Set the grading levels. Letter grades will be the normal A, B, C, D, F, scheme. Ensure that there are enough levels to cover the entire 0-100 percent range.
6. Select the Save button when complete.
Finish by choosing the Done button.
Assigning to students or groups
Choose multiple classes,individual students, or groups of students in one class to assign to.
By default, only students who are in your class now will receive this assignment. Change this by selecting an option from the dropdown menu.
Note: If you choose a close date, any student who joins will receive this assignment until the close date.
Due dates and scheduling
Select a time and date for the assignment to be due. To schedule an assignment, next to Assignment will post immediately with late turn-ins allowed select Edit assignment timeline. Here, you can customize when your assignment will be posted to students and when it will close for turn-ins. By default, no close date will be selected, which allows students to turn in assignments late.
Note: If you choose multiple classes to publish the assignment to, you can select Set due date per class to set individual schedule, due and close date for each class
Calendars
You can choose whether to add this assignment to your calendar on Outlook, students' calendars, and other educators or staff in your class team. Set this preference for all assignments in Assignments Settings.
Next to Add assignment to calendars, select the dropdown and pick one of the following options:
-
Students only adds the assignment to just student calendars.
-
Students and me adds the assignment to both student calendars and your calendar.
-
Students and team owners to adds the assignment to both student and other educators or staff in the class team calendars.
Note: To check on your full class team roster, navigate to your class team and select More options >Manage team.
Assign, save, or discard
Choose the channel where you'd like notifications for this assignment to post. This allows you to keep student work and discussion organized by unit, topic, or subject. By default, assignments will be posted in the General channel or your selection in Assignments Settings.
1. To choose a channel to post in, next to Post assignment notifications to: select the down arrow for a list of available channels.
2. Pick the channel you'd like this assignment notification to post in, your selection will be applied immediately.
Notes:
-
To post assignment notifications to a channel, make sure bot posting is enabled.You can check that here or ask your IT Admin for help.
-
Assignments will post to channels that are visible to all students. Private channels will not appear during this step.
-
If you have selected multiple classes, select Set per Class to set which channel to use or just use the General channel. Assignments to individual students do not post to channels.
When you're ready, you can finish the process of creating your new assignment by assigning it to students.
Note: If your school uses Turnitin, you can sync assignment turn-ins to Turnitin.
-
Assign will immediately publish the assignment and your students will be notified of the new assignment on the day you specified and the notification linking to this assignment will post in the channel you selected. They'll also have an entry on their Teams and Outlooks calendars if you've selected that option.
-
Save will save a draft of the assignment. Students will not receive any notification, and nothing will be added to any calendar.
-
Discard will delete the draft of the assignment. Students will not receive any notification, and nothing will be added to any calendar.
Finish creating the assignment by choosing the Assign button.
Once the assignment is created, it will appear in the assignment list in your Schoology window. In Schoology, navigate to the bottom of the window and choose the Link button.
Your new assignment will be added to the Schoology course materials list.
How to edit an existing assignment
1. Log into Schoology.
2. Choose your course from the course menu.
3. Select an existing assignment from the Materials list.
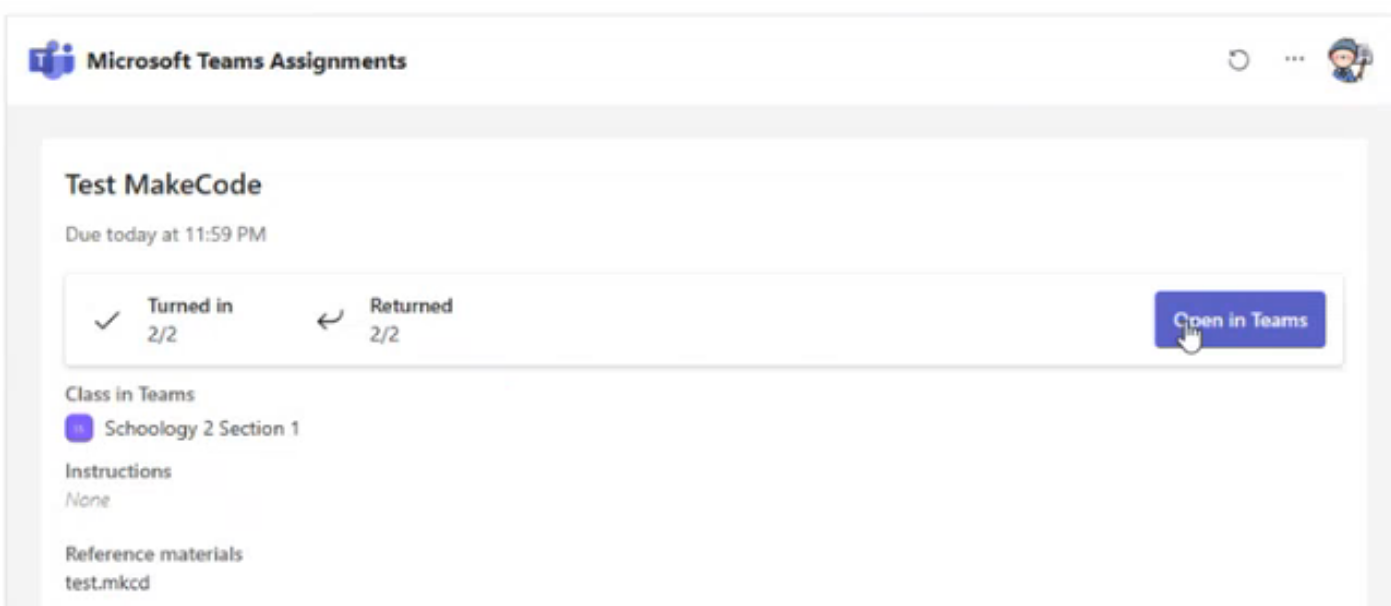
4. Choose the Open in Teams button.
This will open your assignment in teams where you can make the necessary edits.
How to copy content from one course to another
Educators can copy content from one course and reuse it in a completely different course in Microsoft Teams. However, it is not a simple copy and paste process. Every assignment created has a specific due date, number of points, and other factors that add to the complexity of this task.
Read through the checklist below to ensure there are no mistakes in copying a previously used assignment:
-
Due Date: Set a different due date for the assignment and ensure it is not a date in the past or one that falls on a day when class is not in session.
-
Title: It's often a good rule of thumb to give your assignment a new title. If this assignment comes from another course, there may be certain course specific words in the title you'll want to replace.
-
Assigned learners: Check to make sure that all assigned learners for the copied assignment are all added to the assignment.
-
Attached course materials: Ensure that all attached pdfs, worksheets, one drive folder locations etc. point to the correct course.
If copying content is a consistent strategy you choose to utilize, consider creating some assignments that are evergreen and will take less editing between courses. Another option is to create a draft that has most of the content you wish to include for the new assignment without course specific information and copy the draft not the previously used assignment.
Learn more
Create group assignments or assign to individual students
Edit an assignment in Microsoft Teams
Your teacher will create assignments for you to complete in Schoology.
How to complete an assignment
1. Log into your Schoology account.
2. Go to your course.
3. Select an assignment. You'll be able to see the status of your assignment including a due date and points possible.
4. Choose the Complete button to begin work on your assignment.
5. If your educator specified a document for you to turn in, or if you have other files to attach to this assignment, select +Add work and upload your file. You can attach up to 10 resources to an assignment. 500mb is the maximum file size for a resource.
Tip: Work on Office files associated with this assignment right from here—no need to leave the app. Older files with .doc, .xls, and .ppt file extensions can only be edited in the desktop versions of those apps. You can copy content into a new file created in Teams to edit them again.
6. Select Turn in to submit an assignment before its deadline. This button will change depending on the status:
-
Turn in for group if you're working on a group assignment. Only one member of the group needs to turn in the assignment.
-
Turn in again if you're editing an assignment you've already turned in and need to submit work again.
-
Turn in late if you're turning in your assignment after the due date, but your educator has allowed late turn-ins or asked for a revision.
-
Not turned in if the assignment is past due and your educator is no longer accepting turn-ins. You cannot turn in work.
-
Undo turn in if you decide you want to edit your assignment before the due date. You'll need to turn it in again after you make your edits.
After submitting your assignments, track your progress in the Grades tab to review points earned and educator feedback.


