Manage webinar registration in Microsoft Teams
Set up registration
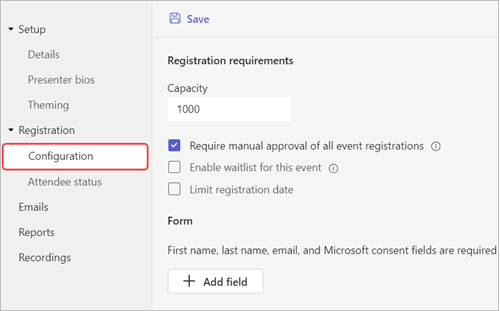
Add structure to your webinar with additional registration settings and requirements. To modify attendee registration, open the webinar from your Teams calendar and go to Registration > Configuration.
From here, you can implement the following:
-
Event capacity - set a limit on how many people can register for the webinar.
-
Require manual approval of all event registrations* - decide who can attend the webinar by approving or denying registration requests.
-
Enable waitlist for this event* - after the event capacity is full, manage overflow registration requests by implementing a waitlist. The waitlist capacity will be equal to the event's capacity.
-
Limit registration date* - set a time window during which potential attendees can register for your event.
*Teams Premium features.
Set registration start and end time
Note: Limiting registration start/end times is available as part of Teams Premium, an add-on license that provides additional features to make Teams meetings more personalized, intelligent, and secure. To get access to Teams Premium, contact your IT admin.
Limit when potential attendees can register for the webinar by setting registration start and end times.
To set registration start and end times:
-
Go to Registration > Configuration.
-
Select Limit registration date.
-
Designate the registration window in the Start date and End date drop-down menus.
Manage registration
Add questions to a webinar registration form to learn more about your audience, including details about their background, how they heard about the event, and more. You can also include legal terms for potential attendees to view and accept.
Add registration fields
To add fields to the registration form:
-
Go to Registration > Configuration.
-
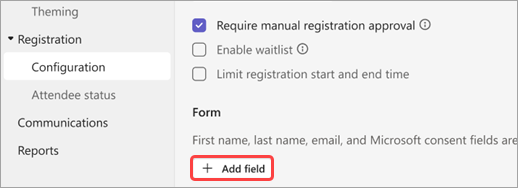
Under Form, select Add field.
-
Choose from preset fields or select Custom question to create your own.
-
Once you've added a field or question, select Required to add it to the registration form.
Note: By default, registration is open until the event ends unless the organizer enables and sets a different registration end time.
View form answers
To view a potential attendee's form answers:
-
Go to Registration > Configuration.
-
Select the dropdown arrow next to Pending approval.
-
Select view in the attendee's row to see their answers to the registration form.
Approve or deny requests
Note: Reviewing registration requests is available as part of Teams Premium, an add-on license that provides additional features to make Teams meetings more personalized, intelligent, and secure. To get access to Teams Premium, contact your IT admin.
To approve or deny registration requests:
-
In Registration, make sure you've selected Require manual approval of all event registrations.
-
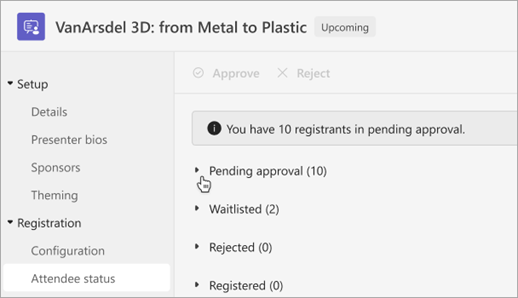
Go to Registration > Attendee status.
-
Select Pending approval.
-
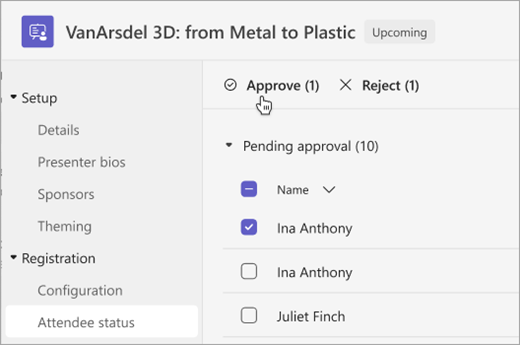
Check the box next to each name you want to approve or deny. Select the box next to Name to select all.
-
Select Approve or Reject to manage the request(s).
Manage the registration waitlist
Note: Managing the waitlist is available as part of Teams Premium, an add-on license that provides additional features to make Teams meetings more personalized, intelligent, and secure. To get access to Teams Premium, contact your IT admin.
People who register for a webinar after the event has reached capacity will be added to the waitlist. When spots open up because the organizer increases capacity or other registrants cancel, waitlisted registrants will move to Pending approval if manual approval is enabled. Otherwise, their registration will go through automatically.
To enable the waitlist:
-
Open the webinar in your Teams calendar.
-
Go to Registration > Configuration.
-
Select Enable waitlist for this event.
To access the waitlist:
-
Open the webinar in your Teams calendar.
-
Go to Registration > Attendee status.
Note: Organizers can't remove or approve attendees from the waitlist; however, they can increase the event's registration capacity to move waitlisted attendees to the registered or pending approval state.
Let registered attendees bypass the lobby
When people join your webinar, they’ll first enter a lobby until they’re let in by an organizer, co-organizer, or presenter. To manage the lobby more easily, let registered attendees bypass the lobby automatically by changing the lobby bypass settings.
To let registered attendees bypass the lobby:
-
Go to your Teams calendar and select your webinar.
-
In Details, select Meeting options
-
In Meeting access
Note: This will allow internal and external registered users and people designated in the Who can bypass the lobby? dropdown to bypass the lobby.
-
Turn the Reject anyone who can't bypass the lobby toggle on to reject anyone who isn’t registered for your event.
Note: This option is only available if the Attendees with the registration link can bypass the lobby toggle is turned on.
-
Select Save.
This setting can be changed before and during the event. If you change it during the event, it’ll affect attendees who enter the lobby after the setting change. To learn more, see Using the lobby in Teams meetings.
Download registration reports
To download a registration report:
-
Select Calendar
-
Find the webinar you want to download a report for.
-
If you're using the new Teams calendar, select the webinar and select Edit
-
If you're using the classic Teams calendar, right-click the webinar and select Manage event
-
-
Select Reports.
-
Select Download


