Organize a live event in Viva Engage
Important: Engage is retiring its Live events powered by Teams Live Events feature effective April 15, 2026. Existing live events that you've already scheduled will continue to be supported through February 28, 2027. We recommend to our customers to transition to events in Engage powered by Teams town halls, which offer an improved experience for large-scale digital and hybrid events.
Viva Engage live events bring presentations to people in your network, where attendees and presenters join from their own computers over video. Built-in discussions are available before, during, and after the event and video recordings are available after the event. Microsoft Teams processes and records video for Viva Engage live events.
Each live event can have up to 10 presenters and 10,000 participants. To host events for more than 10,000 participants, contact the Microsoft 365 Live Events Assistance program to make a temporary exception.
Important: Configure video, community, and user permissions at least 24 hours in advance to ensure that all changes propagate across Microsoft Teams and Viva Engage before the live event.
Viva Engage offers two methods for producing live events.
Choose this production method if you have audio and video (AV) equipment and an AV support staff to run it. In this production method, Viva Engage has everything you need to schedule, run, and participate in the event. Teams automatically records the event and makes the video available for viewing in Viva Engage after the event.
Event setup is easy once you set up the AV equipment and choose a hardware or software external encoder.
|
1: Schedule the live event |
In the Viva Engage community where the event will take place, select Events and select Create live event. If you create a test event, it won't be promoted in the community or home feeds.
|
|
2: Share the live event with attendees |
From within the live event page, select Share and copy the attendee link. Share the link with people you want to attend to Viva Engage, Teams, calendar invites and Outlook. |
|
3: Produce your live event |
When your external encoder is set up, return to the event page. In Viva Engage, go to the Events tab, and click the link for the event. Select Start setup on the video player and wait for the Ready to connect message. Copy the necessary information to connect your encoder to send the live encoder feed. Server ingest URL - In your encoder, this may be called URL or Address. Microsoft Stream doesn't require a stream key or name, so you can fill this in with any non-empty value such as MicrosoftStream. Secondary server ingest URL - This setting outputs a redundant stream from your encoder, which means it requires double bandwidth. If your encoder and bandwidth capacity supports this, use this URL to double push, thereby improving durability and resiliency. Secure Connection (SSL) - Use this to switch between Real time Messaging Protocol (RMTP) or Secure Real time Messaging Protocol (RTMPS) protocols for the ingest URLs. To use RTMPS, your encoder must support it. |
|
4: Start streaming |
Start streaming from the encoder to the server ingest point. You'll see the producer preview update in Viva Engage. Note: Attendees won't see the preview stream. They'll see an automatically generated slate. |
|
5: Start event |
When you're satisfied with setup and can see the preview, select Start event.
Select Endevent on the producer controls to end the event and make the content immediately available in video. |
|
6: Follow up afterwards |
Continue the discussion in Viva Engage after the event. A recording of the video is available for people who can't make the scheduled time, and the Viva Engage conversation remains open for follow-up questions and comments. |
Choose this method if presenters use Microsoft Teams to present themselves on camera (and record video) from their computers. This type of event is scheduled and produced in Teams, similar to setting up a Teams meeting, and requires no AV expertise.
Attendees watch the video and participate in the event from Viva Engage.
|
1: Schedule the live event |
Create the event in a Viva Engage community:
|
|
2: Share the live event |
Get the link to the event and share it with people you want to attend. |
|
3: Broadcast your live event in Teams |
In Teams, start the event, and then start the video. Moderate the discussion in Teams or Viva Engage and end the event in Teams. (See Moderate a live event on this page.) |
|
4: Follow up afterwards |
Continue the discussion in Viva Engage during and after the event. A recording of the video is available for people who can't make the scheduled time, and the Viva Engage conversation remains open for follow-up questions and comments. |
Best practices for organizing live events
To optimize attendance, use these best practices when planning your live event:
-
Promote the event at least 24 hours in advance. In your invitation, remind people that they can participate from their device or computer. If they can't attend, they can watch the recorded video.
-
Choose a time that accommodates the most participants across different time zones.
-
Invite people using the tools they use most: Viva Engage, Microsoft Teams, Outlook, or SharePoint in Microsoft 365. And don't hesitate to send out a reminder the day before and again right before the event - it works!
-
Build momentum by having participants ask questions in the week before the event.
-
Motivate contributors by using question and answer to mark the best answers to questions asked during the event.
Moderate a live event
Event producers, organizers, and community admins can manage discussions and responses for attendees during a Viva Engage live event.
|
Postpone or turn off questions |
|
|
Monitor questions |
|
Organize a community town hall
Live events are an anchor for organizational engagement and collaboration. Through events, leaders can provide guidance and create clarity about strategy and culture. Attendees can engage with leaders, connect with people across their organization, strengthen their networks, and share insights and ideas.
You can create and produce town halls as live events in Viva Engage communities. This section describes the attendee experience and gives best practices to drive discovery, attendance and engagement.
-
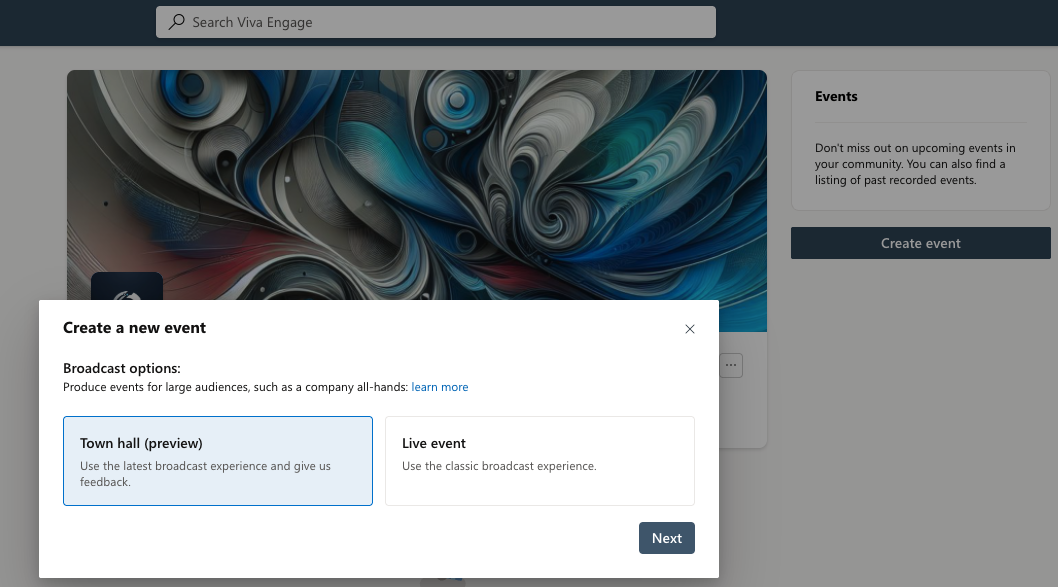
To start, select Create Event in the right panel of the Conversations or Events tabs.
-
Select Town Hall as the broadcast option.
-
Enter the event name, starting and ending dates and times, and a description. Configure the event time from the time zone of your device. Viva Engage localizes the event to everyone's time zone and shows the correct value for all users.
The Visibility section shows the audience for the event:
-
Town halls created for public communities are available to anyone in the organization.
-
Town halls created for private communities are available only for community members.
-
-
Add co-organizers and presenters in the Organizers section.
-
Add up to 10 co-organizers and presenters per event. Any event co-organizers can manage the town hall.
-
The event organizer can manage and delete the town hall. The community admin that creates the town hall is identified as the event organizer.
-
Presenters can be anyone in your organization. They can present their screen and can share voice and video during the event.
-
-
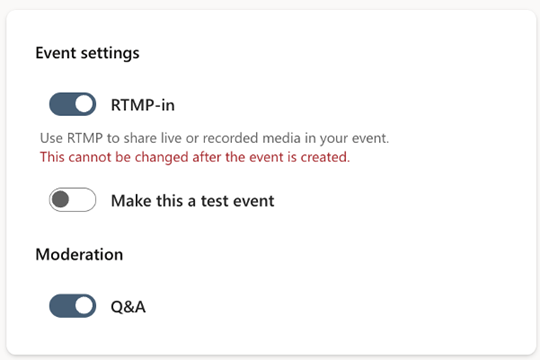
Specify the Event settings. You can use either of the following methods to produce live events:
-
In Teams (the default).
-
A live or prerecorded stream that uses the RTMP protocol.
-
-
By default, live events are produced in Teams. Presenters and organizers join the event, similar to joining a Teams meeting. Organizers can determine which video, audio, and shared screens are broadcast to attendees.
-
To create and publish the event, select Create.
After you create and publish a town hall, the event page appears in the community's Events tab. Selecting the event card takes you to the event page, where organizers and attendees can discover and engage with the event. Organizers, co-organizers and presenters can share, edit and produce the event through that event page.
The organizers, co-organizers, and presenters also receive calendar invites. Invitations reflect each person’s time zone and update automatically if the event time changes.
When to use RTMP vs. production in Microsoft Teams
As noted, live events are produced directly in Teams. It works like a regular Teams meeting, where presenters and organizers control what’s shared with attendees in real time. It’s simple, flexible, and useful for most cases.
You can use a studio, or video production hardware to produce the event. Send the resulting live or prerecorded stream to Teams for distribution to attendees. Use the RTMP protocol to connect a studio or other encoder to the event. If you produce the event using RTMP, enable the RTMP-in toggle.
Note: You can't change the RTMP-in setting after you create the event.
Use RTMP delivery when you want a more polished experience, such as using a studio set up, mixing multiple video/audio feeds, or when you stream pre-recorded content. RTMP lets you send a broadcast-quality stream into Teams using external encoders. Learn more about the RTMP-In feature.
No matter which option you choose, attendees watch the event live on Viva Engage via their browser or mobile device.
Turn on the Make this a test event toggle to create a test event. Test events are designed for practice and dry runs – they won’t appear in the community events catalog, and attendees will not receive event start or end notifications.
Note: after you create the event, you can't change the test event setting.
Select Create to publish the new event.
After the town hall is published, the event page is listed in the community's Events tab. Selecting the event card opens the event page where organizers and attendees can discover and engage with the event, and organizers, co-organizers and presenters can share, edit and produce the event.
After publication, Engage sends calendar invites to organizers, co-organizers, and presenters. Invitations reflect each person’s time zone and automatically update if the event time changes.
Note: Attendees don't receive calendar invites. See the Best Practices section for information about how to promote the event, and drive attendance and engagement.
Sharing, editing, and producing community town halls
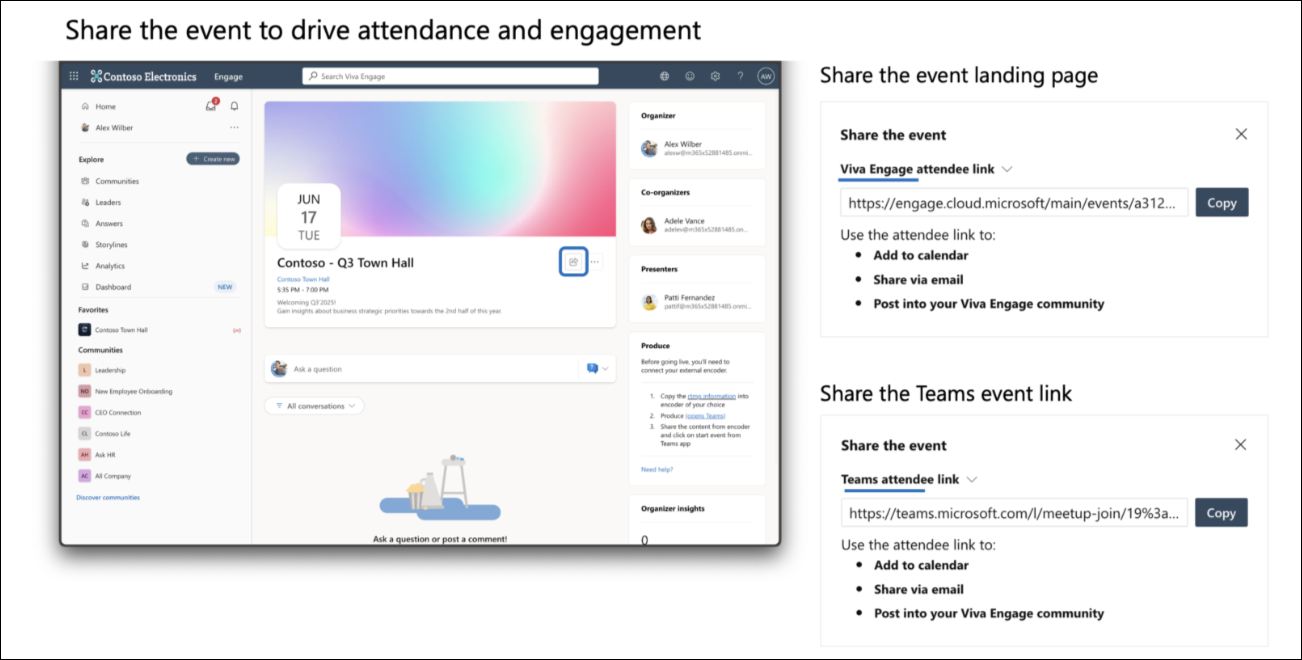
Organizers, co-organizers and presenters can share, edit and produce the event from the event page. The Share feature offers the ability to copy the event page, or the link to the Teams event. You can embed the links in posts and announcements to drive attendance and engagement.
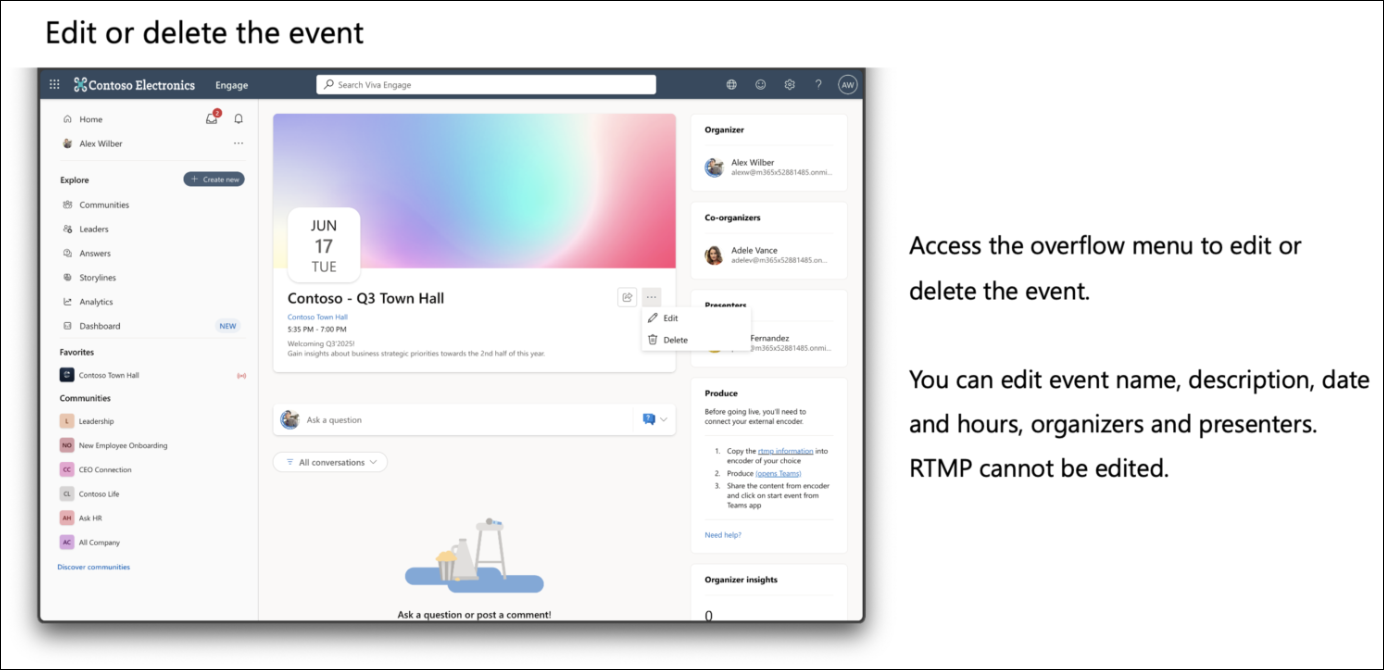
The overflow menu allows organizers, co-organizers and presenters to edit or delete the event:
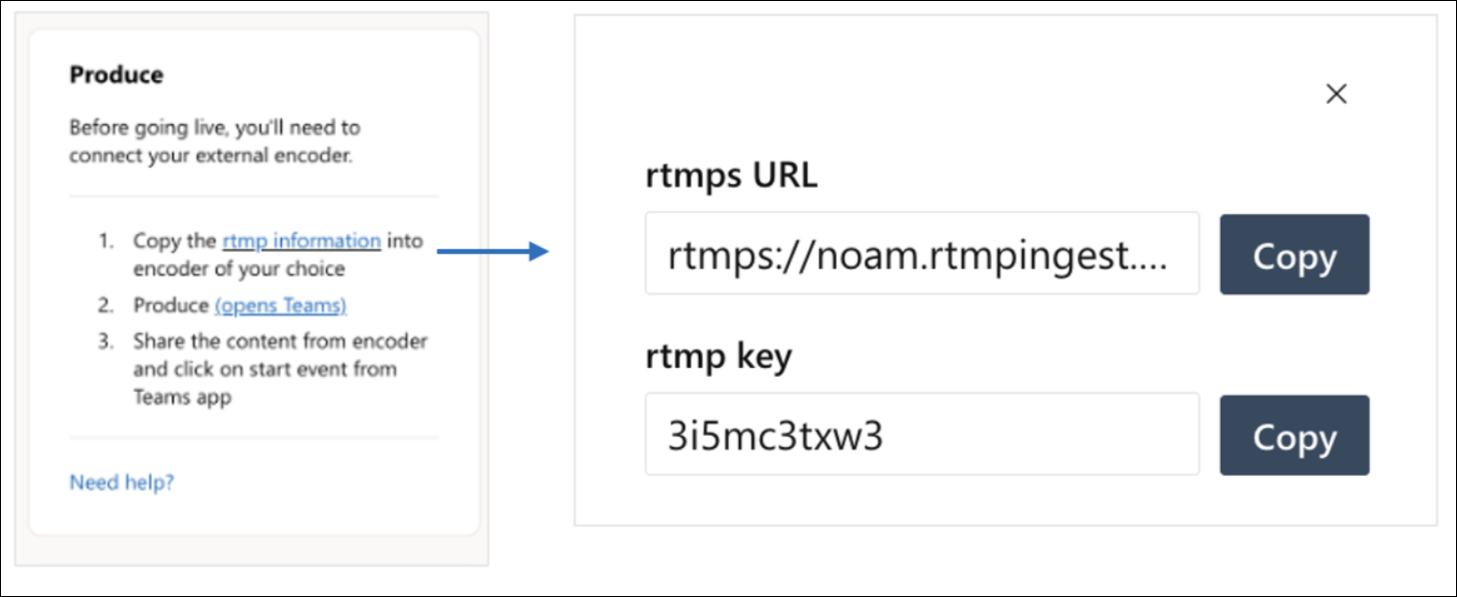
Produce the event from the Produce widget in the right panel. The Produce the event in the encoder of your choice option is only available when RTMP-in is enabled during creation. Clicking on the RTMP information link allows you to copy the RTMP URL and key, for which you can use your chosen encoder:
The attendee experience
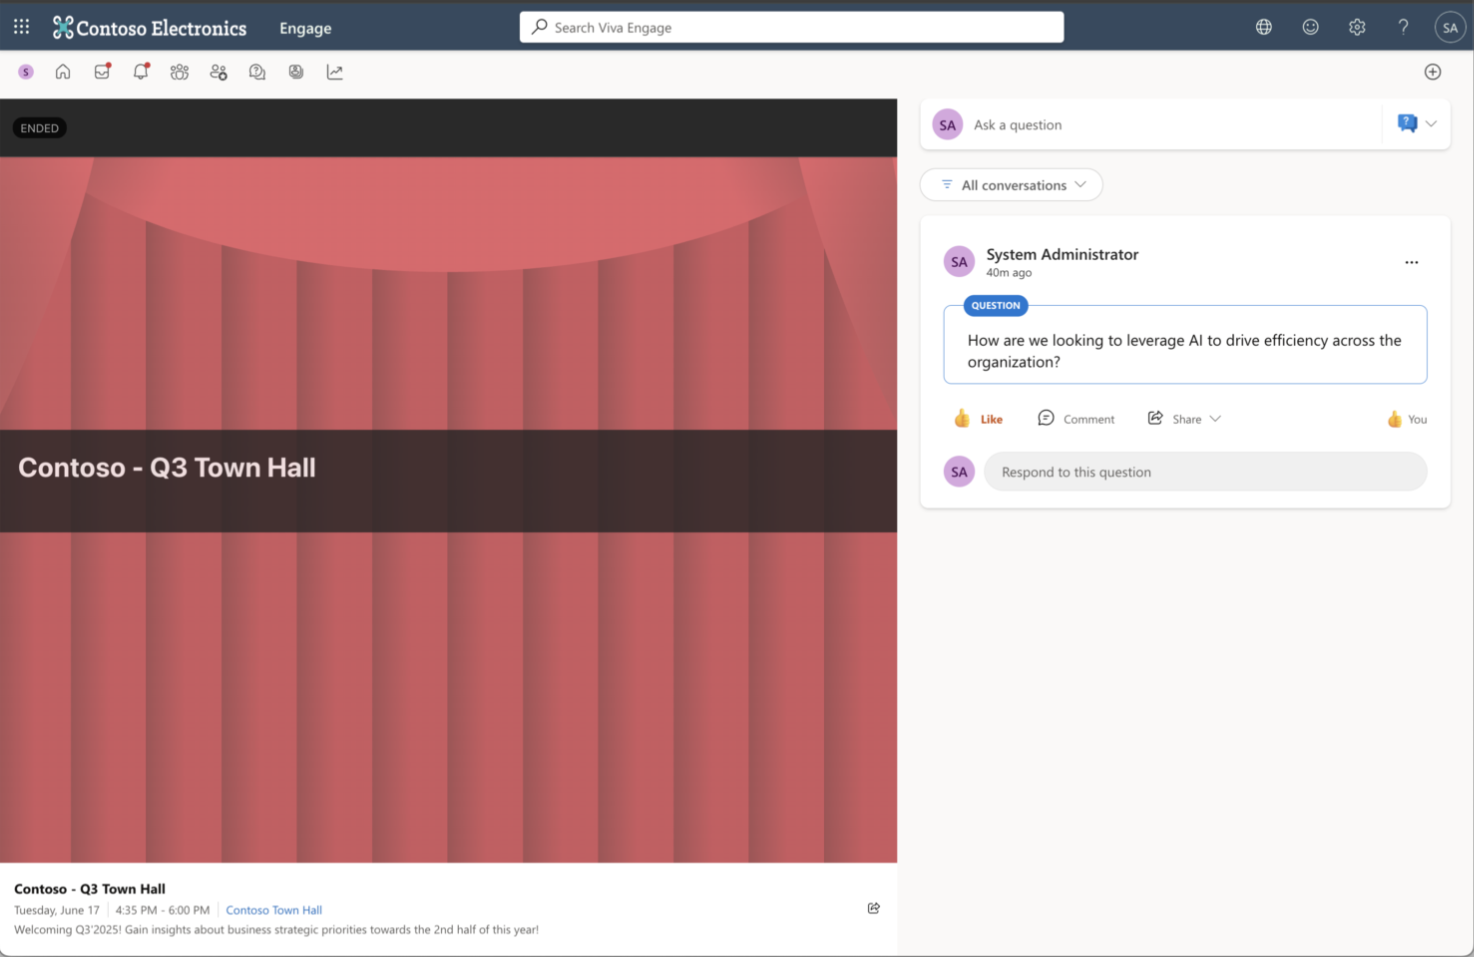
When a town hall begins, attendees can find it at the top of the Conversations tab of the community, where it shows as a banner, or through a notification sent to the bell.
Selecting the event banner or the notification opens the event page where attendees can watch the town hall and participate.
To produce the live event in Teams, select the Produce (open Teams) link in the Produce widget in the right panel. The link opens the Teams meeting window. You can select Join now to join the event. Event production in the Teams web experience is not currently supported.
After you join the event, select Start event in the toolbar.
With Town Halls for communities, organizers and co-organizers control who is on screen. You can bring and take presenters and participants off the screen using the toggle in their cards on the left rail. People who are on screen can share their screen with others.
End an event and manage video on demand
The organizer, co-organizer, or presenter can end the event at any time by selecting End event in the toolbar.
Note: For more information about Teams town halls, see .
After an event is recorded, the recording appears on the event page.
You can manage the recording using the Replace event recording widget located in the right panel of the event page. You can use any SharePoint-hosted mp4 as the video on demand by pasting the file’s URL. Make sure that the file has the right permissions – anyone who should be able to view the video must have access to it.
Note: For sharing video recordings, only SharePoint links are supported.
Get support
Support for live events is typically done by the IT or AV staff within your organization.
If your Microsoft 365 Global administrator provided contact information for your local support team, you can find it in Viva Engage or Microsoft 365:
-
Select the Help icon. Support information is located at the bottom of the help card.
Organizers and producers have access to data for live events.
-
In a browser, go to Viva Engage and navigate to a community.
-
Select Events, choose an upcoming or past event, and select View.
Note: Analytics don't exist for events created before January 1, 2021.
Organizer Insights contain information on conversations, views, and people in the live event. The organizer insights dashboard is updated in real-time, before, during and after the event.
Live Events Insights contains two sections: Reach and Engagement. The data in these sections updates every 5 minutes.

