
Use the Events app in Microsoft Teams to create, customize, and manage events such as webinars, town halls, or large meetings from a single experience. Events organized in both the Events app and Teams calendar will appear in the Events app, where they can be managed.
Important
If you created your event in the Teams calendar, these experiences may look different. For help customizing events scheduled from your Teams calendar, see Schedule a town hall in Microsoft Teams and Schedule a webinar in Microsoft Teams.
In this article
Create an event
Schedule an event from scratch in the Events app to tailor the experience to your exact needs. From the event capacity to attendee features, every element of your event can be customized.
For more structure while scheduling, choose a template that most represents the type of event you want to host. You can always modify template settings while scheduling.
To create a new event in the Events app:
Select Events
 on the left side of Teams.
- If Events isn’t pinned on your app bar, select View more apps
 on the left side of Teams. Then, search and select Events.
- If Events isn’t pinned on your app bar, select View more apps
Select Create event
 .
.Select Create an event from scratch
 or choose an event template.
Fill out event details
Whether you’re creating an event from scratch or using a pre-existing template, customize details and settings to tailor the event to your needs.
To customize event details and settings:
In Add event details:
Enter a Name for your event.
Add a Description to tell attendees about your event.
Specify start and end dates and times.
In Where's this event happening?, add a location if applicable.
If you’re adding a Teams Room, select Teams rooms options to specify who the room is for.
In the Set up room for dropdown menu:
Select Presenting if the room is for people who will be speaking or presenting during the event. When that room joins, it will have the option to join as a presenter or attendee.
Select Attendee viewing if the room is for event attendees. When that room joins, it won’t have the option to join as a presenter.
To learn more, see Host or attend an event from a Microsoft Teams Room.
In Who’s planning this event:
In the Send invites from this mailbox dropdown menu, designate the mailbox that invites will be sent from. Send emails from yourself, a delegate, an event mailbox, or a shared mailbox. Anyone with access to the specified mailbox will be able to edit the event.
Add optional co-organizers and presenters. They’ll receive invites when you save the event.
In Who can attend:
Specify who will have access to the event.
Invite people and groups.
Turn on registration if needed.
In Set up experience and options:
Set your event capacity. Turn on the Optimize for large audience toggle to apply settings that best accommodate larger events. Once your event is saved, this setting can’t be changed.
Select attendee participation features to turn them on or off and preview how they’ll appear during the event.
Turn Manage what attendees see on or off for more control over how content and people appear during the event.
Turn the Enable Green room toggle on to give yourself and other organizers and presenters a place to check audio, video, and screen setup before the event starts.
Select All options for more meeting options.
Note
Some features may be unavailable depending on your event size and licensing. To learn more about scaling event features, see Microsoft Teams event features at scale.
Select Save and Continue
 .
.
Your changes will be saved. Presenters and organizers will receive invites when you save the event and have access to make changes. Attendees won’t receive invites nor be able to view the event until you publish it.
Important
After your event is saved as a draft, the mailbox selection and choice to optimize for a large audience can’t be changed.
Designate mailbox for event emails
When creating an event, you can choose which mailbox sends invitations and event emails. Once your event is saved as a draft, the mailbox selection can’t be changed.
There are several mailbox options:
Event mailbox: A dedicated mailbox is created for the event. Emails are sent from this event-specific identity and co-organizers will have full scheduling and editing capabilities.
Your mailbox: Emails are sent from your personal mailbox, and co-organizers have limited capabilities.
Delegate mailbox: Emails are sent by a delegate on behalf of another person. Other delegates for that person can also edit the event.
Shared mailbox: Emails are sent from a shared organizational mailbox created and managed by your org’s admin. Anyone with access to that mailbox can edit the event.
Co-organizers only have full parity when using an event mailbox. With other options, co-organizers may not be able to edit scheduling details or manage other event elements. To learn more, see Manage Microsoft Teams events in shared mailbox and delegate scenarios.
If a shared mailbox was set up using classic Outlook, it won't appear as an option in the Send invites from this mailbox dropdown menu. To resolve this:
- Turn on shared calendar improvements in Outlook.
- Restart Outlook.
- In Outlook, re-add the missing calendar.
- Close and reopen the Teams Events app.
Existing meetings won't be affected and no data will be lost. If you still don't see the shared mailbox, contact your IT admin.
Add external presenters
Easily add up to 20 external presenters to your event. External presenters are presenters who are anonymous, outside your org, or don’t use Teams.
When you add an external presenter, they'll receive a unique join link that will allow them to enter the event without waiting in the lobby. Anonymous presenters won't need to sign in with a Microsoft account; they can join using the link and type in their name before entering.
To add an external presenter:
Select Events
on the left side of Teams.Select Manage.
Select an event.
Select Edit details.

Select Who’s planning the event?.
In Presenters, enter the email addresses of the external presenters you want to add.
Select Save and send invites
.
To edit presenter details, like their name, bio, and how they appear on the event page, open the event details and select Manage presenters
 .
.
You can also add external presenters when creating the event.
Note
External presenters shouldn't forward their links. They're able to join using the same link on up to three devices. If a guest hasn't successfully authenticated when joining the event, they'll be placed in the lobby. From there, an event organizer or presenter can approve or deny their request to join the event.
Regenerate or copy the external join link
To regenerate or copy the link that external presenters join with:
Select Events
on the left side of Teams.Select Manage.
Select an event.
Select People & emails > Presenters.
Next to the presenter you want to create a new link for, select View join link.
Select Copy
 to copy the link to your clipboard or Reload
 to regenerate a new one.
Manage event drafts
Until an event is published, it will remain a draft that organizers and co-organizers can access and make multiple edits to without sending invites to attendees.
To access an event draft:
Select Events
on the left side of Teams.Select Manage.
Under Drafts, choose the draft you’d like to open.
Select Edit details
to make changes to event details. Then, select Save changes
.
Note
If the event was created in the Teams calendar, editing details will open the calendar event scheduling form. Only events created in the Events app can be edited directly in the app.
Publish an event
After you’ve finalized event details and are ready to invite attendees, publish your event. When you publish an event, invites will be sent to attendees automatically. They’ll be able to view the event details, register, and join the event.
You can still invite attendees after an event is published and modify some event settings. You can’t change the access level or turn registration on or off after the event is published.
To publish an event:
Select Events
on the left side of Teams.Select Manage.
Under Drafts, find the event you want to publish.
Select Edit details
to finalize the event details.Select Save changes
if needed, or Back
 to return to the main draft.
Turn on the Preview toggle to preview how the event site will look to attendees.
Select Publish event
 .
.
After your event is published, you’ll be able to publicize your event.
Duplicate an event
Recreate an event with the same customizations by duplicating it. When you duplicate an event, the event details, added people and groups, and settings will be copied over to a new one. You can then update the name, date, time, and other details as needed.
To duplicate an event:
Select Events
on the left side of Teams.Select Manage.
Find the event you’d like to duplicate and select More options
> Duplicate
.
Save as a template
Save an event as a template to reuse for similar events in the future without having to build it from scratch each time. Templates carry over all your event settings except for the date and time for you to use again.
To save an event as a template:
Select Events
on the left side of Teams.Select Manage.
Select the event you want to reuse.
Select More options
> Save as template
.Add a template name and description so you can identify it later.
Select Save template.
The template will be available when you create a new event, under Your saved templates. Edit, schedule, or delete templates from here.
Cancel an event
To cancel an event created in the Events app:
Select Events
on the left side of Teams.Select Manage.
Select the event you want to cancel.
Select More actions
> Cancel
 .
.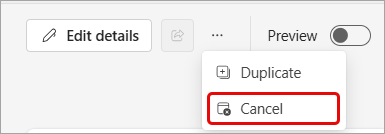 .
.Select Cancel event.
To cancel events created outside of the Events app, see Cancel a webinar or Cancel a town hall.