
Manage event registration in Microsoft Teams to determine how attendees sign up and participate in your event. Turn registration on or off, customize the registration form, review and manage registration requests, and manage your event waitlist to help ensure a smooth registration experience for attendees.
Important
If you created your event in the Teams calendar, these experiences may look different. For help managing registration for events scheduled from your Teams calendar, see Manage webinar registration.
Turn registration on or off
While scheduling your event, you can choose to turn registration on or off.
To turn registration on or off:
Create an event in the Events app.
In Who can attend, turn on the Turn on registration? toggle.
After you save your event, you won’t be able to change this setting.
Customize registration
Customize the registration experience for your event by editing the registration form, turning on manual registration approval and the event waitlist, and limiting registration start and end times.
Important
To modify registration, registration must have been turned on before you first saved the event while scheduling it.
Edit the registration form
Learn more about your attendees by adding custom fields to the registration form. The form will automatically ask attendees for their first and last names and emails, as well as include Microsoft consent fields.
To customize an event registration form:
Select Events
 on the left side of Teams.
Select Manage.
Find the event you want to customize the registration form for and select Edit
 .
.Select Who can attend.
In the registration settings, select Customize.
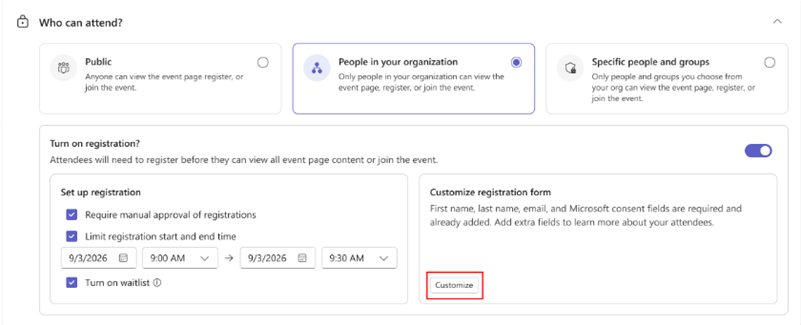
Select Add field.
Choose a field or select Custom question to create one.
Choose whether the field is required.
Use the arrows to move the field above or below others on the form.
Select Save.
Select Save changes
 .
.
To customize a registration form for an event created in the Teams calendar, see Manage webinar registration in Microsoft Teams.
Turn on manual approval
Keep your event secure by requiring manual approval for each attendee’s registration.
To turn on manual approval:
Select Events
on the left side of Teams.Select Manage.
Find the event you want to customize the registration form for and select Edit
.Select Who can attend.
Under Set up registration, check the Require manual approval of registrations box.
Select Save changes
.
Manage registration requests
To manage event registration requests:
Select Events
on the left side of Teams.Select Manage.
Under Published, select an event.
Select People & emails.
Select Attendees.
Next to Status, select Pending approval.
Select View form next to someone’s name to view their registration form.
To manage someone’s request individually, select Decline or Approve next to their name.
To manage requests in bulk, check the boxes next to multiple names or check the box next to Name. Then, select Decline (#) or Approve (#) at the top of the list.
To turn on manual approval or manage registration requests for an event created in the Teams calendar, see Manage webinar registration in Microsoft Teams.
Limit registration start and end times
To set a specific timeframe for attendee registration:
Select Events
on the left side of Teams.Select Manage.
Find the event you want to customize the registration form for and select Edit
.Select Who can attend.
Under Set up registration, check the Limit registration start and end time box.
Set the registration start and end times.
Select Save changes
.
To manage registration for an event created in the Teams calendar, see Manage webinar registration in Microsoft Teams.
Turn on event waitlist
Choose to start a waitlist after your event’s capacity is filled. If registered attendees cancel their registrations, waitlisted attendees will have the chance to register. The waitlist capacity will match the registration capacity.
To turn on the event waitlist:
Select Events
on the left side of Teams.Select Manage.
Find the event you want to turn on the waitlist in and select Edit
.Select Who can attend.
Under Set up registration, check the Turn on waitlist box.
Select Save changes
.
Manage event waitlist
If your event is full, remove a registered attendee or increase the event capacity to admit someone from the waitlist. People will be moved from the waitlist on a first-come, first-serve basis.
To manage an event’s waitlist:
Select Events
on the left side of Teams.Select Manage.
Select an event.
Select People & emails.
Select Attendees.
Next to Status, select Waitlisted.
To manage the waitlist for an event created in the Teams calendar, see Manage webinar registration in Microsoft Teams.
View registration details
Look at how many people registered for your event, viewed the registration page, canceled their registrations, and more.
To view event registration details:
Select Events
on the left side of Teams.Select Manage.
Select an event.
Select Insights.
To download this information for review later, select Download
 .
.