
Personalice entornos en eventos envolventes para adaptar el espacio de eventos a sus necesidades. Aumenta la participación agregando tu propio contenido y haciendo que la experiencia sea única en tu escenario.
Personalizar un entorno
Haga que los eventos envolventes sean más impactantes con plantillas predefinidas y herramientas sin código que le ayudan a diseñar entornos 3D con su marca, imágenes, vídeos, modelos 3D y mucho más.
Solo los organizadores y co-organizadores pueden personalizar el evento al programarlo en Teams. Los cambios en el espacio del evento deben guardarse al menos 10 minutos antes de que se inicie el evento.
Importante
- Si tiene previsto agregar contenido personalizado al evento, configure una carpeta de SharePoint o OneDrive antes del evento con el contenido que planea usar. Esto garantizará un fácil acceso a las direcciones URL al agregar objetos al evento.
- No se admite la carga directa de archivos de contenido para la personalización.
- La personalización de un evento no está disponible después de que el evento ya se haya iniciado una vez.
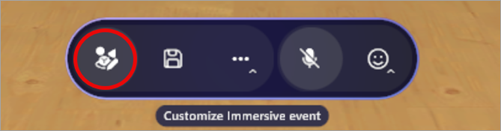
1. Unirse a la sesión de personalización
Para empezar a personalizar un espacio de evento envolvente, únase a la sesión de personalización editando el evento en el calendario de Teams. En la sesión de personalización, aparecerá como avatar en el entorno que seleccionó al programar el evento.
Para unirse a la sesión de personalización para un evento envolvente:
- Seleccione Calendar
 en Teams.
 - Haga doble clic en un evento envolvente.
- Seleccione Administrar evento
 .
. - En la parte superior de los detalles del evento, seleccione Más acciones más
 >Personalizar en envolvente .
 - Seleccione Unirse ahora para entrar en la sesión de personalización.
Importante
La opción Personalizar en inmersivo![]() no estará disponible 10 minutos antes de la hora de inicio del evento.
no estará disponible 10 minutos antes de la hora de inicio del evento.
2. Editar el espacio del evento envolvente
Una vez que esté en la sesión de personalización, puede empezar a realizar cambios en el entorno que le rodea.
Para cambiar el espacio del evento:
Seleccione Editor en la barra de menús.
En editor, seleccione Agregar un objeto al entorno
 .
.En Catálogo, seleccione un objeto para agregarlo al entorno.
Seleccione el gizmo en el centro del objeto para cambiar su posición, cambiar su tamaño o moverlo.

Configure otros detalles del objeto, como su Visibilidad, si está Habilitado y activo durante el evento, etc.
Para eliminar un objeto, seleccione El
 en la fila del objeto en el Editor.
3. Agregar objetos de contenido personalizados
Desde el Catálogo, agregue imágenes personalizadas, modelos 3D y mucho más desde OneDrive o SharePoint.
Para agregar objetos personalizados:
En editor, seleccione el tipo de objeto que desea agregar a su espacio (por ejemplo, Imagen, Modelo 3D, Vídeo, Audio).
En el explorador web:
Abra la carpeta de archivos de OneDrive o SharePoint con el contenido que guardó para agregarlo al espacio.
Mueva el puntero sobre un archivo y seleccione Compartir
 >Copiar vínculo
 para copiar la dirección URL.
Importante
Asegúrese de que la audiencia esperada del evento tenga acceso al archivo en OneDrive.
En la sesión de personalización, pegue la dirección URL del contenido en el campo URL del panel de detalles del objeto.

Presione Entrar para cargar el contenido.
Repite los pasos anteriores para crear tu experiencia.
Recomendación
- Para disfrutar de la mejor experiencia de evento, agregue tres o más objetos que contengan contenido relevante para su escenario.
- Para crear una experiencia interactiva, use los grupos de acciones para conectar varios objetos y controlar cómo se muestran. Esto le permite mostrar secuencias de contenido de objeto para el público.
4. Guardar los cambios
Cuando termine de personalizar el entorno, guarde los cambios seleccionando ![]() en la barra de menús. Después de guardar, los cambios permanecerán incluso si abandona la sesión de personalización.
en la barra de menús. Después de guardar, los cambios permanecerán incluso si abandona la sesión de personalización.
Las personalizaciones se pueden guardar en un único evento, pero no se pueden volver a usar en varios eventos.
Importante
Asegúrese de guardar todas las personalizaciones al menos 10 minutos antes de la hora de inicio del evento.
Objetos personalizables
Hay muchas opciones para agregar objetos al evento. Cualquier evento puede tener varios objetos. No podrá obtener una vista previa de los objetos durante la sesión de personalización, pero puede unirse al evento antes para obtener una vista previa de ellos.

Obtenga más información sobre lo que hace cada objeto y cómo puede personalizarlo.
| Objeto | Función | Opciones personalizables |
|---|---|---|
| Uso compartido de pantalla | Permite a los moderadores o participantes compartir su contenido de pantalla con el entorno envolvente. El audio compartido de pantalla no es compatible. |
|
| Rompehielos sociales | Genera preguntas aleatorias de rompehielos para facilitar las conversaciones y ayudar a las personas a conocerse mejor. |
|
| Punto destacado: asistente | Determina dónde aparecerá un asistente y la dirección a la que se enfrentará cuando se le llame después de levantar la mano. |
|
| Punto destacado: organizador | Determina la ubicación y la orientación de un organizador cuando lo difunde. |
|
| Asiento | Representa una posición de asiento virtual que los participantes pueden ocupar durante el evento. |
|
| Texto | Muestra texto estático o dinámico en el entorno, que se suele usar para etiquetas, instrucciones, pancartas o títulos. |
|
| Modelo 3D (archivo .glb) | Representa y muestra modelos 3D en el entorno con el formato .glb. Los participantes pueden verlo e interactuar con él. |
|
| Reproductor de audio (archivo .mp3) | Reproduce clips de audio (por ejemplo, música o narración) incrustados en el entorno. |
|
| Punto de des originado | Determina dónde aparece un asistente y en qué dirección se encuentra cuando se une a un evento envolvente. |
|
| Imagen (.png, archivo .jpeg) | Muestra imágenes 2D dentro del entorno y es útil para personalización de marca, señalización o ayudas visuales. |
|
| Reproductor de vídeo | Reproduce contenido de vídeo en pantallas virtuales o superficies dentro del entorno envolvente. |
|
| Botón Texto | Desencadena otros objetos que se reproducirán como parte de un grupo de acciones. |
|
Grupos de acciones en eventos envolventes
Cree experiencias interactivas sin codificación. Cree oportunidades para la participación dinámica de la audiencia permitiéndoles activar animaciones, sonidos e indicaciones visuales durante eventos en directo.
Hay un sinfín de posibilidades creativas con grupos de acción. Por ejemplo:
- Momentos de bienvenida del evento: activa el audio, agrega una imagen de bienvenida y confeti e inicia un uso compartido de pantalla.
- Mostrar el funcionamiento de un motor de chorro: use un botón para desencadenar la aparición de un modelo de un motor de chorro, inicie su animación y reproduzca audio.
- Realice un cuestionario informal: Escriba una pregunta en la pared y coloque los botones de respuesta para mostrar una imagen de una marca de verificación o una respuesta incorrecta.
- Ejecutar una presentación con modificadores de contenido: cambie las direcciones URL de imágenes y vídeos para mostrar nuevo contenido a los asistentes durante un evento.
Con los grupos de acciones en eventos envolventes, puede crear experiencias interactivas sin escribir código. Controlar los estados de objeto y desencadenar secuencias durante un evento automáticamente o mediante botones en los que se puede hacer clic.
Los estados de objeto incluyen:
- Habilitar o deshabilitar objetos (por ejemplo, mostrar u ocultar un modelo 3D)
- Controlar animaciones (inicio, detención, bucle)
- Reproducción o detención de elementos multimedia (audio y vídeo)
- Cambiar dinámicamente las direcciones URL de los elementos multimedia
Agrupe acciones y conéctelas a un botón o reprodúzcalas desde el panel de grupos de acciones durante un evento en directo.
| Tipo de objeto | Opciones de estado |
|---|---|
| Audio | Habilitado, estado de reproducción, volumen, DIRECCIÓN URL |
| Rompehielos | Habilitado |
| Modelo 3D | Habilitado, animación, bucle |
| Texto | Texto habilitado |
| Reproductor de vídeo | Habilitado, estado de reproducción, volumen, DIRECCIÓN URL, bucle |
| Uso compartido de pantalla | Habilitado |
| Botón Texto | Habilitado |
Crear grupos de acciones
En una sesión de personalización, agregue objetos al espacio.
Seleccione Grupos de acciones en la barra de menús.

Seleccione Crear nuevo grupo de acciones
, asigne un nombre al grupo y seleccione Aceptar.

Seleccione Agregar contenido
para especificar un objeto.
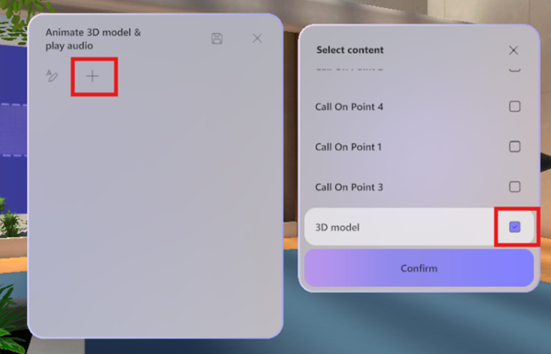
Seleccione el objeto en la lista y seleccione sus controles.

Nota
En este ejemplo, el modelo 3D está deshabilitado y no será visible en el espacio. El grupo de acciones lo habilitará una vez que se desencadene el grupo de acciones, de modo que el estado habilitado esté activado. Además, la animación comenzará a repetirse una vez que el grupo de acciones esté activado.
Agregue objetos adicionales al grupo de acciones repitiendo los pasos 4 a 5.
Enviar comentarios
Para enviar comentarios sobre su experiencia de evento envolvente, seleccione Menú![]() >Enviar comentarios
>Enviar comentarios![]() dentro del evento inmersivo.
dentro del evento inmersivo.
Para enviar comentarios sobre la experiencia de Teams, como la programación o la ventana del evento (incluida la pantalla Unirse y características como audio, chat o pantalla compartida), seleccione Configuración y más![]() >Informar de un problema
>Informar de un problema en la esquina superior derecha de la ventana del evento de Teams.
Temas relacionados
Cargue y guarde sus archivos y carpetas en OneDrive