
追加の登録設定と要件を使用して、ウェビナーに構造を追加します。 出席者の登録を変更するには、Teams 予定表からウェビナーを開き、[ 登録>Configuration] に移動します。

ここから、次を実装できます。
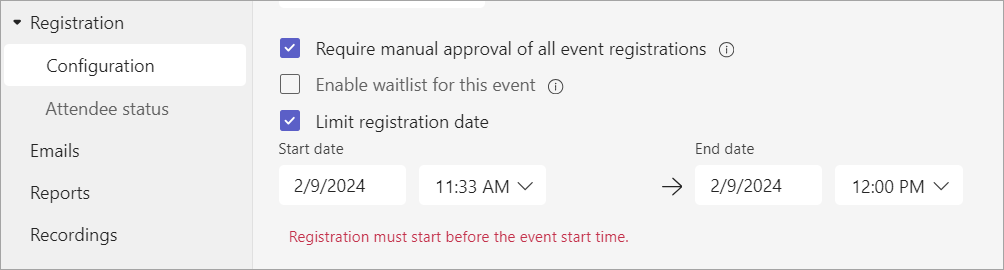
- イベント容量 - ウェビナーに登録できるユーザーの数に制限を設定します。
- すべてのイベント登録の手動承認が必要* - 登録要求を承認または拒否することで、ウェビナーに参加できるユーザーを決定します。
- このイベントの待機リストを有効にする* - イベント容量がいっぱいになった後、待機リストを実装してオーバーフロー登録要求を管理します。 待機リストの容量は、イベントの容量と等しくなります。
- 登録日を制限* - 潜在的な出席者がイベントに登録できる時間枠を設定します。
*高度な登録機能。
注
イベント構成に登録機能がない場合は、IT 管理者に問い合わせてください。
登録の開始時刻と終了時刻を設定する
注
- 登録の開始時刻/終了時刻を制限することは高度な登録機能であり、最大 3,000 人の出席者が参加するイベントで利用できます。 大規模なイベントでこの機能を使用するには、最大 100,000 個のインスタンスを有効にするために、組織に出席者容量パックが必要です。
- 2026 年 4 月 1 日より前にTeams Premiumしていた場合は、ライセンスの有効期限が切れるまで、最大 100,000 人の出席者までのイベントでこの機能に引き続きアクセスできます。 イベントの Teams ライセンスの詳細については、IT 管理者にお問い合わせください。
登録の開始時刻と終了時刻を設定して、潜在的な出席者がウェビナーに登録できる時間を制限します。
登録の開始時刻と終了時刻を設定するには:
[ 登録>構成] に移動します。
[ 登録日の制限] を選択します。
[ 開始日 ] ドロップダウン メニューと [ 終了日 ] ドロップダウン メニューで登録ウィンドウを指定します。
登録の管理
ウェビナー登録フォームに質問を追加して、背景の詳細、イベントの聞き方など、対象ユーザーの詳細を確認します。 また、潜在的な出席者が表示および同意するための法的条件を含めることもできます。
登録フィールドを追加する
登録フォームにフィールドを追加するには:
[ 登録>構成] に移動します。
[ フォーム] で、[ フィールドの追加] を選択します。
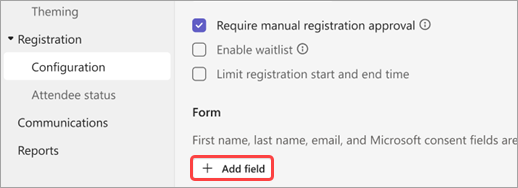
事前設定されたフィールドから選択するか、[ カスタム質問 ] を選択して独自の質問を作成します。
フィールドまたは質問を追加したら、[ 必須 ] を選択して登録フォームに追加します。
注
既定では、開催者が別の登録終了時刻を有効にして設定しない限り、登録はイベントが終了するまで開きます。
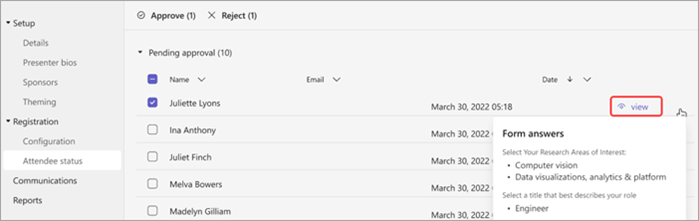
フォームの回答を表示する
出席者候補のフォーム回答を表示するには:
[ 登録>構成] に移動します。
[ 承認待ち] の横にあるドロップダウン矢印を選択します。
出席者の行で [ビュー ] を選択して、登録フォームに対する回答を表示します。
要求を承認または拒否する
注
- 登録要求の確認は高度な登録機能であり、最大 3,000 人の出席者が参加するイベントで利用できます。 大規模なイベントでこの機能を使用するには、最大 100,000 個のインスタンスを有効にするために、組織に出席者容量パックが必要です。
- 2026 年 4 月 1 日より前にTeams Premiumしていた場合は、ライセンスの有効期限が切れるまで、最大 100,000 人の出席者までのイベントでこの機能に引き続きアクセスできます。 イベントの Teams ライセンスの詳細については、IT 管理者にお問い合わせください。
登録要求を承認または拒否するには:
[ 登録] で、[ すべてのイベント登録の手動承認が必要] を選択していることを確認します。
[ 登録>Attendee 状態] に移動します。
[ 承認待ち] を選択します。
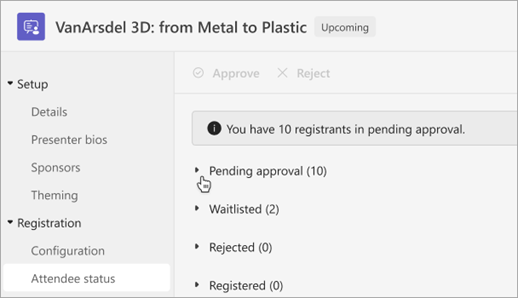
承認または拒否する各名前の横にあるチェック ボックスをオンにします。 [ 名前 ] の横にあるボックスを選択して、すべてを選択します。
[ 承認] または [ 拒否] を選択して要求を管理します。

登録待機リストを管理する
注
- 登録待機リストの管理は高度な登録機能であり、最大 3,000 人の出席者が参加するイベントで利用できます。 大規模なイベントでこの機能を使用するには、最大 100,000 個のインスタンスを有効にするために、組織に出席者容量パックが必要です。
- 2026 年 4 月 1 日より前にTeams Premiumしていた場合は、ライセンスの有効期限が切れるまで、最大 100,000 人の出席者までのイベントでこの機能に引き続きアクセスできます。 イベントの Teams ライセンスの詳細については、IT 管理者にお問い合わせください。
イベントが容量に達した後にウェビナーに登録するPeopleは、待機リストに追加されます。 開催者が容量を増やしたり、他の登録者がキャンセルしたりしたためにスポットが開くと、手動承認が有効になっている場合、待機リストに登録された登録者は [承認待ち] に移動します。 それ以外の場合、登録は自動的に行われます。
待機リストを有効にするには:
- Teams 予定表でウェビナーを開きます。
- [ 登録 > 構成] に移動します。
- [このイベントの待機リストを有効にする] を選択します。
待機リストにアクセスするには:
Teams 予定表でウェビナーを開きます。
[ 登録>Attendee 状態] に移動します。
注
開催者は、待機リストから出席者を削除または承認することはできません。ただし、待機リストに登録された出席者を登録済みまたは保留中の承認状態に移動するために、イベントの登録容量を増やすことができます。
登録済みの出席者にロビーをバイパスさせる
ウェビナーに参加するユーザーは、開催者、共同開催者、または発表者が参加するまで、最初にロビーに入ります。 ロビーをより簡単に管理するには、ロビー バイパス設定を変更することで、登録された出席者がロビーを自動的にバイパスできるようにします。
登録済みの出席者がロビーをバイパスできるようにするには:
Teams 予定表に移動し、ウェビナーを選択します。
[ イベント
![チームの表示] -[展開] アイコン を選択します](../media/teams-expand-icon.png) 。
。[ イベント
![の管理] edit-pencil-icon-20x20-png](../media/edit-pencil-icon-20x20-png.png) を選択します。
を選択します。[ 会議オプション
![] [設定] ボタンを選択します](../media/skype-teams-mobile-icon-settings.png) 。
。[ Meeting access
![teams-meeting-access-icon]\(会議アクセス チーム-meeting-access-icon](../media/teams-meeting-access-icon.png) \) で、[ 登録を含む出席者] リンクをオンにすると、ロビーのトグルがバイパスされます 。
\) で、[ 登録を含む出席者] リンクをオンにすると、ロビーのトグルがバイパスされます 。注
これにより、[ ロビーをバイパスできる ユーザー] ドロップダウンで指定された内部および外部の登録済みユーザーとユーザーがロビーをバイパスできるようになります。
[ロビーをバイパスできないすべてのユーザーを拒否する] トグルをオンにして、イベントに登録されていないすべてのユーザーを拒否します。
注
このオプションは、 登録リンクを持つ出席者がロビートグルをバイパスできる 場合にのみ使用できます。
[
 ] を選択します。
この設定は、イベントの前後に変更できます。 イベント中に変更すると、設定変更後にロビーに入る出席者に影響します。 詳細については、「 Teams 会議でのロビーの使用」を参照してください。
登録レポートをダウンロードする
登録レポートをダウンロードするには:
- Teams で [Calendar
![teams-calendar-tab-icon]](../media/teams-calendar-tab-icon.png) を選択します。
を選択します。 - レポートをダウンロードするウェビナーを選択します。
- [ イベント を選択します。
- [レポート] を選択します。
- [
 >Registration レポートのダウンロード] を選択します。